laptoprob
back to basics
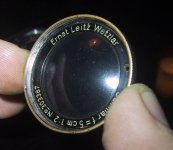
So I have an almost wrecked Summar. Front lens is very uneven, focus mount is iffy, mount threads are crossthreaded. Total Loss, in other words.
Partly because I really enjoy getting into great old lenses (also literally), I decided to try to find out what is the problem with the lens group just in front of the aperture blades. This group looks like cracked. Being a cemented group, this probably means decementing.
How do I get this group out?
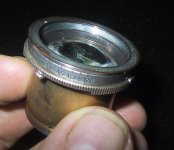
It looks like being retained from the front by a narrow black ring without any grips, holes or such.
Could this be wrongly assembled? If so, some drilling to get a grip and unscrew I guess?
Partly because I really enjoy getting into great old lenses (also literally), I decided to try to find out what is the problem with the lens group just in front of the aperture blades. This group looks like cracked. Being a cemented group, this probably means decementing.
How do I get this group out?
It looks like being retained from the front by a narrow black ring without any grips, holes or such.
Could this be wrongly assembled? If so, some drilling to get a grip and unscrew I guess?
Attachments
Last edited:
Kim Coxon
Moderator
Hi Rob,
The nameplate ring should unscrew. It hd the same thread as the filter. You need to use a bung to grip it. Ideally, you can get sepecial bungs for this but you can make do with a soft rubber bung. You made need to cut the middle out to clear the front element. The ones I use came in a slightly different kit from this but the same seller.
http://cgi.ebay.co.uk/Film-Camera-M...hZ017QQcategoryZ30038QQtcZphotoQQcmdZViewItem
Behind it should be a paperlike washer. This is just a push fit but can be a PITA to remove.
Kim
Last edited:
laptoprob
back to basics
well Kim, yes. The front nameplate ring is off. The 2nd pic shows the scratched black ring I think retains the decementing element. This should unscrew too I think?
laptoprob
back to basics
Anyone else knows about the interior of a Summar?
Kim Coxon
Moderator
If it is the same as the collapsible Cron, it is a push fit. On a cron, I managed to remove it by very gently inserting the tip of a scapel under it and "flicking" it out.
Kim
Kim
laptoprob said:well Kim, yes. The front nameplate ring is off. The 2nd pic shows the scratched black ring I think retains the decementing element. This should unscrew too I think?
laptoprob
back to basics
Couldn't push it out, Kim. I can reach the rear through the opened aperture. but the front is retained by the black ring, about 3mm 'high'. After that there is the last bit of the stainless steel (?) screw ring. This last bit is the same thread the front ring fits into.
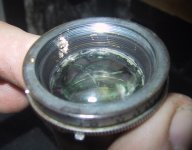
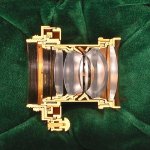
That aperture is a very special one though! Curved to fit between the various glass surfaces. Must be a nightmare to assemble.
That aperture is a very special one though! Curved to fit between the various glass surfaces. Must be a nightmare to assemble.
laptoprob
back to basics
one step further, no real luck yet...
one step further, no real luck yet...
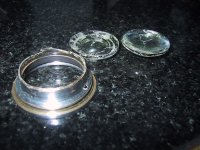
So I drilled two holes in the ring I thought would screw out. The white metal ring and the black one are now loose from the aperture housing, but still together holding the decementing glass.
Now what?
one step further, no real luck yet...
So I drilled two holes in the ring I thought would screw out. The white metal ring and the black one are now loose from the aperture housing, but still together holding the decementing glass.
Now what?
Attachments
laptoprob
back to basics
breakthrough
breakthrough
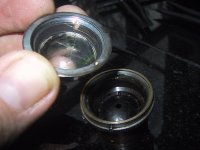
I made a back door. I filed off the thin ring of clamped brass holding the two decemented lenses together. Once that was done, the two just came out easily. 100% decemented. The crack like structure visible from the outside are remains of the canada balsam.
What is an easy diy glue for this, Kim?
breakthrough
I made a back door. I filed off the thin ring of clamped brass holding the two decemented lenses together. Once that was done, the two just came out easily. 100% decemented. The crack like structure visible from the outside are remains of the canada balsam.
What is an easy diy glue for this, Kim?
Attachments
Kim Coxon
Moderator
Kim Coxon
Moderator
It isn't glue but Canada Balsam. It needs to be because of the optical properties. I haven't any links to hand but try the Camera repair forum and search the threads here. I am sure I have seen it discussed somewhere.
Kim
Kim
laptoprob said:I made a back door. I filed off the thin ring of clamped brass holding the two decemented lenses together. Once that was done, the two just came out easily. 100% decemented. The crack like structure visible from the outside are remains of the canada balsam.
What is an easy diy glue for this, Kim?
cpborello
Established
laptoprob said:What is an easy diy glue for this, Kim?
No personal experience, but I have heard people use this glue.
http://www.norlandproducts.com/adhesives/NOA%2061.html
laptoprob
back to basics
Hi Kim, it does help, but it is beyond my capabilities. I cleaned the front element with steel polish, the finest stuff I know of. The surface remains 3D, but much cleaner now.
I will search in my Quinon thread about gluing lenses. The two bits are really clean now, so I gotta get some glue.
After all that I still have to file into the 39mm screwmount to make it fit again.
I will search in my Quinon thread about gluing lenses. The two bits are really clean now, so I gotta get some glue.
After all that I still have to file into the 39mm screwmount to make it fit again.
cpborello
Established
laptoprob
back to basics
Thanks Chris, I will try to get it done with UV curing glue.
Stu W
Well-known
Rob, the UV glue works great and is easy to use. I recemented a f1.2 pentax lens that I bought for a song. Perfect repair. I bought the glue from microtools. Unlike the balsam, a few second in the sun and it's a done deal. Stu
By the way-do you think they didn't intend on having Summar's serviced when they designed them?
By the way-do you think they didn't intend on having Summar's serviced when they designed them?
laptoprob
back to basics
Thanks Stu. All other Leica lenses I have gone into were really easy to dismount. Only this glued part is difficult to get into, but now I know it is easier. Hindsight.
The black ring I tried to unscrew simply doesn't. It's stuck/clamped to the correct position. The mount of the glued pair is not meant to take apart. Then again, it was never necessary. The glued pair wasn't supposed to come apart.
All other parts are relatively easy. Especially if you know how to.
The black ring I tried to unscrew simply doesn't. It's stuck/clamped to the correct position. The mount of the glued pair is not meant to take apart. Then again, it was never necessary. The glued pair wasn't supposed to come apart.
All other parts are relatively easy. Especially if you know how to.
laptoprob
back to basics
section!
section!
Finally, when I'm done taking the Summar apart I come across an old RFF thread with literally a section, or rather a dummy Summar from a Westlicht auction.
Now I see the drilling I've done is useless. It's one single part.
The reason for the curved aperture remains a mystery to me though.
section!
Finally, when I'm done taking the Summar apart I come across an old RFF thread with literally a section, or rather a dummy Summar from a Westlicht auction.
Now I see the drilling I've done is useless. It's one single part.
The reason for the curved aperture remains a mystery to me though.
Attachments
ozarque
Member
Summar Iris Diaphragm reassembly (the nightmare)
Summar Iris Diaphragm reassembly (the nightmare)
I need to know how to keep all the 12 iris blades on my 1937 Summar aligned so I can reassemble the darn thing. I can get close, but in the last steps I cannot get all the inner blade knobs into their holes while keeping all the outer blade knobs in their slots.
If I had not tried to disassemble it to re-align the aperture ring, things would have been ok. As it turns out, it cannot be made to align with the index mark because the front and rear element groups must be from more than one lens. Some previous owner took two bad lenses and made one good one, it appears, by simply unscrewing the front group and putting it into the body of a different Summar. It works ok other than not lining up with the aperture index mark.:bang:
Eastwestphoto
Member
Leitz leica 1938 Summar 5cm/2 Bokeh Coated lens
Leitz leica 1938 Summar 5cm/2 Bokeh Coated lens
https://www.flickr.com/photos/59361781@N03/41479610292/in/dateposted-public/
Shot at F:2, this coated Summar 5cm from 1938 lens is about 95% clear, very slight haze. Its a test shot for a BOKEH study. Great results are possible with a good Summar 5cm lens!
Share:
-
This site uses cookies to help personalise content, tailor your experience and to keep you logged in if you register.
By continuing to use this site, you are consenting to our use of cookies.