GTN stuck ASA ring

alinCiortea

Member
Local time
9:02 PM
Joined
Oct 22, 2008
Messages
36
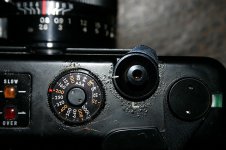
Just got a GTN from Ebay and it seems the ASA ring is stuck. I've managed to turn it from 800 to 200 for the price of some scratches around the ring :bang:
My question is> could I fix it myself (and what could the problem be)? I have no experience whatsoever, aside replacing the ground glass and foam in my S2a Bronica

Thank you! :angel:

LE> there's also smth like overheated paint around the dial and some near the rewind knob, but the rest of the camera looks pretty good.
 

Attachments

  • GTN.jpg
    GTN.jpg
    151.8 KB · Views: 1
Last edited:
Uh, and I thought mine was a beater. The surface bubbling looks like corrosion - could be the cause of the problem. If the camera is in a worse shape inside, it may be in paperweight condition. It positively needs to be opened for assessment of the damage, and a CLA, if possible and worthwhile.
 
Definitely corrosion damage. It's possible this camera has been immersed in water at some point in it's long life. Do the electronics work?

Russ
 
As far as it seems, all electronics work but I still have to run a film through it. Being a rather localized issue, I'd be tempted to think the camera perhaps has had come in contact with a corroding agent rather than a possible immersion or keeping in a highly humid air. I guess I'll just try my skills on it, as Mark Hama has charged 105$ + 25$ for parts... :(
 
Would recommend taking the top off - easy job - lubricate around the ASA switch area and depending on the colour of the corrosion -if white use vinegar to clean it away - then ronsonol then light oil, a couple of drops, say WD 40. Check the battery compartment too. Been there done this sort of thing..
 
The battery compartment is very clean. I've tried to take the top off but the ASA ring screw seems to be stuck as well and I don't have an appropriate pliers. Is it ok to heat it with a soldering gun in order to loosen it up?
 
Tinkerers first tools is lighter fluid. Put a drop on center screw of ASA dial and let it soak in for 10-30mins. You could avoid scratching dial.
 
Normally, it does not. I have cleaned black painted body. In places where corrosion(?) has impacted paint, it sure will come off, but you anyway don't want to keep that mess on camera.
Moisten ear cleaning bud and apply fluid directly to place you want. It's easy to spill fluid directly from can more than you'd need.

It's a pity lighter fluid is poisonous (work in vented room, watch eyes) because otherwise it's so good that drinking it would be top act of repair :)
 
The lighter fluid did a great job for softening the screws. I also had to do some pretty medieval improvising to unscrew the ASA ring and film advance lever (see img 1). The ASA selector was pretty corroded (img 2) but I've managed to loosen it up with plenty of circuitry spray and all in all the camera seems fully operational now, not in its best shape and a bit scratched but working.

Thank you all for your pieces of advice!
 

Attachments

  • IMG_1573_res.jpg
    IMG_1573_res.jpg
    105.6 KB · Views: 0
also an image from a test roll shot earlier today (agfacolor 100 - straight out of the scanner)
 

Attachments

  • GTN_agfacolor-test_06_res.jpg
    GTN_agfacolor-test_06_res.jpg
    154.9 KB · Views: 0
Yeah, that GTN seems got some bad corrosion. Have fun with it! btw my beater GSN also works and I like it, despite non-display look.

P.S. instead of medieval tool I used eraser (rubber piece) - makes good grip and helps to unscrew without damaging parts. Sure, in your case only after loosening it with naphtha.
 
I had initially tried with all sorts of sharp things but couldn't get enough leverage. More than that, they slipped a couple of times and scratched the paint around the dial. My biggest problem was not knowing how that special pliers is called, nor the the screw, so I didn't know what to look for at hardware shops. The first idea was a bit more elaborate and a lot more good looking but I went to smth as simple as possible. It worked like a charm with no damages at all to the camera :)
 
I have a small set of engineering dividers for removing these screws. Support the tips of the dividers with fingers pliers etc. to keep the tips in the one plane.
These screws are known as pin head screws.
 
Back
Top Bottom