Black borders around prints and sprocket holes

wontonny

Well-known
Local time
1:58 AM
Joined
Nov 9, 2006
Messages
278
How do people achieve the very thin black border around their prints? Most notably like HCB, since he made it a point to show that he didnt crop his images. I read somewhere that people simply make cardboard cutouts and use that as their neg carrier in the enlarger. Are there neg carriers that you can buy that leave room around the frame to be able to print a black border? While on the same subject how do you print the sprocket holes?
 
There are several ways. But the negative carrier has to be abit bigger then the image. i have two negative carriers and one I have filed out. This makes a black border.
If i want sprocket holes i put the 35mm negative in a MF enlarger between glass.

Cheers,

Michiel Fokkema
 
The thing I find annoying is finding a sensible sized paper for non-cropped images. What do you guys use?
 
i dont know how HCB did it, but when i use the pro lab services [as i would for paying clients] we mount everything in separate cardboard mounts [ourselves, they wont do it-to time consuming to cut each neg frame], all sorts of varying sizes are available. if you walk in off the street as a regular photographer wanting prints you get what you are given
 
Look for a 'full frame' carrier. I've got one for my Beseler. Or you could file out your carrier as suggested. Or you could mask a 6x6 carrier down to 35mm full frame.

Or possibly easier, just make a mask for 8x10 -- slightly smaller, and after you've projected your negative, remove negative and put the mask in the upper right corner of the paper, expose white light (no neg), then move the mask diagonally to the bottom left corner of the paper and expose again. That is a lot easier than trying to put the mask dead center with the same border all the way around.

For printing the sprocket holes, mount negative in 6x6 carrier or similar. If you don't have, just mount the negative between two sheets of glass. If you wish, you can get fancy and mask or paint one of the sheets of glass, but not necessary.
 
Last edited:
Yeah, 3 options: medium format glass carrier, full frame carrier, or filed out carrier. For example, for a Beseler 23C, look for the 8072 (glass), 8055 (full frame), or 8053's and file them out. The 8055 is 25x37 mm, the 8053 is smaller. The 8055 will give you black borders and a little bit of sprocket hole and a smoother edge. You can mask it down further with your easel if you want just an even black line around your print.

If you want the ragged edge sloppy look, get a second normal carrier and file it down. Paint the filed edges black (or use a sharpie) unless you want that black-white-black border effect (like the first link in this thread. That comes from reflections off the silvered edge.

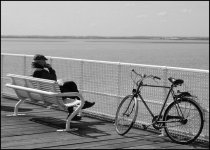
If you want the whole negative, or two, you need a medium format sized carrier. I did this print with the glass carrier mentioned above:

If you do buy a glass carrier, you can go with the cheaper non-anti-newton glass one, and purchase new anti-newton glass from a place like Focal Point for about $20. It might save you money.

You could also make one out of matt board or foam core like you said, but it won't necessarily have all of the properties of the above options. It will be cheaper though. Actually, Beseler carriers can be had for $5 now if you look, so not all that much cheaper.

As to the non-cropped images on paper, I just leave white boarders around the edges. Makes it easier to mount and easier to handle too.
 
Last edited:
wouldn't this put the negative at risk for scratching? did you smooth over the jagged edges?

Yes. You can use the same file to smooth out the edges. You'll want to do this anyway to get the burrs off. This way you can slightly taper those inside edges so that they don't come anywhere near the negative. Then paint the edges black to eliminate any possible reflections off the new silver edges.
 
Yes. You can use the same file to smooth out the edges. You'll want to do this anyway to get the burrs off. This way you can slightly taper those inside edges so that they don't come anywhere near the negative. Then paint the edges black to eliminate any possible reflections off the new silver edges.

that's how i do it, works great. no scratched negatives so far.

anyone know how to do this digitally?

you could do the same as above, except scan the negative while it's in the neg carrier as opposed to printing. your borders would look more "authentic" if you mounted them in the negative carrier each time you scanned a new frame. i'm of the mindset that adding a border in post is easy to spot and tacky because it's not inherent to the image itself, but don't let that stop you.
 
black borders

black borders

anyone know how to do this digitally?

It's even easier to do it digitally. In Photoshop, choose "Select all." Then go to Edit, and select "Stroke". Adjust your border size (I like to use 20 - 25 pixels), and click Apply. Go back and click on "Deselect." You're done.
 
It's even easier to do it digitally. In Photoshop, choose "Select all." Then go to Edit, and select "Stroke". Adjust your border size (I like to use 20 - 25 pixels), and click Apply. Go back and click on "Deselect." You're done.
It's even easier in 'Paintshop Pro' - with an add borders option!...thickness, colour, etc.
Dave.
 

Attachments

  • daw11.jpg
    daw11.jpg
    46.1 KB · Views: 0
  • daw22.jpg
    daw22.jpg
    39.1 KB · Views: 0
I wonder if HCB would print that way today, given that PS and other programs make his main idea - printing so that it was obvious he wasn't cropping - a moot point.
 
I made custom cardboard carriers for my flatbed scanner, when I had one, and got what I thought were really cool-looking edges. I've since upgraded to a Nikon, and getting to do that is the one thing I miss.
 
Back
Top Bottom