Issy
Well-known
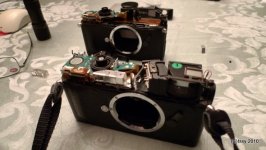
I have one Hexar RF that chronically will not stay in horizontal alignment, so as I stated in an early post, I have waited patiently to get my hands on a parts Hexar RF that I could disassemble and try to understand. The opportunity presented itself, and I found one that had a blown shutter (error 10 or 11).
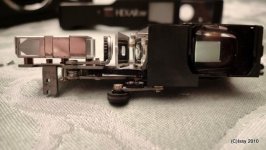
With some careful planning and a little bit of luck, I was able to transplant the range finder mechanism from the broken Hexar to the working but mis-aligned Hexar. Not for the faint of heart, it requires the top removal, the unwrapping of the flex circuits, the dis-attachment of the display from the body, the same for the shutter speed display, and while depressing the focus lever wheel in, coaxing the entire RF platform out in one piece. I am still tweaking the vertical and horizontal alignment, but all seems to be working.
Items gleaned:
1) I'll say it again, "not for the faint of heart". It would have been very easy to tear one of the flex circuits, especially the one that runs to the self timer LED, or the display. I figured a 50/50 chance I would be able to do this... I started by removing the mechanism on the broken one first, of course.
2) As I knew going in, and thanks to some earlier discussions with JC Masset in France who had been speaking to Greg Weber, there are actually two versions of the RF mechanism... they are interchangeable with respect to the body (same mounting holes are available), but use very different hard ware to mount them.
My original camera was the new version, the donor version is the older. However, the newer uses a brass eccentric screw to change the alignment, the older version looks steel or nickel.
3) The RF mechanism itself cannot really be disassembled…most of the pivot point ends are stamped (like a rivet), so once removed cannot be replaced. (at least, by a mere mortal like myself). The glass can be removed for cleaning, but the swing mechanisms are pretty much in place.
Have fun...
Bill
With some careful planning and a little bit of luck, I was able to transplant the range finder mechanism from the broken Hexar to the working but mis-aligned Hexar. Not for the faint of heart, it requires the top removal, the unwrapping of the flex circuits, the dis-attachment of the display from the body, the same for the shutter speed display, and while depressing the focus lever wheel in, coaxing the entire RF platform out in one piece. I am still tweaking the vertical and horizontal alignment, but all seems to be working.
Items gleaned:
1) I'll say it again, "not for the faint of heart". It would have been very easy to tear one of the flex circuits, especially the one that runs to the self timer LED, or the display. I figured a 50/50 chance I would be able to do this... I started by removing the mechanism on the broken one first, of course.
2) As I knew going in, and thanks to some earlier discussions with JC Masset in France who had been speaking to Greg Weber, there are actually two versions of the RF mechanism... they are interchangeable with respect to the body (same mounting holes are available), but use very different hard ware to mount them.
My original camera was the new version, the donor version is the older. However, the newer uses a brass eccentric screw to change the alignment, the older version looks steel or nickel.
3) The RF mechanism itself cannot really be disassembled…most of the pivot point ends are stamped (like a rivet), so once removed cannot be replaced. (at least, by a mere mortal like myself). The glass can be removed for cleaning, but the swing mechanisms are pretty much in place.
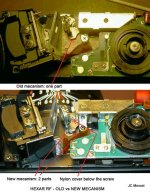
From JC (and the old/new picture is from him, the rest are mine):
"The range finder frame and bracket are the parts that needs to be replaced to hold the
alignment, the replacement is now 2 parts unlike the one piece in the original.
To describe the new part compared to the old one would be the new one has
a two part arm ( this holds the small range finder lens) and a new
plate to rest on where the old just had the arm off the cam from the
lens opening with no lower plate on the body it only rested on the body
casting and on both plates new and old there was a eccentric screw
which set the alignment along with the lens adjustment but on the new
model it had more adjustment and would hold the adjustment as where the
old one would not. There is a small Nylon cover on the new one to
prevent wear on the plate and maintain vertical and horizontal
alignment . "
" The new mecanism provide a better range of RF adjustment so the Leica Lens would work
without having to re-align the rangefinder. The new part hold the alignment, but is usefull also
for the wear since the bracket will move every time the camera is focused and the lens
installed. Also the Nylon wear plate would move smoothly"
"A funny thing about Konica and the Hexar RF's the serial numbers means
absolutely nothing. When Konica produced the cameras they made all the
serial numbers at once and when they assembled the units they followed
no chronological order. (this was the same on the other Konica film
camera models) So you could have one of the first units having a larger
number than one made a year later. The only way to tell is to inspect
the insides to see if the unit was a later built having the updates and
improved range finder system."
"A person which has some good range finder repair experience should be able to
get it close or right on when it come to focus & alignment. The system if a fairly
simple one"
Have fun...
Bill