Nikon 8000ed secrets?

Local time
1:33 PM
Joined
Mar 31, 2012
Messages
5
Folks have reported similar problems previously, but I've never seen any real solutions.:bang:

I recently suppressed my earlier memories of frustration with my ancient Nikon 8000ed film scanner, and dragged it out of retirement. Initially I was quite delighted; the Hamrick software for this sad orphaned scanner operated flawlessly, accomplishing about 500 scans. Mixed formats:35mm color/B&W negatives/slides; 120.

Several weeks ago, with no apparent provocation, it reverted to its old bad habits; sometimes not recognizing the carrier, or guessing the wrong one; sometimes scanning with loud clunking noises accompanied by skips in the image.

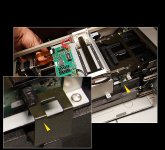
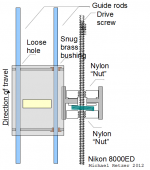
The guide rods, carriage screw, and plastic gears appear fairly clean and intact. I suspect the initialization of the starting carriage position is the problem, but simple experiments have not pointed towards any solution.

Any ideas? I've not been able to find a service manual on line. Although this scanner was quite expensive when new, I do not really want to throw more money at it, but if there is something simple I'll try it.

When it works, it has always worked great.

___
Update: Using the information here http://www.colorneg.com/nikonscan64.html?lang=en
I was able to get Nikon Scan 4.3.0.3 working on Windows 7. Made several scans, and everything seemed to work fine.

Next time I turned it on it could not recognize the film carrier. Has not worked on subsequent attempts. Green light blinks slowly, then stays solid, as it should. Windows device manager sees the scanner.

Any ideas?
 
Several weeks ago, with no apparent provocation, it reverted to its old bad habits; sometimes not recognizing the carrier, or guessing the wrong one; sometimes scanning with loud clunking noises accompanied by skips in the image.
If this weren't a FireWire scanner I'd say that you're experiencing a USB low voltage situation. Without going into non-related details about USB, see if your FW card/ports have an updated driver available. Make sure the cord is secure. Change out cords if you have one available. Go into Device Manager and check all settings for the FW card.

Something sounding similar happened to me with a USB flatbed. Turned out my keyboard was rated as self powered when in reality it was sucking voltage, voltage that the scanner was providing. It was intermittent with no apparent reason for anything to be awry or work properly. One minute it worked, the next minute it was dead and wouldn't even complete a preview scan.
 
Make sure you let it go through its lengthy initialization procedure after you turn it on BEFORE you open the sliding door that covers the opening where you put in the holder. Wait till the LED on the front stops flashing and all the mechanical sounds stop.
 
The 1394 bus driver that is included with Windows 7 replaces the 1394 bus drivers that were included with earlier versions of Windows. See this site for details


http://www.microsoft.com/whdc/connect/1394_Windows7.mspx


You can try the following steps to fix the issue. Im not a Windows guy but I know of others who have fixed Firewire drive issues with this

1- Click the Start Button, type devmgmt.msc in the “Start Search” box and press Enter.
2- Expand the "IEEE 1394 Bus Host Controllers" node in the device tree on the right hand pane
3- Right click the host controller node select "Update driver software ..."
4- Select "Browse my computer for driver software"
5- Select "let me pick from a list of device driver on my computer ..." and Check the box before “Show compatible hardware”.
6. Choose the second option---1394 OHCI Compliant Host Controller (Legacy), and click next to update the driver.
 
I do not have a Nikon scanner, but don't I remember from another discussion that some of them over time build up a bad preferences file on the computer, and finding and deleting that can cure a lot of problems?

Doing a search, I see that's about cumulatively-deteriorating color, but what-the-heck, maybe you should give it a try, anyway...
 
The scanner apparently fails POST. Bad news, it's usually a hardware problem.
Mine started doing that, I had to carry it to the repair center.
You may be able to investigate: open it, switch it on and look at which step it fails (during POST it should check motors, carriage sensor, LED module).
With some luck it's just a carriage sensor (some kind of end-of-travel switch for example).

Best of luck.
 
some progress

some progress

I made some progress this weekend.

I reverted to legacy drivers as craygc suggested. [Actually, installed old firewire card that came with scanner, and then followed craygc's process to use legacy drivers.] This seemed to make operation more repeatable.

Still was not recognizing film carrier.

There is an optical position sensor on the left side. [I'll try posting a picture.] If I eject the carrier, I can then turn the motor shaft by hand to line the sensor up so it is just covered by a metal index plate. Subsequent insertions of the film carrier are correctly identified.

Tolerance seems to be about +/-3mm.

____
Scans now mostly work. Occasional "Clunk" accompanied by a skip in the image. I seems that once the gears position the carrier to the start of frame, the actual scan is done by the motor turning the worm screw, which moves the light source slowly towards the back of the machine.

The light source platform seems to be getting hung up. The "Clunk" is when it snaps to catch up.

Others have reported that cleaning the two slide rods helps. I'll give this a try next. [Fairly major dis-assembly.]

If Nikon stops supporting their equipment, which I understand, they should at least release the service manual (and source code).
 

Attachments

  • nikon-003s.jpg
    nikon-003s.jpg
    88.9 KB · Views: 0
My kitchen is now scattered with 8000ED parts.

I followed the dis assembly instructions found here:

http://www.marginalsoftware.com/LS8000Notes/cleaning_the_optics_of_the_ls.htm

Only real problem was the power switch extension rod; switch now has a broken plunger. Glue should fix.

Mirror and lens looked clean, so did not risk scratches.

The scanning mechanism is a fairly simple screw drive. The movable platform is guided by the two polished rods. [Actually only one of the rods has a tight fitting bushing.] The rods and drive screw are held parallel by the cast chassis. I cleaned the rods, bushings, and screw with WD-40. [They did not seem too bad.]

Everything is not put back together again, but moving the mechanism by hand so far does not give me a lot of confidence. When scanning, the screw turns so as to move the platform slowly towards the back of the box. The threaded nylon "nuts" are free to slide, but as they are threaded they cannot slide relative to each other. As the screw turns, it is actually a compression spring that pushes the platform.

The "Clunk" happens when the platform hangs up. The screw drives the two nylon nuts towards the rear. Once the spring is compressed enough, (or actually bottoms out), the platform clunks backwards.

Cleaning the guide rods *should* help. It seems like the real problem may be not enough compression force in the spring.
 

Attachments

  • mechanical.png
    mechanical.png
    50.1 KB · Views: 0
So far, so good.

So far, so good.

[At least for now, working great.] Cleaned the rods and screw, and wiped with WD40.

Getting the nut assembly back together was somewhat tricky. The spring loaded nuts can slide backward or forward, but are prevented from turning by a stop extending through a radial slot. So, the nuts must be compressed against the spring, and the screw turned exactly to hit both sets of threads.

Because of the screw pitch there are several distances between the nuts that work, but any particular distance must align perfectly. Easier to do than describe, but some sort of fixture to hold everything in alignment would help.

I compressed the spring somewhat tighter than originally.

Bottom line, at least for now, running smooth and quiet. No clunks or significant skips on the scans.

The increased compression seems to help a lot. Not entirely sure that the motor is happy with the increased load, or that a thin film of WD40 is the best lubricant, but so far working.
 
By the way: if you ever experienced some slight banding in the shadows, that's caused by the triple-line CCD.
You can force the scanner to operate in single-line mode by selecting "SuperFine" in Nikon Scan or "Fine Mode" in Vuescan.
This way scanning will be slower, but without any banding. You may also get slightly better actual resolution.
 
Back
Top Bottom