RD-1 and 50 Summilux

Benjamin Marks

Veteran
Local time
10:58 PM
Joined
Mar 27, 2005
Messages
3,340
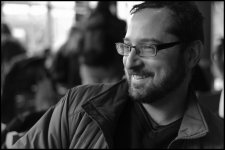
Here is an available-light portrait from this weekend with the RD-1 set at 400 and the 50 Summilux at f2 or so. Shot in Epson's B&W mode and converted from RAW with Epson's RAW converter and then Photoshopped from a 16-bit RGB TIFF to 8-bit grayscale jpg for sending and posting. I print from the 16-bit image and the 6x9 inch print looks very nice indeed. I may try to go larger with this image (9x12) as a gift.

Comments welcome, of course.

Ben Marks
 

Attachments

  • Sam 02-17-07.jpg
    Sam 02-17-07.jpg
    173 KB · Views: 0
shot in B&W mode

shot in B&W mode

Benjamin Marks said:
Here is an available-light portrait from this weekend with the RD-1 set at 400 and the 50 Summilux at f2 or so. Shot in Epson's B&W mode and converted from RAW with Epson's RAW converter and then Photoshopped from a 16-bit RGB TIFF to 8-bit grayscale jpg for sending and posting. I print from the 16-bit image and the 6x9 inch print looks very nice indeed. I may try to go larger with this image (9x12) as a gift.

Comments welcome, of course.

Ben Marks
Very nice shot Ben. We know that lens is good :) but I am impressed that you got that result shooting n B&W mode. I guess the difference is that you shot it in B&W mode but RAW rather than jpeg. I usually shoot color mode and convert in PS. I will try doing this too. It really looks good!
 
Thanks for the comments, folks. When I use the RD-1 it is almost always in RAW B&W mode. Adobe Bridge tends to ignore this, and display the image in color (which I guess makes sense as it is a data dump from the sensor). I have had the best conversion experience with Epson's own RAW converter, which produces a 16-bit RGB TIFF in B&W. After any sharpening/contrast adjustment, I then strip out the color info (doesn't appear to change the appearance of the image).
 
Benjamin Marks said:
Thanks for the comments, folks. When I use the RD-1 it is almost always in RAW B&W mode. Adobe Bridge tends to ignore this, and display the image in color (which I guess makes sense as it is a data dump from the sensor). I have had the best conversion experience with Epson's own RAW converter, which produces a 16-bit RGB TIFF in B&W. After any sharpening/contrast adjustment, I then strip out the color info (doesn't appear to change the appearance of the image).
Epson's RAW converter will produce b/w if you have the settings as 'as shot' rather than 'color' - and the camera's set up for b/w of course (just re-read the post quoted above - I thought you were converting to b/w rather than removing the color info - sorry - I guess you're stripping out the color info to reduce file size?).

The nice thing is that you get the pre-set filters, which is nicer than using channel mixer in PS. For example, for IR I tend to use the green filter, which cuts out all the clipping you get in the red channel.

I do find you get smoother files with capture one, but more 'film-like' (ie, for me, tri-x like) grain from the Epson converter. So I'd use capture one for max detail, and EPR for mood. Sort of... :)
 
Last edited:
pfogle said:
I do find you get smoother files with capture one, but more 'film-like' (ie, for me, tri-x like) grain from the Epson converter. So I'd use capture one for max detail, and EPR for mood. Sort of... :)

Interesting. I have the LE version of C1, but have not been able to make it do all of the things I want yet. (so many programs, so little time). I should give this a try. Oh, yes, in answer to your comment, I convert to greyscale just to control the file size. Not really sure what the RGB data is doing there for a B&W image, just before printing. Now if you are using layers/channels to do your conversion, I could see where you'd want to maintain that data, at least in your "master" file.
 
Here are two shots taken this afternoon. I opened them using the Epson RAW Converter where I took them back to B&W and did most of the manipulation there in terms of filtration. I removed some of the sharpening which was at "25". Then, in PS I used unsharp mask, and I sized the image, saving as a tif in 16 bit for print and then here as a jpeg.

This is new territory for me so suggestions are certainly welcome.

http://www.pbase.com/bitonal/image/74693328
http://www.pbase.com/bitonal/image/74692921

David
 
DwF said:
Here are two shots taken this afternoon. I opened them using the Epson RAW Converter where I took them back to B&W and did most of the manipulation there in terms of filtration. I removed some of the sharpening which was at "25". Then, in PS I used unsharp mask, and I sized the image, saving as a tif in 16 bit for print and then here as a jpeg.

This is new territory for me so suggestions are certainly welcome.

http://www.pbase.com/bitonal/image/74693328
http://www.pbase.com/bitonal/image/74692921

David
That's more or less what I do - often convert in C1-LE, or in EPR. I've lost interest in Raw Shooter and Lightroom, which I didn't really get to grips with.

I usually have to change the gamma, to get more depth to the midtones. I either use curves or levels, depending on mood.

USM I do twice: 10-15% at about 25-50 pixels radius to boost the micro-contrast, then 0.4-0.6 pixels at 100% (in photoshop) to get the edges. I don't resize at all to print, just use the native Epson 1290 printer driver after scaling the print output in PS print preview. I print at about 11x16 inches on super A3 matt paper.

I'm sure there are many people out there who do better prints, but I find them fine, and have had no complaints using this method. It's very hard to tell the difference between the R-D1 files printed this way, and my scanned tri-x negatives (except the R-D1 files are usually better :D ).
 
Last edited:
Thanks for all that Phil. When you say you use USM twice, the second in PS, where do you do the first......in C1? And is that something that can easily be down-loaded? Incidentally I found a really good tutorial for sharpening an other stuff if anyone is interested. His detaileld explanations are very clear and useful. The link is here.
www.ronbigelow.com
David
 
DwF said:
Thanks for all that Phil. When you say you use USM twice, the second in PS, where do you do the first......in C1? And is that something that can easily be down-loaded? Incidentally I found a really good tutorial for sharpening an other stuff if anyone is interested. His detaileld explanations are very clear and useful. The link is here.
www.ronbigelow.com
David
no - but I usually keep the default sharpening in C1 - which is 35% soft-look. It seems to be OK and not put artifacts onto edges. Doesn't really matter, you could set it to default to zero in preferences. The key thing is use a small radius (that stops the 'halo' effect on high contrast edges) and not to overdo it.

It's important to remember what you're doing this for - in my case, to make a nice print to stick on the wall. If it's for web, you can get away with a bit more, though I'd probably do it after downsizing. Other people probably know more about this side of things. The other thing is that every picture has different requirements, so not to get locked into a formula. I know there are customised products out there, scripts and whatever, for 'intelligent sharpening' or whatever the latest thing is, but really - USM and PS resizing (I use the bicubic method) seems to give good prints as far as I can see.

Bottom line - I once saw a Cartier-Bresson retrospective - awsome exhibition. There were about 100 prints from 50 years work. So if you get two stunning images a year, you're doing pretty good :D
 
I've spent enough time honing silver negs in a darkroom to appreciate the one or two that actually do look good after they dry out. So I agree with you there. Eventually I will print larger but I invoke Harry Callahan that small is okay in that it preserves the intimacy that one feels looking at pictures in a book, or up close. For my own images I have tended to keep prints to 11x14 or less and usually less.
 
DwF said:
I've spent enough time honing silver negs in a darkroom to appreciate the one or two that actually do look good after they dry out. So I agree with you there. Eventually I will print larger but I invoke Harry Callahan that small is okay in that it preserves the intimacy that one feels looking at pictures in a book, or up close. For my own images I have tended to keep prints to 11x14 or less and usually less.
we seem to have run a similar path. My biggest buzz in photography has definitely been getting out of the darkroom - even tho' I loved it for 30 years!

I've a very ordinary Epson 2450 scanner - about 5 years old, and only recently started scanning a few old negs. It's been a real revelation, as I thought I would never used analogue media again. I can do a lot of things almost as well as in the darkroom, including lith prints (there are some terrible articles on the web about simulating lith prints - I guess the people who wrote them never really mastered the chemical version. It took me a couple of hours to work out an method that works for me in PS).

All my portfolio prints these days are A4 - I tend to use a smaller book than I used to. However, I do still like printing for the wall.
 
Funny Phil. I have the 2450 as well. :) I have been less active shooting the past three years and just getting back to it. I miss the film but not the mess of darkroom.
And thanks TM for the lead on lonestardigital. I will check that out.
David
 
Back
Top Bottom