maigo
Well-known
Hi Folks,
I have a Canonet QL17GIII with a sticky slow shutter and a dial that won't reach 500.
My approach to repair is to remove the front lens element to access the shutter.
I have referred to the Rick Oleson's Tech Notes CD disassembly diagram (website doesn't have it), original Canonet service manual exploded view and Mike Eckman website.
On Eckman's website I am at Step 5 - removing the rear ring that retains the rear part of the front element.
Pics:
The ring is stuck on very tightly.
Turning counter-clockwise (and clockwise, just in case), I have tried tried:
(1) using a 7/8 inch crutch tip to remove the ring. No movement at all.
(2) rigging a fine tip pliers to fit into the narrow gap between the filter thread ring and lens ring to grip the approx 1mm notches at the rear of the stuck ring. The pliers are so fine tipped that I bend them.
(3) heating the ring with a soldering iron. I could get the ring surface temp only up to an uneven 40C so not much of a chance of this working.
I would rather not go to the step of drilling into the inner part of retaining ring to create bigger notches, like Eckman has done.
Here is an image from his site that illustrates the ring and his drilling solution.

Any suggestions or experiences appreciated.
Thanks.
Michael.
I have a Canonet QL17GIII with a sticky slow shutter and a dial that won't reach 500.
My approach to repair is to remove the front lens element to access the shutter.
I have referred to the Rick Oleson's Tech Notes CD disassembly diagram (website doesn't have it), original Canonet service manual exploded view and Mike Eckman website.
On Eckman's website I am at Step 5 - removing the rear ring that retains the rear part of the front element.
Pics:
The ring is stuck on very tightly.
Turning counter-clockwise (and clockwise, just in case), I have tried tried:
(1) using a 7/8 inch crutch tip to remove the ring. No movement at all.
(2) rigging a fine tip pliers to fit into the narrow gap between the filter thread ring and lens ring to grip the approx 1mm notches at the rear of the stuck ring. The pliers are so fine tipped that I bend them.
(3) heating the ring with a soldering iron. I could get the ring surface temp only up to an uneven 40C so not much of a chance of this working.
I would rather not go to the step of drilling into the inner part of retaining ring to create bigger notches, like Eckman has done.
Here is an image from his site that illustrates the ring and his drilling solution.
Any suggestions or experiences appreciated.
Thanks.
Michael.
Last edited:
MacReady
Member
Dan Daniel
Well-known
Not certain that you can get a typical spanner wrench into the space in this case. Between the main black lens body and the silver plate is a small gap. The notches are down inside this gap.I would invest in an adjustable spanner wrench for lenses, that combo of words should find what you need.
You'll be able to get enough torque from the right angle to shift it
There is a tool made for this. It is a thin-walled pipe, basically, with two small tabs to grab the notches. Rather rare item. Because it sits around the whole flange it is strong enough to work, not just bend like needle nosed pliers.
If you do get a spanner wrench, be prepared to have to grind them down to fit.
dmr
Registered Abuser
I got it out by drilling, but did a much neater job than in the photo above.
I took the dremel with a very small bit, not really sure what, as this was 13 years ago, but very small, and did more of a "dimple" than a hole. Then I used a lens spanner with pointy tip things to unscrew it.
I've heard of people taking a rubber stopper (large pharmacy or lab supply place) and getting enough traction to remove it, but if you've tried a crutch tip this may not work.
When reassembling, be sure to cover the drilling with dark NP or even a dark marker to get rid of any spurious reflections.
Good luck.")
I took the dremel with a very small bit, not really sure what, as this was 13 years ago, but very small, and did more of a "dimple" than a hole. Then I used a lens spanner with pointy tip things to unscrew it.
I've heard of people taking a rubber stopper (large pharmacy or lab supply place) and getting enough traction to remove it, but if you've tried a crutch tip this may not work.
When reassembling, be sure to cover the drilling with dark NP or even a dark marker to get rid of any spurious reflections.
Good luck.
maigo
Well-known
I would invest in an adjustable spanner wrench for lenses, that combo of words should find what you need.
You'll be able to get enough torque from the right angle to shift it
Thanks MacReady - I do have a spanner wrench but as Dan Daniel says, it's too large to fit into the space.
Not certain that you can get a typical spanner wrench into the space in this case. Between the main black lens body and the silver plate is a small gap. The notches are down inside this gap.
If you do get a spanner wrench, be prepared to have to grind them down to fit.
I only have one spanner and it was 26USD so I am still thinking of an alternative before I render it to a single purpose.
I got it out by drilling, but did a much neater job than in the photo above.
I took the dremel with a very small bit, not really sure what, as this was 13 years ago, but very small, and did more of a "dimple" than a hole. Then I used a lens spanner with pointy tip things to unscrew it.
dmr: Good to know the drilling works as a last resort.
maigo
Well-known
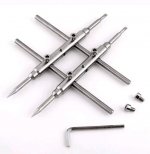
I got this idea in an email from ebay seller nobbysparrow for a DIY spanner.
This ground-down pliers won't work because of the angled approach to the innder notches.
So I'll try getting some disposable screwdrivers from the dollar store for filing down (I don't have a grinder) and the plates from Home Depot and let you know how it goes.

eBay seller NOBBYSPARROW lens removal spanner DIY.
This ground-down pliers won't work because of the angled approach to the innder notches.
So I'll try getting some disposable screwdrivers from the dollar store for filing down (I don't have a grinder) and the plates from Home Depot and let you know how it goes.
eBay seller NOBBYSPARROW lens removal spanner DIY.
MacReady
Member
Thanks MacReady - I do have a spanner wrench but as Dan Daniel says, it's too large to fit into the space.
Sorry, wasn't trying to teach you to suck eggs. Couldn't see the picture very well on my phone
dxq.canada
Well-known
You need one of these custom tools: https://oldcam.wordpress.com/2017/11/09/i-pity-the-tool/
Possibly build from copper pipe ?
Possibly build from copper pipe ?
maigo
Well-known
You need one of these custom tools: https://oldcam.wordpress.com/2017/11/09/i-pity-the-tool/
Possibly build from copper pipe ?
Thanks for the link. The tool image is from the original Canonet Service Manual.
I could see perhaps a 1 inch OD pipe with notches cut on the bottom and a pair of holes on top to run a rod or screwdriver through.
https://en.m.wikipedia.org/wiki/Copper_tubing
The challenge is that you are inserting the pipe over top of a retaining ring thread (holds the outside front element) to reach the notches. Those threads could be easily damaged.
Sent from my iPhone using Tapatalk
maigo
Well-known
I tried two more approaches tonight.
(1)
I filed down my ESD needle nose component pliers to remove the pliable tips and then used a heat gun to apply some serious heat.
Using my Costco surface temp IR thermometer I measured 90C which is as far as I can go without seriously burning my fingers on the metal or melting the plastic shutter ring.
Applying this high heat did not have any effect.
(2) After the body cooled down to room temp, I tried using a can of compressed air upside down to apply cold spray to the ring. Then used the files pliers to turn the ring.
No dice.
Next step:
Get the metal bars as pictured above to braced the filed pliers to gain more torque.
Sent from my iPhone using Tapatalk
blumoon
Well-known
Would a few drops of lighter fluid help?
dmr
Registered Abuser
Would a few drops of lighter fluid help?
It sure helped with the sticky shutter, but I don't see how it would help in getting the element to unscrew.
maigo
Well-known
Canon QL17GIII - Problem Removing Stuck Front Element Inner Retaining Ring
Well, I finally got it apart. I made the jig using files down screwdrivers as in the above photo but it did not work. The points would slip out before I could apply enough force to loosen the ring.
The solution was to drill new divots on the inner ring using a 7/64 drill bit and then use the spanner tool in the new divots.
Now the ring has two holes covered with gaffer tape.
Ugly but it worked. Safer than applying gasket sealant to cover the holes.
I straightened the bent shutter speed ring selector arm (see Eckman link above) and can turn the ring to 500.
The aperture ring was super stiff with ancient grease so I cleaned it up and applied a very thin layer of silicon grease. Very smooth now.
Those two tasks were my goal in disassembling the camera.
Next step is to replace the seals, clean the viewfinder and test it.
I bought the camera 6 years ago this month, put one roll through it and then put it in a box marked To Be Repaired.
I am happy that I have finally got the hard part done.
Michael.
Sent from my iPhone using Tapatalk
maigo
Well-known
Pictures of holes and bent shutter ring speed selector arm:
https://flickr.com/photos/66044583@N00/sets/72157706949075065
Sent from my iPhone using Tapatalk
https://flickr.com/photos/66044583@N00/sets/72157706949075065
Sent from my iPhone using Tapatalk
Share:
-
This site uses cookies to help personalise content, tailor your experience and to keep you logged in if you register.
By continuing to use this site, you are consenting to our use of cookies.