Moto-Uno
Moto-Uno
I have trays for 8 x 10 and 11 x 14 prints, however I'd like to print on some 16x20 paper I just got and am looking for a tested , cheap way to pass the paper through the chemistry ? Pictures or diagrams would be most welcome . Thanks in advance for any ideas . Peter
Graybeard
Longtime IIIf User
I have trays for 8 x 10 and 11 x 14 prints, however I'd like to print on some 16x20 paper I just got and am looking for a tested , cheap way to pass the paper through the chemistry ? Pictures or diagrams would be most welcome . Thanks in advance for any ideas . Peter
Take a look in discount stores for shallow plastic storage boxes. These are common in sizes approximating 16x20.
JoeV
Thin Air, Bright Sun
Wallpaper troughs.
https://www.walmart.com/ip/Leaktite...30463&wl11=online&wl12=38470563&wl13=&veh=sem
Use one for each chemical, plus a water rinse trough. Cut pieces of plastic PVC pipe to fit into each trough. Hold the paper by opposite ends and "see-saw" the paper in the liquid, with the PVC pipe weighing down the paper so as to stay submerged.
Moto-Uno
Moto-Uno
Thanks guys , I'm thinking more along the lines that "JoeV"suggests , as I believe it'll use less chemistry .(Cheap) Peter
ps: Joe , any further progress on your light pipe camera ? I'm a tinkerer too.
ps: Joe , any further progress on your light pipe camera ? I'm a tinkerer too.
Jake Mongey
Well-known
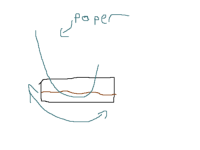
What I do is I basically take each end of the paper and run it through in a curve. Start by dipping one edge in and run the paper through until the other edge is about to come out and then reverse so its even.
Heres a diagram (as you can tell I am a graphic designer )
)

Heres a diagram (as you can tell I am a graphic designer
)Attachments
Moto-Uno
Moto-Uno
^Yeah that's pretty much how I envisioned it . Thanks , Peter
JoeV
Thin Air, Bright Sun
Thanks guys , I'm thinking more along the lines that "JoeV"suggests , as I believe it'll use less chemistry .(Cheap) Peter
ps: Joe , any further progress on your light pipe camera ? I'm a tinkerer too.
Alas, too many irons in the fire. Then just recently I read that a couple of artists have perfected their drinking straw Camera and are making large color portraits. Strike while the iron is hot, they say.
Moto-Uno
Moto-Uno
^Got any links to their work ? Peter
Graybeard
Longtime IIIf User
Thanks guys , I'm thinking more along the lines that "JoeV"suggests , as I believe it'll use less chemistry .(Cheap) Peter
ps: Joe , any further progress on your light pipe camera ? I'm a tinkerer too.
You may find that this becomes rather tedious by amount the third print.
How do you plan to wash the prints?
Moto-Uno
Moto-Uno
A large laundry room wash basin and a small fish tank pump to circulate the water , see I did say cheap ! And you know I won't be doing many of them at any one time , I'm painfully slow in the dark room ( not the best reader of negative exposure and hence more than a few test strips ) Peter
Bob Michaels
nobody special
No practical help but for inspiration read about the 107' x 31' negative developed using 600 gallons of developer and 1,200 gallons of fixer at http://www.legacyphotoproject.com
Moto-Uno
Moto-Uno
^ Insane almost when one thinks of a project of that magnitude and not $5.00 spent on the lens !!!!! Peter
esearing
Established
6 inch plastic tube/pipe at 20+ inches with open ends. Curl your paper inside the pipe, spin it in a wallpaper tray or planter box about 1/3rd filled. One tray for each chemical. You may have to hold the pipe under the fluid if buoyant. Filling the tube would require 2.5 gallons whereas the tray method will let you use only 1 gallon or less.
I have also seen a tray with a drain at one end tilted on a table (diagonally) and the developer poured over the image continuously. The drain has a hose to bucket/container that captures your developer, stop, fixer etc so you have to have containers ready to swap out. by adding a small shut off valve you could leave the fluid in the tray if you could raise and lower the angle of the tray when needed for emptying. timing would be the hard part and making sure the chemistry ends up in the right bucket.
I have also seen a tray with a drain at one end tilted on a table (diagonally) and the developer poured over the image continuously. The drain has a hose to bucket/container that captures your developer, stop, fixer etc so you have to have containers ready to swap out. by adding a small shut off valve you could leave the fluid in the tray if you could raise and lower the angle of the tray when needed for emptying. timing would be the hard part and making sure the chemistry ends up in the right bucket.
Share:
-
This site uses cookies to help personalise content, tailor your experience and to keep you logged in if you register.
By continuing to use this site, you are consenting to our use of cookies.