Mr_Flibble
In Tabulas Argenteas Refero
Bought a Welta Weltax a while ago, the shutter had ceased up when I got it. The cam on the shutter tensioning lever was jamming the self-timer.
After clearing that up the speeds seem to be okay.
But the Bulb and Time settings aren't working properly.
When set to these settings. When you start to press down the release lever the shutter blades start to open but about halfway through pressing the lever something slips and the blades close again.
I've had this camera open a few times, but I just can't seem to figure it out.
The Compur S is similar to this one

There is a little forked arm attached to underside of the release lever. (you can just see it in the 8 o'clock area of the shutter in the photo above).
The right side of the fork pushes against a catch that opens up the shutter blades.
The left prong of the fork catches another catch to the right of it. It forces the entire fork-shaped part to the left as the release lever is pushed down. This pulls the right prong of the fork away from the pin that pushes open the shutter blades and thus allows the shutter blades to close again.
Anyone got an idea of what might be wrong here? I'm hoping it's just a misplaced spring and not that somethings bent to badly out of shape.
Any ideas appreciated.
After clearing that up the speeds seem to be okay.
But the Bulb and Time settings aren't working properly.
When set to these settings. When you start to press down the release lever the shutter blades start to open but about halfway through pressing the lever something slips and the blades close again.
I've had this camera open a few times, but I just can't seem to figure it out.
The Compur S is similar to this one
There is a little forked arm attached to underside of the release lever. (you can just see it in the 8 o'clock area of the shutter in the photo above).
The right side of the fork pushes against a catch that opens up the shutter blades.
The left prong of the fork catches another catch to the right of it. It forces the entire fork-shaped part to the left as the release lever is pushed down. This pulls the right prong of the fork away from the pin that pushes open the shutter blades and thus allows the shutter blades to close again.
Anyone got an idea of what might be wrong here? I'm hoping it's just a misplaced spring and not that somethings bent to badly out of shape.
Any ideas appreciated.
Mr_Flibble
In Tabulas Argenteas Refero
The photo is just an example to give you an idea which Compur we're talking about.
I'll make a macro photo of mine today when I get the chance.
The shutter won't cock for B & T settings on Compurs. They just work by pressing the releases.
I've already done an extensive search on Compur repair, assembly/disassembly but most are not for the Compur-S and show very little of the mechanism.
That's why I came here to question the collective camera repair geniusses gathered here. *looks hopeful at Hans Kerensky*")
I'll make a macro photo of mine today when I get the chance.
The shutter won't cock for B & T settings on Compurs. They just work by pressing the releases.
I've already done an extensive search on Compur repair, assembly/disassembly but most are not for the Compur-S and show very little of the mechanism.
That's why I came here to question the collective camera repair geniusses gathered here. *looks hopeful at Hans Kerensky*
Gumby
Veteran
Compur shutters generally insist on being properly cleaned and lubricated. I'd bet yours is aking for such service.
02Pilot
Malcontent
I was just inside one of these shutters not long ago. If I have a chance I'll open it up again and see if I can figure out what might be causing your issue. If you can post a close-up shot of the lower left corner of the shutter (or better, a short video of it while you actuate the shutter) it would be useful for comparison.
Dan Daniel
Well-known
I don't know exactly where it is, but there is a lever that is moved into a different position by the shutter speed cam plate (the silver one behind the black name plate).
I think I see the lever. How to describe- the shutter release lever, at 8 o'clock. Has two levers connected to it- one at 4 O'clock, one at 12 O'clock. In your photo there appears to be a small hole in the cocking ring above the 12 o'clock position. And to the left of this is a small nub. See if this nub moves back, to the outside of the shutter. (the nub might also be slightly above this inner nub).
When you install the shutter speed plate, this nub needs to be pulled out so that it slides into the proper groove on the plate. It's been a while but I think that you can get things going with this nub underneath the plate, not in the groove.
Anyway, as you rotate the shutter speed plate, there will be a groove that appears to b=do nothing opposite the escapement area. It is actually the mechanism that activates the T and B settings- a small ridge will come into play when you set T/B and will push the nub away from the center. So try this- lay the shutter speed plate in place in a way that puts it set for T or B. Now look around the inner ring to find a slot with a ridge at one end. This is where the nub should be.
Well, I could be full of it. Just going on memory vapors...
And if the nub is in place, if what I am describing is real and what you have going on and T/B still doesn't work, well... no idea.
Mr_Flibble
In Tabulas Argenteas Refero
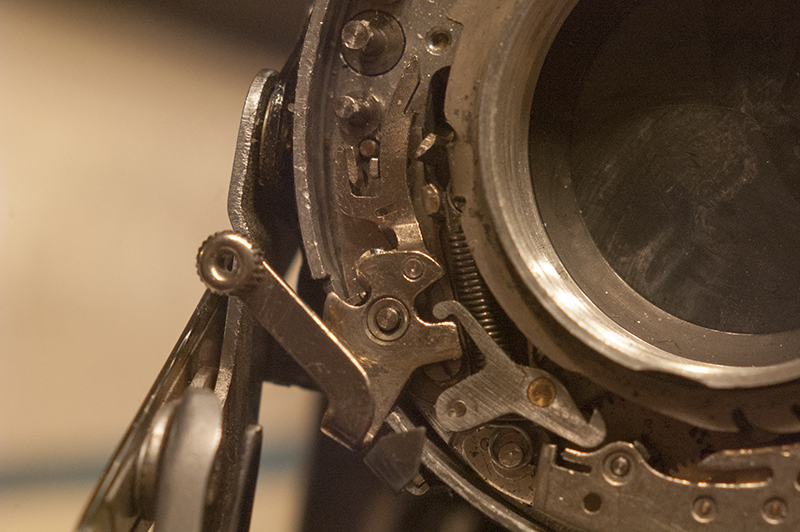
Here is the shutter (without the speed setting dial, so automatically at B or T and a few other things removed to show you the bit I was talking about) with the release pressed all the way down.
It shows the two-pronged fork part attached to the release lever. It has moved upward by the release action and is pulled to the left by the left part caught between the prongs.
The right prong of the fork with the shark-mouth shaped cut out starts out by catching the pin attached to the shutter blade ring (just to the lower right of the shark-mouth) and dragging it upward with it to open the shutter.
But as the fork is dragged to the left the pin slips out and the shutter closes prematurely.
My first guess is that the left prong of the fork should not be on the left side of that part for the B and T setting to hold the shutter open.
I'll see if I can do a little movie tomorrow. No time this evening I'm afraid.
Mr_Flibble
In Tabulas Argenteas Refero
Daniel, yes that's pretty much how the B/T setting work with this shutter. the nub is allowed to fall inward towards the lens, this allows the B/T linkage to engage with nub/pin that opens the shutter blades.
Otherwise it will use the regular speed escapement.
I've generally made sure the speed selection ring is installed correctly with no pins caught in the wrong groves. The ring should not seat properly otherwise.
Thanks for all the suggestions so far, everyone.
Otherwise it will use the regular speed escapement.
I've generally made sure the speed selection ring is installed correctly with no pins caught in the wrong groves. The ring should not seat properly otherwise.
Thanks for all the suggestions so far, everyone.
mikemc_photo
Established
My advice is put the speed cam ring on and turn it...watch what the cam tells you...B & T are the speeds you can see.Make sure your levers move between the two settings
Mr_Flibble
In Tabulas Argenteas Refero
Thanks Mike. I've had some time to think and Daniel may be on to something:
That nub might be bent out of position due to incorrect re-assembly at some point. That might prevent the parts of the b/t mechanism attached to the shutter release lever from moving far enough towards the lens, thus the left prong of the fork catches on the wrong side of that 'guide pin' first.
You can see the nub just above the spring in the photo. It would need to be bent outwards (away from the lens) only a fraction of a millimeter.
When you install the shutter speed plate, this nub needs to be pulled out so that it slides into the proper groove on the plate. It's been a while but I think that you can get things going with this nub underneath the plate, not in the groove.
That nub might be bent out of position due to incorrect re-assembly at some point. That might prevent the parts of the b/t mechanism attached to the shutter release lever from moving far enough towards the lens, thus the left prong of the fork catches on the wrong side of that 'guide pin' first.
You can see the nub just above the spring in the photo. It would need to be bent outwards (away from the lens) only a fraction of a millimeter.
hanskerensky
Well-known
Guess that could indeed be the source of the problem. Will check my images this evening (now at the office).
Here the system on a Compur-Rapid (which seems to be different) :
https://www.flickr.com/photos/29504544@N08/6685690983

Here the system on a Compur-Rapid (which seems to be different) :
https://www.flickr.com/photos/29504544@N08/6685690983
Mr_Flibble
In Tabulas Argenteas Refero
Thanks Hans, I was hoping you would respond.
I think the pin near the green arrow in the top image approximates the pin I am talking about. I'll try bending it outward a little bit this evening.
I think the pin near the green arrow in the top image approximates the pin I am talking about. I'll try bending it outward a little bit this evening.
Mr_Flibble
In Tabulas Argenteas Refero
Bending the nub was no good, the fork was already as far towards the lens (the right) as it could go, only other thing to do was bend the left prong inward very slightly so it would not catch that one part on the first press of the lever.
Turns out that was exactly what was wrong.
Still had to take it apart three times to improve some spring power that would reset the release lever. (it only fails to return to its start position on the B-setting if I release the lever gently back upwards. It works fine when I press down and let it snap back up by itself. Or give it a little prod in the right direction. Not a big deal ).
Now, for the other big problem, making sure I reinsert the focus mount on the right threads so the focus works correctly.
Turns out that was exactly what was wrong.
Still had to take it apart three times to improve some spring power that would reset the release lever. (it only fails to return to its start position on the B-setting if I release the lever gently back upwards. It works fine when I press down and let it snap back up by itself. Or give it a little prod in the right direction. Not a big deal
). Now, for the other big problem, making sure I reinsert the focus mount on the right threads so the focus works correctly.
farlymac
PF McFarland
I broke one of those levers while repairing a Compur-Rapid which had the same arrangement. Most aggravating thing to do. I soldered it back together, but never got it just right. Then it broke loose again. I gave up. Glad you were able to adjust it correctly. It was my experience that while installing the cocking rack/ring, it was too easy to foul it on the tip of that lever, either bending it, or in my case breaking it off.
PF

Broken Lever 3 by br1078phot, on Flickr
PF
Broken Lever 3 by br1078phot, on Flickr
hanskerensky
Well-known
Still had to take it apart three times to improve some spring power that would reset the release lever. (it only fails to return to its start position on the B-setting if I release the lever gently back upwards. It works fine when I press down and let it snap back up by itself. Or give it a little prod in the right direction. Not a big deal
Rick, out of curiosity i yesterday evening had a look inside the Compur of a Welta Weltur (1936).
The shutter was working fine before but after opening (speedcam removed) i started to have exact same problem. ALSO on the T-setting.
I decided to re-assemble anyway and the problem resolved itself (miracle !) BUT ONLY after i cocked and actuated the shutter on a "normal" speed (believe it was 1/250).
Here an image of the T-setting mechanism :
www.flickr.com/photos/29504544@N08/14430111646/

Mr_Flibble
In Tabulas Argenteas Refero
I don't think solder would make a strong enough bond to hold the broken piece in place. A weld would be better I think. Always troublesome with stamped metal parts
The green arrow in your picture points to the part I've adjusted.
The green arrow in your picture points to the part I've adjusted.
Steve M.
Veteran
I've owned a lot of leaf shutter cameras where the B and T settings did not work unless you used a cable release. I assume they were designed that way, since the most probable time you would be using those settings would be w/ the camera on a tripod, which is when you would use the cable release. Did you try that?
Mr_Flibble
In Tabulas Argenteas Refero
Someone sent me the that advice through a PM yesterday. I can see that this makes sense, but I think this is only true for the older generation of leafshutters shutters. Say up to the 1920s?
I would not expect to see this feature on a 1930s Compur design anymore.
Anyway, the Compur-S shutter is behaving now as it should.
Thanks for all the input.
I would not expect to see this feature on a 1930s Compur design anymore.
Anyway, the Compur-S shutter is behaving now as it should.
Thanks for all the input.
hanskerensky
Well-known
I've owned a lot of leaf shutter cameras where the B and T settings did not work unless you used a cable release. I assume they were designed that way, since the most probable time you would be using those settings would be w/ the camera on a tripod, which is when you would use the cable release. Did you try that?
I now have 3 older Compur shutters with the T and B settings :
1x Dial Set c1930
2x Rim Set c1934 and c1936
All work without problem just with the Release Lever on the front of the shutter.
Mr_Flibble
In Tabulas Argenteas Refero
Right, The Weltax is back together. Glass cleaned. Focus is calibrated too.
I've now also figured out why the camera had problems with the focus. A part of one of the struts fails to engage properly so the lens didn't get locked into the right position causing a slight shift in flange distance. I need to give that part a little bend so a pin stays inside a guide rail.
I've now also figured out why the camera had problems with the focus. A part of one of the struts fails to engage properly so the lens didn't get locked into the right position causing a slight shift in flange distance. I need to give that part a little bend so a pin stays inside a guide rail.
Share:
-
This site uses cookies to help personalise content, tailor your experience and to keep you logged in if you register.
By continuing to use this site, you are consenting to our use of cookies.