VF101
Established
As I have mentioned in another thread, I recently decided to start wet printing. I have never done that before, though I have been doing photography back in the pure analog ages of the eighties.
I'll keep a diary about my experiences here, perhaps someone may find it interesting or just funny to read about all the mistakes I'll gonna make. I do film development for more than a year now (APX 100 and Tri-X in Rodinal), so the basic developing process is not new to me. And as I was working in the DNA lab of our university for nearly a year, I'm not new to handling chemicals either.
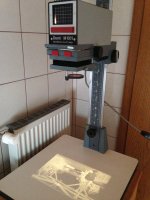
My "new" enlarger (Durst M601 from the late seventies, I think) arrived last week. There were several loose parts, and I have not been able to tinker them together until I found a scanned manual somewhere on the web. The enlarger has just a black and white head, but a filter drawer should enable me to use multigrade paper. I've just ordered a set of multi-contrast filters for this purpose.
The next step is to prepare my semi-dedicated darkroom. It's a bathroom that is seldomly used and big enough to store the enlarger on a sideboard. Two sinks should come handy for watering my prints, not to mention the tub for really big prints.") I still have to get a plywood panel to darken the glazed door though.
I still have to get a plywood panel to darken the glazed door though.
I'll start my printing endeavor with Tetenal Eukobrom and Adox Easy Print RC 311 paper. I've got already a fixer, which I'll use for film development as well as for prints (but not the same liquid for both). What I really worry about is the dust problem. Scanning my negatives gives a plethora of little white dust spots, so I fear to get prints with little black dots all over them. Thus I also ordered a film cleaner spray.
I'll keep you updated as soon as the developer and paper arrive.
I'll keep a diary about my experiences here, perhaps someone may find it interesting or just funny to read about all the mistakes I'll gonna make. I do film development for more than a year now (APX 100 and Tri-X in Rodinal), so the basic developing process is not new to me. And as I was working in the DNA lab of our university for nearly a year, I'm not new to handling chemicals either.
My "new" enlarger (Durst M601 from the late seventies, I think) arrived last week. There were several loose parts, and I have not been able to tinker them together until I found a scanned manual somewhere on the web. The enlarger has just a black and white head, but a filter drawer should enable me to use multigrade paper. I've just ordered a set of multi-contrast filters for this purpose.
The next step is to prepare my semi-dedicated darkroom. It's a bathroom that is seldomly used and big enough to store the enlarger on a sideboard. Two sinks should come handy for watering my prints, not to mention the tub for really big prints.
I still have to get a plywood panel to darken the glazed door though.I'll start my printing endeavor with Tetenal Eukobrom and Adox Easy Print RC 311 paper. I've got already a fixer, which I'll use for film development as well as for prints (but not the same liquid for both). What I really worry about is the dust problem. Scanning my negatives gives a plethora of little white dust spots, so I fear to get prints with little black dots all over them. Thus I also ordered a film cleaner spray.
I'll keep you updated as soon as the developer and paper arrive.
Attachments
Last edited:
tunalegs
Pretended Artist
You will find that dust has far less impact on prints than it does on scans! Enjoy your new darkroom and have fun.
batey_1020
Well-known
Im excited to follow your progress. I have never done Wet printing but have all the equipment stored away. One day i will make the effort to get started and i hope to do the same as you and doccument it.
mwoenv
Well-known
For printing, I find that a soft blower brush and Rocket-air blower take care of any dust on negatives before putting them in the enlarger. Of course, storage in negative sleeves is important in preventing dust in the first place.
Fawley
Well-known
I have an M601 as well. A very nice solid enlarger, but you may encounter trouble from luder's (?) marks from the glass enlarger. I have been meaning to improvise my Durst carrier so that there is only glass on the bottom and I hold down the top of the negative by some other means.
pakeha
Well-known
You will find that dust has far less impact on prints than it does on scans! Enjoy your new darkroom and have fun.
plus 1 on this, Yes dust is an issue, however work flow and organisation should come first. I print in our laundry and have few problems with dust, well not that i notice anyway
enjoyHHPhoto
Well-known
Hi Stefan,
congratulations!
You will not regret this move. Printing in your own lab is awesome.
Don't worry too much. Just use
- pergamin sleeves (best are those for archival usage, P.A.T. certified; you can buy those in Germany at www.monochrome.com) for storage
- microfaser fabric and / or the "Kinetronics" Bürsten (see www.fotobrenner.de)
- a bellows / Blasebalg like the big one from Hama
https://de.hama.com/00005610/hama-blasebalg-dust-ex
Wish you lots of joy in your new darkroom!
Cheers, Jan
congratulations!
You will not regret this move. Printing in your own lab is awesome.
What I really worry about is the dust problem.
Don't worry too much. Just use
- pergamin sleeves (best are those for archival usage, P.A.T. certified; you can buy those in Germany at www.monochrome.com) for storage
- microfaser fabric and / or the "Kinetronics" Bürsten (see www.fotobrenner.de)
- a bellows / Blasebalg like the big one from Hama
https://de.hama.com/00005610/hama-blasebalg-dust-ex
Wish you lots of joy in your new darkroom!
Cheers, Jan
VF101
Established
Thank you all for your kind words and encouragement.
Could someone please elaborate on this problem? I've never heard of it nor can I find any information on Google.
but you may encounter trouble from luder's (?) marks from the glass enlarger
Could someone please elaborate on this problem? I've never heard of it nor can I find any information on Google.
tunalegs
Pretended Artist
Thank you all for your kind words and encouragement.
Could someone please elaborate on this problem? I've never heard of it nor can I find any information on Google.
I think he means newton rings?
shadowfox
Darkroom printing lives
Very exciting!
1. Giottos "rocket" air blower, buy the biggest one you can find. Use it just before you expose the negative to get rid of the dust. Using it can mean the difference between having to spot your prints later or not. I like to paint *from* my photographs, but not *on* them.
2. Having to setup and tear-down every time you want to print will discourage you in the long run, pick a permanent spot, even without running water (use extra trays for now).
Keep us posted.
VF101
Established
Today developer, paper and the likes arrived, but blacking out the room is harder than I thought. The plywood panel bends and flexes and it even can't keep the light completely out. So I'll have to darken it with a black pond foil and stabilize it.
This darkroom will be semi-permanent, meaning the enlarger will stay in the room and I will just have to put the plywood in place to keep the light out. And if I'll continue to print, a really permanent darkroom is definitely an option. But for now I have to start printing at first.
This darkroom will be semi-permanent, meaning the enlarger will stay in the room and I will just have to put the plywood in place to keep the light out. And if I'll continue to print, a really permanent darkroom is definitely an option. But for now I have to start printing at first.
shadowfox
Darkroom printing lives
I solve the darkening problem easily.
I only print before dawn or at night.
I only print before dawn or at night.
VF101
Established
Just a quick note to let you know I've now succeeded in darkening the room. At least during the night the room is pitch-black. Since I'm on vacation next week, I'll have to wait for doing my first enlargements until I'm back. This week is filled with all kinds of preparations for the trip and thus no good time to start something completely new.
taylan
Street Dog
For dust problem, you also need to check negative carrier glasses. They have to be clean and scratch free. Otherwise you need to chance it and it may be very hard to find proper glasses. I have a Durst M800 and I changed it by using Kaiser's glasses which were the only one that I could find locally. They are a little larger than Durst's. For this reason I sanded it with a proper sandpaper for glass. It took 4 hour for each one. Also keep in mind, you need one anti-newton glass for upper part of the negative carrier and an ordinary glass for bottom part.
williams473
Well-known
That's wonderful that you are starting out with printing. Have patience as a lot of practice is needed to wet print, but once you master it there's nothing like it. The nicest part is that you don't have to worry about a lab not getting it exactly like your file - what you hold in your hand once it's done is what it is - no suprises. My little bit of advice to that end is to dry your test strips and prints with a hairdryer before evaluating them if you print on fiber based paper. There is something known as "dry down" with FB paper in which the tones will darken to varying degrees (depending on the paper) as it dries. It only takes 30 secs or so, and with accurate test strips you can put your tones exactly where you want them in the final print. Also, evaluate your prints under good lighting, or at least the type of lighting you plan to view/exhibit the prints in. Good luck - this is the "craft" part of the art that I hope you will really enjoy
Matt
Matt
VF101
Established
So, a lot of work in my day job prevented the start of my printing career for more than half a year. But last week was my first day in the darkroom at last. I knew I'd make a lot of mistakes and surely I did.
I had a real hard time to find the correct exposure - my test prints were completely black, even the part with only two seconds exposure time. I had no idea that for 18x13 prints (centimeters, not inches) I had to stop down my lens all the way down to f16 or whatever its tiniest aperture may be. And even then two seconds exposure were still too long. In the meantime I could solve this problem: I put a dark grey foil in the filter drawer. Additionally I made slightly larger prints (left no white border as in my first attempts), and thus could increase exposure time to about six to twelve seconds.
And here, some of my other mistakes for your enjoyment:
Having the basic process sorted out now, I did my first prints with multigrade filters today. I have to say, it's a fascinating world I'm diving into. As soon as I print some non-family pictures, I'll post them here.
I had a real hard time to find the correct exposure - my test prints were completely black, even the part with only two seconds exposure time. I had no idea that for 18x13 prints (centimeters, not inches) I had to stop down my lens all the way down to f16 or whatever its tiniest aperture may be. And even then two seconds exposure were still too long. In the meantime I could solve this problem: I put a dark grey foil in the filter drawer. Additionally I made slightly larger prints (left no white border as in my first attempts), and thus could increase exposure time to about six to twelve seconds.
And here, some of my other mistakes for your enjoyment:
- In my very first attempt, I took two sheets out of the bag and exposed them. I did not notice it until I had two sheets of paper in my developer bin.
- For the first exposure test, I used a sheet of office paper to cover the photo paper. Of course the office paper was too thin and did not block the light.
Having the basic process sorted out now, I did my first prints with multigrade filters today. I have to say, it's a fascinating world I'm diving into. As soon as I print some non-family pictures, I'll post them here.
blue4130
Well-known
It could be that you have the incorrect bulb for the enlarger. Using a brighter (higher watt)bulb would cause the exposure time problems that you are having. You should not have to resort to using a ND filter for printing.
Vics
Veteran
I never had any fun in the darkroom until I got rid of my Durst M601. I had been using it for years until I came across a Beseler 23CII for cheap with two Nikkor lenses, and then I was in heaven. No more spotting dust mnarks, because the Beseler has glassless negative carriers! Plus the Nikkor lenses were so much than what I had with the Durst. You'll be OK to start, but keep your eyes open for a better enlarger. Have fun!
mwoenv
Well-known
The exposure time problem is unusual if your negatives are of reasonable density and you mentioned you are stopping down the lens. Are you sure there is no stray light exposing your paper? Sources can be light getting through the doors and windows, light escaping the enlarger around the head and negative carrier that reflects off walls and, in a bathroom, metal and glass shower doors.
To check if your darkroom is light tight, place a coin on a sheet of print paper in the dark, let it sit for 5 minutes and then develop it. You should not see an outline of the coin or darkening of the paper. Perform without a safelight on and again with a safelight on; the latter test will indicate if your safelight is contributing to paper fogging and exposure.
To test for light leaks from the enlarger, turn on the enlarger in the dark with the lens cap on. Wait a couple of minutes to let your eyes adjust to the darkness to see stray light. Seal excessive light leaking from the head or around the negative carrier with thin weatherproofing foam as much as you can, being careful not to block vents in the head near the bulb.
I use a bathroom as a temporary darkroom and hanging towels or cloth material around metal/glass shower doors and tile walls near the enlarger has prevented remaining stray light from reflecting off those surfaces to the easel/paper.
After doing these things to reduce stray light and turning on the safelight only when absolutely necessary, prints have had significantly better whites and contrast; apparently paper fogging was occurring before.
VF101
Established
My day job is really preventing me from using my darkroom more often. But today I've made some substantial progress. I succeeded in getting prints that came out just as I imagined them to be! I've learned that practice is the key for getting better prints - and that involves printing the same negative again and again with different settings and different grades. You can learn a lot when you see what a difference two stops exposure are making for your print in the end.
Hopefully I can scan some of the prints tomorrow and post them here.
Hopefully I can scan some of the prints tomorrow and post them here.
Share:
-
This site uses cookies to help personalise content, tailor your experience and to keep you logged in if you register.
By continuing to use this site, you are consenting to our use of cookies.