bkrystad
Established
In my post from early January about setting up my grandfather's Beseler 23C, I said "My resolution for the new year is to be developing and printing on my own, I hope some time before December '08, but we'll see."
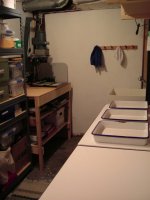
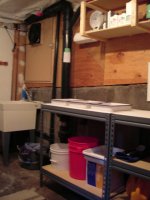
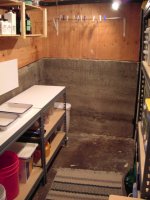
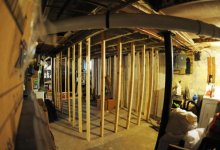
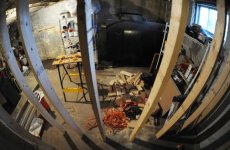
I'm ahead of schedule. I converted a small utility room in the basement, building from scrap everything I could (enlarger table, chemical shelves, drying rack). I used as much of my grandfather's equipment as I could and filled in the rest with used wherever available: trays, tanks and reels, enlarger timer, etc. Took about a month to piece it all together (including waiting for eBay deliveries).
It was a challenging experiment to make a decent setup on a low budget. But it's in place (some pics attached), and in the past month I've developed four rolls with contact sheets and made two dozen enlargements.
And frankly, it's a thrill. Like being a kid again. Thanks for the helpful input from many RFF'ers along the way!
Attachments
BigSteveG
Well-known
Your darkroom is so neat. I use an unused kithen in my converted garage. I've not light proofed mine. I simply do all my printing at night. Film can be developed in daylight tanks. I wish I had a sink more like yours. I'm hoping to score a lab sized film dryer at some point. I've seen them as low $250.....I'm waiting till someone just wants to unload one for $100 or so...
MichiganBill
Member
Jealous, jealous, jealous! Be sure to post some photos so we can see your work!!
sepiareverb
genius and moron
Beautiful. Is that ventilation I see in the wall? Looks much like my second darkroom, except that I had a black plastic wall & switchback entry.
May you have happy printing!
May you have happy printing!
pesphoto
Veteran
That looks great, nice job! Have fun in there.
cosmonot
uʍop ǝpısdn sı ǝʞ
I too am envious... It looks great! Congrats!
My darkroom is still in the planning stages. Eerything is here and ready to get set up, but the ceiling in my upstairs bathroom still shows signs of a slight leak. This is after we had the roofers out, and of course AFTER I spent three days putting up a new ceiling. A basement setup would be so much easier but the workshop down there makes so much dust...
My darkroom is still in the planning stages. Eerything is here and ready to get set up, but the ceiling in my upstairs bathroom still shows signs of a slight leak. This is after we had the roofers out, and of course AFTER I spent three days putting up a new ceiling. A basement setup would be so much easier but the workshop down there makes so much dust...
visiondr
cyclic iconoclast
Green with envy.
If only my little basement cubby could be converted. All I need is water in and water out... yeah sure, that's easy.:bang:
Enjoy it!
If only my little basement cubby could be converted. All I need is water in and water out... yeah sure, that's easy.:bang:
Enjoy it!
anselwannab
Well-known
That foam that comes in a can and expands to 10xs it original size works great for the trouble areas like that round duct where light can come in.
You can't tell how light tight something is until you sit in there for 10 minutes. And then I would start to see light leaks where there weren't any.
What are you going to do for a water wash?
A coat of glossy white paint can help to make keeping dust down.
I too thought it was my first dark room. Houses must have a common 4x9 storage room.
Click On!
Mark
bkrystad
Established
Thanks for all the feedback, a few details:
Dryer, washing, etc. -- I'm strictly on an RC diet right now, next big gulp will be additional equipment for fiber. The tub sink in the corner with a detachable spray head works great for quick RC rinses.
Ventilation -- That was a project. Over the sink is a large casement window (ground height). I put a large sheet of 1/2in. MDF and cut a hole for an 8in. light-proof vent on the window side and mounted half of a cheap disassembled box fan on the room side to blow through it. Then I hung the whole thing on a 36in. piano hinge and went around the sealing face with 3/8in. weatherstripping foam. Black electrician's tape over the piano hinge finished it.
Darkness -- It's dark. I hung a large blackout curtain outside in the hall (the wife loved that decision) that blocks light around the leaky old 5-panel door. Foam and tape elsewhere got the rest of the sources. The kids love it. I dare them to see how long they can spend in there looking for cracks of light. None of us have found one yet.
Heat -- Also a bit of a hassle. It's a basement. I have to preheat the room with an oil convection heater for one hour beforehand to get to 68F. Then I have to remember to turn it off when I use the enlarger to avoid voltage fluctuation.
I have zero digital process. Just the HP PhotoSmart scanner on my wife's iMac. So I've attached a poorly done scan of one of my prints: souped and enlarged in the room you see here.
Camera: Minolta XD11 with Rokkor-X MD f/1.7 85mm
Exposure: f/2.8, 1/60th
Negative: Ilford HP5 in D76 1:1 for 11 minutes
Enlarger: Besler 23C Series II with C.E. Rokkor-X MD f/2.8 50mm
Enlargement: Ilford MultiGrade glossy RC in Ilford Multigrade 1:9, f/16 for 12 seconds
So many mistakes to make, so little time! Looking forward to all of them.
Attachments

John Noble
Established
That's a great shot, period. I'll bet it looks great hanging on the wall, and I'll bet it feels great to have made it yourself.
david b
film shooter
Congrats on the darkroom.
I spent a few hours tonight straightening mine up so I can print tomorrow.
I think the Global Darkroom Day is April 21.
Enjoy it.
I spent a few hours tonight straightening mine up so I can print tomorrow.
I think the Global Darkroom Day is April 21.
Enjoy it.
Very nifty and useful-looking setup, with a wet side and a dry side; should be a lot of fun. It reminds me of my first darkroom in my studio apt on Seattle's Capitol Hill, a few blocks south of Volunteer Park. It had a Murphy bed that tilted up and pivoted into a walk-in closet. I left the bed down and covered the bed's doorway with a large blackout curtain. My Beseler 23C was at the inner end of the closet, with the wet stuff along the curtained wall. I had to go across the entry hall into the bath for print wash.
My current darkroom isn't much larger, and I still use the blackout curtain at the entry pocket door. But this time I do have a proper darkroom sink and two mixing faucets with dial thermometers. Luxury!
Hope you'll enjoy your darkroom as much as I've enjoyed mine.
My current darkroom isn't much larger, and I still use the blackout curtain at the entry pocket door. But this time I do have a proper darkroom sink and two mixing faucets with dial thermometers. Luxury!
Hope you'll enjoy your darkroom as much as I've enjoyed mine.
Share:
-
This site uses cookies to help personalise content, tailor your experience and to keep you logged in if you register.
By continuing to use this site, you are consenting to our use of cookies.