R
You are using an out of date browser. It may not display this or other websites correctly.
You should upgrade or use an alternative browser.
You should upgrade or use an alternative browser.
Iskra 6x45 Images, And Kitchinette Lens Test
- Thread starter ruben
- Start date
- Latest activity Latest activity:
- Replies: Replies 30
- Views: Views 3K


R
ruben
Guest

detzie
Member
")
R
ruben
Guest
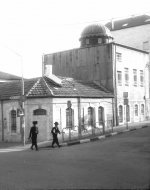
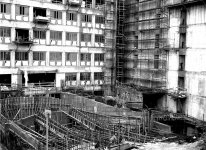
Now we start the first stage, out of two, of our test. All the images above and below were made with Tri-x pulled to 200, and scanned with the rather cheapo Epson 2450.
Kindly notice the following image, which like the precedent ones was not cropped. Afterwards we will start to crop and see what we get, but now full frame:

Kindly notice the following image, which like the precedent ones was not cropped. Afterwards we will start to crop and see what we get, but now full frame:
Attachments
R
ruben
Guest
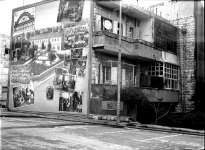
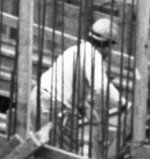
Now we are going to see how it will look on our computer screen a 24x36mm portion of the original negative, getting the same computer screen space. So this will mean, I understand, what would happen if your Industar at the Iskra was mounted on a 135mm normal film

Attachments
Last edited by a moderator:
R
ruben
Guest
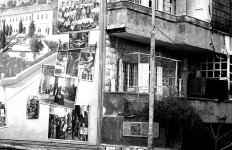
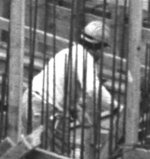
Ok, the above pic look ok to me, as no torture was effected on our lens to confess it is not worthy. But now we will start to get serious, pull the strings, and cut a smaller part of the negative to be displayed on the same computer screen space.
We are going to see what the lens would deliver had it be mounted in a half frame camera. This will be the negative cut 18x24mm

We are going to see what the lens would deliver had it be mounted in a half frame camera. This will be the negative cut 18x24mm
Attachments
R
ruben
Guest

R
ruben
Guest
Ok, there is a trick in all this test, you may start to become aware of . What we have been doing so far is to take an image "printed" at 30x20 cm an changed loupes of greater magnification each time. This enabled us to see more and more detail, since we were deprived of the possibility of seen the whole of the image "printed" in big size.
We couldn't do this due to the fixed size of our computer screens.
This is why I am going to show now a second series of tests, which perhaps may compensate us for this lack.
But, kindly let me some 5 minutes break, and I will be back now.
Cheers,
Ruben
We couldn't do this due to the fixed size of our computer screens.
This is why I am going to show now a second series of tests, which perhaps may compensate us for this lack.
But, kindly let me some 5 minutes break, and I will be back now.
Cheers,
Ruben
R
ruben
Guest
Ok folks, here I am again.
Since our Industar 58 has endured so far all KGB pressures to confess its betrayal to Communism, I will make from my free will a necessary confession related to the following test: since the 3rd grade of the primary school, me and mathematics started to become bitter enemies. Therefore I cannot vouch that what I am going to do is the right thing to do.
What I am going to do is to post a full frame 6x45 image and "print" it on an imaginary computer screen at different sizes, far greater than our computer screens.
In order to do it, I will crop a very tiny spot of the original giantic image and show that crop. The area showed in the crop will remain constant in the sense that you will be looking at the same subject. But you will see it at different screen sizes corresponding to the sizes becoming each time smaller had you seen a print of 4x5meters, 2x2.7meters etc. looking all the time at the same spot. Had I make myself clear ?
R
ruben
Guest
R
ruben
Guest
R
ruben
Guest
R
ruben
Guest
R
ruben
Guest
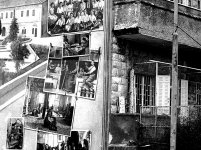
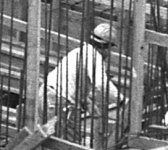
Finally we continue with the same. Now we ask our scanner to cut by half the enlargement of the full frame image, 1750%, and get a total image measuring 0,96x0,73 m.
I end here because at this point I obtain quite an acceptable detail for me, although the upper one (2500%) was not bad at all.

I end here because at this point I obtain quite an acceptable detail for me, although the upper one (2500%) was not bad at all.
Attachments
R
ruben
Guest
That's all, feel free to question my proceedings and post proposals, and of course say whatever you feel.
Cheers,
Ruben
PS
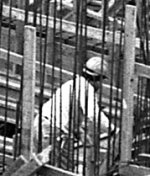
The latter picture of the construction works and the worker was done from inside a bus, i.e. through a window, and this also means I am not sure that during the 30 seconds the bus stopped I was able to find the best combination favouring a middle aperture, nor that I had been the most kind when pressing the shutter release.
But on the other hand the negative looks very good processed.
Cheers,
Ruben
PS
The latter picture of the construction works and the worker was done from inside a bus, i.e. through a window, and this also means I am not sure that during the 30 seconds the bus stopped I was able to find the best combination favouring a middle aperture, nor that I had been the most kind when pressing the shutter release.
But on the other hand the negative looks very good processed.
Last edited by a moderator:
mongo141
Established
ruben said:That's all, feel free to question my proceedings and post proposals, and of course say whatever you feel.
Cheers,
Ruben
PS
The latter picture of the construction works and the worker was done from inside a bus, i.e. through a window, and this also means I am not sure that during the 30 seconds the bus stopped I was able to find the best combination favouring a middle aperture, nor that I had been the most kind when pressing the shutter release.
But on the other hand the negative looks very good processed.
Looks great to me Rubin, I have been saying how great these cameras are for years. I have three of them, two Iskra 1's and a mint II ( or as close to mint as you will probably find). ALL of them had to have the frame counters worked on and ALL of them had to have to have the shims behind the lens added to or reduced to obtain a sharp inf. focus ( I made a lot of shims) but it was sure worth the effort. They are one of my most used cameras and I am camera poor as it seems... Dave
R
ruben
Guest
Hi Dave,
Just in case you have the facilities and a digital, could you enligthen us with an image or two about where have you placed the shims, and how EXACTLY have you checked the sharpness on the film plane ?
On the film plane issue I am curious not about the screen but about the magnification device you used.
Cheers,
Ruben
mongo141
Established
ruben said:Hi Dave,
Just in case you have the facilities and a digital, could you enligthen us with an image or two about where have you placed the shims, and how EXACTLY have you checked the sharpness on the film plane ?
On the film plane issue I am curious not about the screen but about the magnification device you used.
Cheers,
Ruben
First the INF. focus was checked by putting the camera on a tripod and putting a ground glass in the film plane and checking the focus with the lens set to INF. I use a microwave tower about 3 miles away as an object and an 8X jewlers loupe. if it is out of focus (and every one I have seen has been out of focus to one degree or another) it is a matter of removing the entire lens assembly from the front standard requiring a lens spanner from the back with the bellows collapsed. Between the lens assembly and the focusing helical there are shims of various thickness made of alu. for the thick ones and copper for the thin ones. These are about 31mm OD and about 25mm ID with a small pair of notchs 180 degrees apart to clear the alignment pins on the back of the lens assembly. The helical stays in the front standard and has some witness marks to insure that if it is removed to relube you get started on the right thread.
This is now time to relube the thing since the FSU grease has dried up to something like wax. once the INF. focus has been set you are done with the exception of setting the RF to INF. which is done with the tiny screw on the left front standard and can been seen looking at the camera from the front ( it has a tiny lock screw) There is no close focus adjustment, it is built into the focusing helical but there is a verticle adjustment which is under a blind plug next to the cold shoe. ( requires a very small clamping ring spanner which I made). all in all a lot of work but worth it in the end. For a ground glass you can use a thin piece of glass cut to fit on the film rails and a piece of matt Scotch tape on the side toward the lens, worked fine... One of the FSU dealers had several complete NEW lens assemblys with bellows that had been cut off of scrapped new cameras at one time, everything was junk except the lens shutter assemblys and the bellows. I bought a couple at $60.00 ea. the glass I have been told is the last of the Karl Zeiss glass that the Soviets hauled out of Germany at the end if WWII. These cameras were made for high ranking party members and were very expensive to produce or so my research has led me to believe. Regards, Dave
R
ruben
Guest
mongo141 said:...... Between the lens assembly and the focusing helical there are shims of various thickness made of alu. for the thick ones and copper for the thin ones. These are about 31mm OD and about 25mm ID with a small pair of notchs 180 degrees apart to clear the alignment pins on the back of the lens assembly. .............
I am not sure yet about the exact place you are talking about, but I have disassembled my 4 Iskras and never seen a shim. Some day kindly post a pic, or use any one from the internet to point the place you are talking the shims are found
The other interesting thing I learn from you is that there is no RF alignment for short distances. I thought I still had to look for.
Cheers,
Ruben
Last edited by a moderator:
mongo141
Established
ruben said:I am not sure yet about the exact place you are talking about, but I have disassembled my 4 Iskras and never seen a shim. Some day kindly post a pic, or use any one from the internet to point the place you are talking the shims are found
The other interesting thing I learn from you is that there is no RF alignment for short distances. I thought I still had to look forl.
Cheers,
Ruben
Hi Ruben, The shims are there but you have to pull the entire lens assembly off (shutter and all) the camera and they are either stuck to the lens assembly or stuck to the front standard. They are how the factory adjusted the INF. focus ( their standards were not as high as mine I guess since some of the cameras I have or had were pretty far off) My other half has a couple of D*****L cameras, I will borrow one tomorrow one and publish a Pix of the shims. Regards, Dave
Share:
-
This site uses cookies to help personalise content, tailor your experience and to keep you logged in if you register.
By continuing to use this site, you are consenting to our use of cookies.