RichC
Well-known
I thought it'd be useful to have a Leica M8/M8-2 tips thread.
I've been jotting down tips in a Word even if they're not immediately useful, to save searching later (and fruitlessly) for info I know I saw somewhere on the web!
I've stuck my Word (it's a bit rough and ready) on the web, and it can be downloaded here: http://www.mediafire.com/file/yfhyhjm42nm/Leica_M8_FAQ.doc
Example tips are below - please post your own tips in this thread (or corrections to mine!)...
Slow start-up
A myth! The LCD take 3 seconds to come to life but the camera is ready after only about 0.5 second. So, don’t wait for the top-plate LCD to appear before shooting: the camera will be ready before you bring it to your eye!
IR-blocking filters
B+W 486 UV/IR filters work just as well as the Leica filters, and are much cheaper and easier to find.
Green banding
If a very bright light, reflection, etc., is bisected by one of the edges of the sensor, you can get a broad green line emanating from the light source in the photo. This can be avoided by ensuring that bright light sources do not fall on a sensor edge.
Do fast SD cards make a difference?
Sandisk Extreme SD card write time (continuous shutter mode): raw + hi-res jpg = 40 secs (10 shots); raw only = 15 secs (12 shots, as the buffer partially clears by the time photo 11 and 12 are captured). Sandisk Ultra gives same times, so only advantage of buying a fast card is less time to transfer from card to PC. Note the excessive time taken to write raw + jpg images – avoid!
Bobfrance
Over Exposed
Thanks for posting this up Rich.
As a new M8 user I don't think I have any tips to contribute, but I'll be keeping an eye on this thread for helpful info.
Bob.
As a new M8 user I don't think I have any tips to contribute, but I'll be keeping an eye on this thread for helpful info.
Bob.
Ben Z
Veteran
I haven't noticed a need for any special tips/tricks for operating the M8 in the field, it works just like my M4 except it captures on an SD card instead of film. The only tips are involved in the post-processing, and most of those come under the heading of "less is more", eg, turn all the sharpening and noise reduction OFF in the C1-4 DNG converter unless shooting @ ISO 1250/2500 in which case set chroma noise reduction to 75.
johannielscom
Snorting silver salts
I used to own a D300 and in Continuous Mode I used to press the shutter button as I saw fit.
The M8 shutter software cannot handle this. Just push the button down, let the Continuous Drive Mode do its job and later chimp to see what you got.
The reason for this: the instant return mirror on the D300 is so fast, that by the time you press the button again, the camera is ready for you.
Pressing the shutter button on the M8 while the shutter mechanism still is active, results in shutter faults, which will require shutting the camera off to clear.
Is this a deficit? No, IMHO. The M8 is no DLSR, when thinking film cameras you would be limited to the speed on a motor drive, which is about the same, and cannot fire the camera before the previous cycle has completed either.
sepiareverb
genius and moron
I had trouble with my Macbook Pro finding the camera when shooting RAW only and tethering to the camera with the USB cord. Shooting RAW & JPG solved this, as Leica NJ said it would. Getting a card reader for the PC slot solved it also, and is much easier.
RichC
Well-known
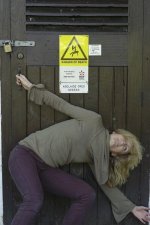
Correcting IR contamination without a filter
Correcting IR contamination without a filter
Sometimes you don't have an IR filter, or don't want to use it because of flare-inducing conditions. So, what to do?
Certain ICC profiles used in place of the standard Leica M8 generic one can tame the IR cast. The Phase One P30 Flash - Easy Black profile (which comes with Capture One) works very well: it removes the magenta cast from fabrics, improves neutrals, and makes skin tones more natural. On the downside, greens and yellows become less saturated and more yellow. For more info: http://www.luminous-landscape.com/reviews/cameras/m8-magenta.shtml
Jamie Roberts created some profiles to specifically address the IR issue (http://james-roberts-photography.com). The profiles can be downloaded from http://private.james-roberts-photography.com/M8/m8_profiles.zip. More information: http://www.l-camera-forum.com/leica-forum/leica-m8-forum/9637-new-m8-profiles-c1-instructions.html. Note: the profiles were created for Capture One 3 but work fine in Capture One 4. To associate the profiles with the Leica M8 menu rather than ‘Other’ in Capture One 4, rename the files so they start ‘LeicaM8-’.
You may wish to develop the Raw file twice, one with the standard profile and one with the IR profile, then add the IR file as a layer in Photoshop, selectively erasing the colours you don’t want.
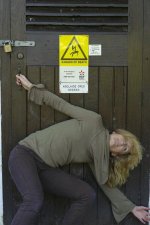
The examples show a photo taken without an IR filter and developed with the standard Leica profile (note magenta jeans) and the same photo developed using the P30 Flash - Easy Black profile (Jamie Roberts' "low saturation" profile gives a similar look).
PS: I know the photo's rubbish - it's the only one I have to hand with IR contamination ...!
Correcting IR contamination without a filter
Sometimes you don't have an IR filter, or don't want to use it because of flare-inducing conditions. So, what to do?
Certain ICC profiles used in place of the standard Leica M8 generic one can tame the IR cast. The Phase One P30 Flash - Easy Black profile (which comes with Capture One) works very well: it removes the magenta cast from fabrics, improves neutrals, and makes skin tones more natural. On the downside, greens and yellows become less saturated and more yellow. For more info: http://www.luminous-landscape.com/reviews/cameras/m8-magenta.shtml
Jamie Roberts created some profiles to specifically address the IR issue (http://james-roberts-photography.com). The profiles can be downloaded from http://private.james-roberts-photography.com/M8/m8_profiles.zip. More information: http://www.l-camera-forum.com/leica-forum/leica-m8-forum/9637-new-m8-profiles-c1-instructions.html. Note: the profiles were created for Capture One 3 but work fine in Capture One 4. To associate the profiles with the Leica M8 menu rather than ‘Other’ in Capture One 4, rename the files so they start ‘LeicaM8-’.
You may wish to develop the Raw file twice, one with the standard profile and one with the IR profile, then add the IR file as a layer in Photoshop, selectively erasing the colours you don’t want.
The examples show a photo taken without an IR filter and developed with the standard Leica profile (note magenta jeans) and the same photo developed using the P30 Flash - Easy Black profile (Jamie Roberts' "low saturation" profile gives a similar look).
PS: I know the photo's rubbish - it's the only one I have to hand with IR contamination ...!
Attachments
kully
Happy Snapper
Take the lens cap off.
That's a tip I could have used last night - about 5 minutes before someone pointed it out to me
kully
Happy Snapper
A hint from me - if you have a Zeiss ZM 28/2.8, get the hood for the C-Sonnar 50/1.5. It fits perfectly and causes no vignetting.
yanidel
Well-known
thanks for doing that, good synthesis.
f16sunshine
Moderator
Maybe synical but here us a tip from my recent experience.
Carry an RD1 as a digital RF back up.
I always have a 5D with me as well for close focus but, now will not rely on the M8 as the digital platform for RF lenses.
Carry an RD1 as a digital RF back up.
I always have a 5D with me as well for close focus but, now will not rely on the M8 as the digital platform for RF lenses.
kully
Happy Snapper
....but, now will not rely on the M8 as the digital platform for RF lenses.
Could I ask why?
Bobfrance
Over Exposed
I think because it broke.
RichC
Well-known
Reducing noise at high ISO
Reducing noise at high ISO
Some of the following has been shamelessly nicked and stitched together Frankenstein-like from assorted posts...
If you examine shots from dSLRs such as the Canon 5D taken at high ISOs, you will see that noise resides mainly in the tonal range between the midtones and the shadows. The dynamic range is narrow at high ISOs, so correct exposure is critical.
If you expose for the subject, you may end up with a lot of dark tones, some so dark that they exceed the dynamic range of the camera. The result is shedloads of noise and unwanted artifacts like banding. And if you attempt to lighten the shadows on the computer, the results are disastrous!
The Canon 5D has a pretty good dynamic range at high ISOs, so it’s possible to expose for your subject yet avoid excessive noise, since there’s less chance of your dark tones falling straight through the camera’s noise floor!
The Leica M8 is a different kettle of fish at high ISOs - witness all the moaning about how awful it is at ISO 640 and higher. The main cause of all this angst is the M8’s narrow dynamic range at high ISOs, so, unlike the Canon 5D, you have to tread gingerly on the M8’s creaky floorboards of exposure to avoid hurtling to your doom through the noise floor! For example, if you correctly expose your subject at ISO 1250, any shadows areas can only be 1 stop darker than mid-grey before they show excessive noise.
So, what to do? The first thing is not to expose your main subject correctly, and definitely not to use auto-exposure: you will probably end up with dark areas with noise and banding because they fall outside the sensor’s range.
Instead, expose for the shadows. This means that often you will be deliberately overexposing your main subject (without blowing highlights) – the exposure is then reduced during post-production in your raw converter. The result is loads of detail with minimal noise, and images that will stand up against most high-end dSLRs such as the Canon 5D.
There are downsides to this technique. First, since you have only a limited dynamic range and you’re exposing for the shadows (‘exposing to the left’ or ETTL), you may blow out highlights, such as street lamps. So, you may need to compromise, and expose for those tones a stop or two brighter than the darkest shadows (you can selectively darken the shadows in Photoshop etc. to hide the noise, if necessary). You may even have to ignore the highlights and let them blow out. Secondly, increasing the exposure will also increase the shutter speed, which brings its own problems.
Consider an example: someone standing under a single street lamp at night. This is too awkward for auto-exposure, so you’d probably meter off something that’s lit and reasonably neutral, perhaps their face or the pool of light on the ground. Let’s assume you have to use ISO 2500 to get a shutter speed fast enough to hand hold. At ISO 2500, midtones will be at least 1 stop darker (= ISO 5000) and shadows at least 2 stops under (= ISO 10,000). The M8 at this ISO has less than a stop of leeway below the metered exposure. So, if you expose your subject correctly, you will end up with a photo that has dark areas with excessive noise and banding.
If instead you expose for tones a little above the darkest shadows, for example where the pool of light is fading into darkness, then pull down the exposure during raw conversion, the noise will be significantly reduced. Ideally, you’d expose for the darkest shadows, but this will blow out the lighter tones unacceptably – even exposing for the midtones will probably mean that the bright street light will blow out to some extent, but this can’t be helped. (Blown highlights can be minimised by exporting two files from the image using the raw converter, with the exposure of one reduced to ideal for the subject, and the other with the exposure optimised for the highlights. These images can then be blended in Photoshop. You may also be able to take two shots at different exposures, and combine them later in Photoshop.)
Using the M8 to expose carefully for midtones/shadows at high ISOs is not as quick as using a camera like the Nikon D700 or Canon 5D that has a wider dynamic range at high ISOs and thus does not need such careful control of the exposure. However, used in this way, the M8 will give results that are comparable, or at least acceptable.
A used M4-2 can be had for less cash than the Epson R-D1.
Many Ms go for less than the R-D1... why only think of the M4-2?
Bobfrance
Over Exposed
I set my M8 to shoot DNG + Basic JPG and set the camera to shoot Black and white. This Enables me to have a B&W preview on the screen which I much prefer as I find it easier to assess composition.
The DNG files, of course, remain full colour and unchanged.
Bob.
The DNG files, of course, remain full colour and unchanged.
Bob.
Any new tips.
nasdak
Established
Some of the following has been shamelessly nicked and stitched together Frankenstein-like from assorted posts...
If you examine shots from dSLRs such as the Canon 5D taken at high ISOs, you will see that noise resides mainly in the tonal range between the midtones and the shadows. The dynamic range is narrow at high ISOs, so correct exposure is critical.
If you expose for the subject, you may end up with a lot of dark tones, some so dark that they exceed the dynamic range of the camera. The result is shedloads of noise and unwanted artifacts like banding. And if you attempt to lighten the shadows on the computer, the results are disastrous!
The Canon 5D has a pretty good dynamic range at high ISOs, so it’s possible to expose for your subject yet avoid excessive noise, since there’s less chance of your dark tones falling straight through the camera’s noise floor!
The Leica M8 is a different kettle of fish at high ISOs - witness all the moaning about how awful it is at ISO 640 and higher. The main cause of all this angst is the M8’s narrow dynamic range at high ISOs, so, unlike the Canon 5D, you have to tread gingerly on the M8’s creaky floorboards of exposure to avoid hurtling to your doom through the noise floor! For example, if you correctly expose your subject at ISO 1250, any shadows areas can only be 1 stop darker than mid-grey before they show excessive noise.
So, what to do? The first thing is not to expose your main subject correctly, and definitely not to use auto-exposure: you will probably end up with dark areas with noise and banding because they fall outside the sensor’s range.
Instead, expose for the shadows. This means that often you will be deliberately overexposing your main subject (without blowing highlights) – the exposure is then reduced during post-production in your raw converter. The result is loads of detail with minimal noise, and images that will stand up against most high-end dSLRs such as the Canon 5D.
There are downsides to this technique. First, since you have only a limited dynamic range and you’re exposing for the shadows (‘exposing to the left’ or ETTL), you may blow out highlights, such as street lamps. So, you may need to compromise, and expose for those tones a stop or two brighter than the darkest shadows (you can selectively darken the shadows in Photoshop etc. to hide the noise, if necessary). You may even have to ignore the highlights and let them blow out. Secondly, increasing the exposure will also increase the shutter speed, which brings its own problems.
Consider an example: someone standing under a single street lamp at night. This is too awkward for auto-exposure, so you’d probably meter off something that’s lit and reasonably neutral, perhaps their face or the pool of light on the ground. Let’s assume you have to use ISO 2500 to get a shutter speed fast enough to hand hold. At ISO 2500, midtones will be at least 1 stop darker (= ISO 5000) and shadows at least 2 stops under (= ISO 10,000). The M8 at this ISO has less than a stop of leeway below the metered exposure. So, if you expose your subject correctly, you will end up with a photo that has dark areas with excessive noise and banding.
If instead you expose for tones a little above the darkest shadows, for example where the pool of light is fading into darkness, then pull down the exposure during raw conversion, the noise will be significantly reduced. Ideally, you’d expose for the darkest shadows, but this will blow out the lighter tones unacceptably – even exposing for the midtones will probably mean that the bright street light will blow out to some extent, but this can’t be helped. (Blown highlights can be minimised by exporting two files from the image using the raw converter, with the exposure of one reduced to ideal for the subject, and the other with the exposure optimised for the highlights. These images can then be blended in Photoshop. You may also be able to take two shots at different exposures, and combine them later in Photoshop.)
Using the M8 to expose carefully for midtones/shadows at high ISOs is not as quick as using a camera like the Nikon D700 or Canon 5D that has a wider dynamic range at high ISOs and thus does not need such careful control of the exposure. However, used in this way, the M8 will give results that are comparable, or at least acceptable.
that's obvious... but doesn't work in real life !
High isos are often used in critical light, when the shutter speed is already at the limit. Exposing for the shadows means overexposing ; when you're already at max aperture and high isis, it means a slower shutter speed... that you cannot get without blur.
Use a lower-contrast lens for shooting high-ISO.
johannielscom
Snorting silver salts
When I still had my M8, I found at 160ISO it exposed like 200ASA film rated at 160. Likewise with 320ISO, that setting closely resembled 400ASA film rated at 320.
The 'over-exposure' new Leica M8 owners used to complain about actually is a built-in feature: when correcting it, you will retain shadow detail and at the same time reduce noise in the darker parts.
Many film RF shooters consider it good practise to over-expose 1/3 stop from the box speed, the M8 closely mimicks the results.
Brians low-contrast lens tip further reduces noise, which often in fact is 'pixels changing color' in darker areas. Never thought of that, very clever.
Ben Z
Veteran
that's obvious... but doesn't work in real life !
High isos are often used in critical light, when the shutter speed is already at the limit. Exposing for the shadows means overexposing ; when you're already at max aperture and high isis, it means a slower shutter speed... that you cannot get without blur.
That's what came to mind when I read it but I thought maybe I was missing something. If I have to overexpose a stop or two in order to hold down the noise, isn't it tantamount to shooting at a lower ISO to start with?
Last edited:
Share:
-
This site uses cookies to help personalise content, tailor your experience and to keep you logged in if you register.
By continuing to use this site, you are consenting to our use of cookies.