jaapv
RFF Sponsoring Member.
Did you guys notice that Jono put up the fisherman DNG on both LUF and GetDPI forums ?
jonoslack
Member
Thanks Jaap
There will be more as well
Please put your take on any conversions in this thread
Have Fun!
There will be more as well
Please put your take on any conversions in this thread
Have Fun!
seakayaker1
Well-known
Jono, thanks for sharing the file . . . . .
Look forward to playing with any others that you can share.
Look forward to playing with any others that you can share.
robklurfield
eclipse
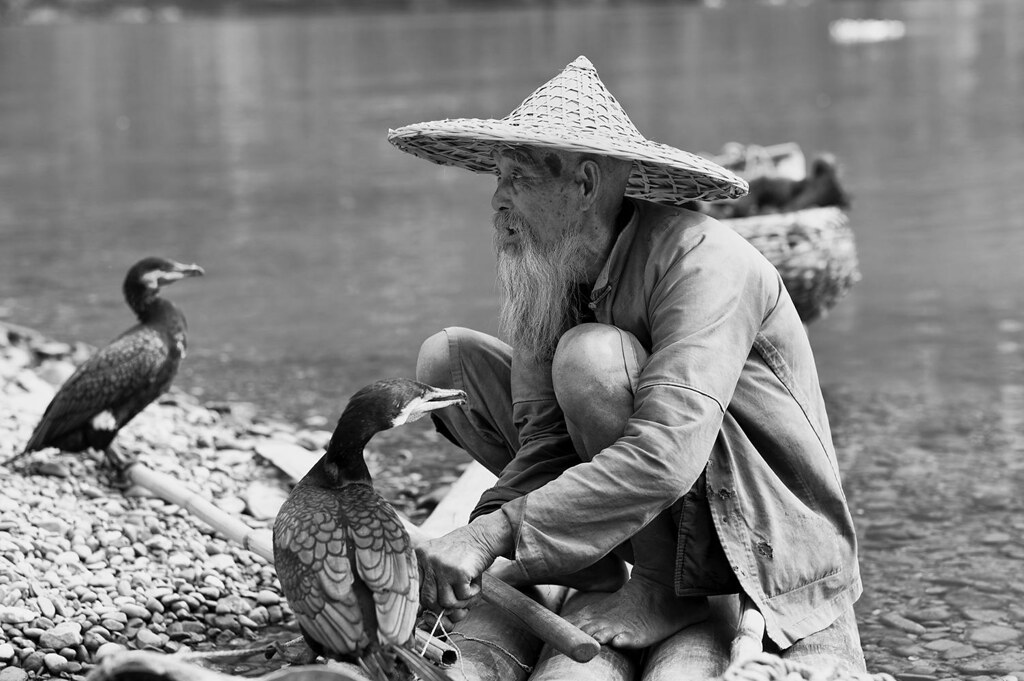
That image is exquisite (the details so sharp that I believe I can see the H1N1 virus getting reading to leap from the birds to the man).
Too bad that money is an object for me. I'll have to make do with an M8 and film for a while yet.
Meanwhile, I'll enjoy the images from you folks who get first delivery or are playing with pre-release cameras.
Too bad that money is an object for me. I'll have to make do with an M8 and film for a while yet.
Meanwhile, I'll enjoy the images from you folks who get first delivery or are playing with pre-release cameras.
Lss
Well-known
Thanks, Jaap, for letting us know, and big thanks to Jono for making the file available.
The level of detail and sharpness is very very good, and there is a ton of shadow detail. I really like what I am seeing. Too bad I can't order the camera. I understand it can be pretty demanding but it would work for a lot of stuff that I currently do and would like to do even more.
The level of detail and sharpness is very very good, and there is a ton of shadow detail. I really like what I am seeing. Too bad I can't order the camera. I understand it can be pretty demanding but it would work for a lot of stuff that I currently do and would like to do even more.
paulfish4570
Veteran
looks almost as good as an x100 file ... ")
gho
Well-known
Thanks for sharing the files! I had a look with RawTherapee and the Gimp. The detail in the files is quite amazing. Here are two versions of the shot, a "flat" one and one with a bit more contrast. Just straight and simple curve adjusments.


Keith
The best camera is one that still works!
So much aliasing in the clothing and the hair.
I am not seeing much difference to the regular M9, apart from the hi noise performance. One bad point is that blown highlight details cannot be recovered at all. It seems like it is best to totally underexpose with the MM and bring it back from the shadows since there is hardly any noise.
Personally I don't see enough benefits over the regular M9, especially because you lose a lot of flexibility in post production even if you take colour out of the equation.
gho
Well-known
100% crop

I don't know, I find the detail on pixel level quite good.
I don't know, I find the detail on pixel level quite good.
Keith
The best camera is one that still works!
When you take your eyes away from the central subject there is a lot of highlight detail missing from this image ... so as said under exposure will be important to retain this. Really, that is no different to any digital camera in my experience!
Usually the colour channels blow out at different levels, and if two are left intact you can reconstruct the missing channel.
Also raw files are often underexposed, but the software bumps the image brightness automatically. If you open your images in raw photo processor you will see what I mean.
What this means with normal colour files is that you can take the exposure value down and recover the highlights.
This does not seem to work with the MM files. The blown out areas remain blown out. Well that seems to be the case from the one DNG file that I have to play with
Overall I am finding it all to limiting.
sojournerphoto
Veteran
Thanks Jono and Jaap.
Interesting.
There is (as expected) less obvious aliasing/artifacting than the M9 - reasonable given there is no CFA to reduce the sampling frequency in each colour band).
The images are much less happy being sharpened than the M9s (which already needed less than 1Ds3 or 5D files) and using high detail settings in ACR/LR is downright ugly. Possibly this is becasue high detail settings use deconvolution approach and may b optimised for CFA sensor cameras (I'm still on LR3 and CS5).
I don't like the blown highlights, but that's not unique to the MM, but I do like the images Jono has brought home. Nice rendering and good to work in ACR.
raytoei@gmail.com
Veteran
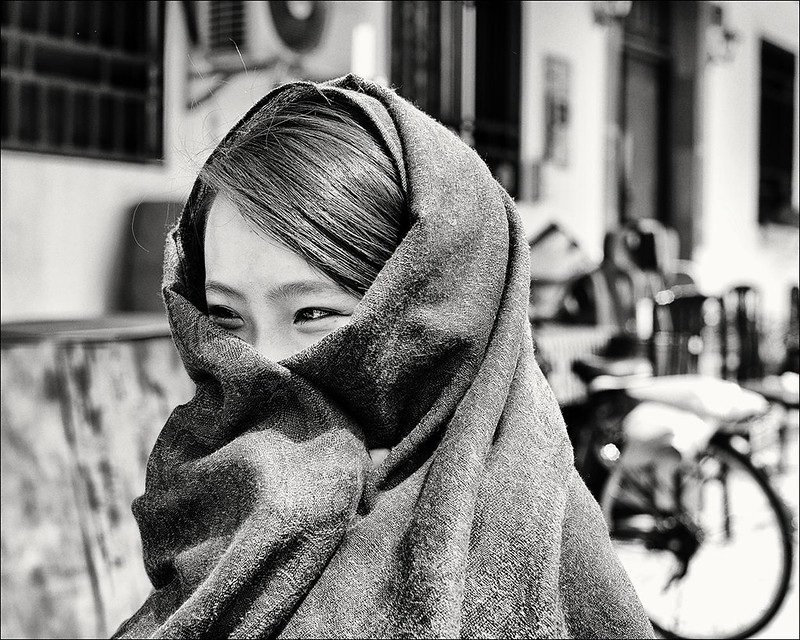
did some sfx yesterday on the 2 sample images...


jaapv
RFF Sponsoring Member.
You are working on only half the story. And the wrong half at that. The detail of the monochrome is in the shadows and midtones. So if you are trying to create you image from the highlights down you are approaching this from the wrong end. You must start off by adapting the default settings of your raw converter and PP software, which are indeed less suited to these files.
Usually the colour channels blow out at different levels, and if two are left intact you can reconstruct the missing channel.
Also raw files are often underexposed, but the software bumps the image brightness automatically. If you open your images in raw photo processor you will see what I mean.
What this means with normal colour files is that you can take the exposure value down and recover the highlights.
This does not seem to work with the MM files. The blown out areas remain blown out. Well that seems to be the case from the one DNG file that I have to play with
Overall I am finding it all to limiting.
seakayaker1
Well-known
You are working on only half the story. And the wrong half at that. The detail of the monochrome is in the shadows and midtones.
Perhaps you have misunderstood me. Because that is what I have been saying. However, if you do blow the highlights usually you can take them back. With the files from the MM this does not seem to be the case.
BobYIL
Well-known
While trying to play with the mentioned files, the followings could be of some value to consider.
As long as the "information” does not exist in the image data in sufficient amounts, then no matter how one tries to play with the tones, it would not be different than sliding the “block of tonalities” along the gradation scale to the right or left.
First the "information” in simple terms: It is not any different than the total range of tonal zones recorded on the film we used to know. In digital its equivalent is the Dynamic Range (DR) expressed in Evs. It’s the capability of a given sensor + processor combination to express the illumination range of a given image in terms of varying tones of gray; gray only! from pure white to deep black; be it a color sensor or a B&W one.
The more the DR means the more the gray tones from white to black at any ISO. The lower ISO means less load for the processor, lower noise floor, more DR; i.e. larger number of gray tones. With the M8 this was 11.3 Evs, the M9 took it to 11.7. The situation with top CMOS sensors today: Some APS-C sizes reached 14 and some FF sizes over 14 Evs..
We have no information about the DR of the M9M… most possibly it is the same as of the M9. (Sensitivity and resolution increase due to lack of CFA has nothing to do with DR.)
Add to these also a known fact with digital that the highlight zone is always “squeezed” compared to the darker end; i.e. the tones between light silver gray and pure white are rather limited in number compared to the same on film whereas with the new sensors of some 14Evs DR there seems to be a number of “tones” to be recovered out of the shadows (I think pro photographers wishing it so with top end cameras; with the D800 for example one can extract 4 stops out of shadows.)
Short: One can not create extra zones of gray through any software unless they exist on the raw data as “information” stated above. This has nothing to do with the raw converter employed. Also I'd suggest to concentrate more on the upper end of the gray scala for more natural looking outcomes.
Just my two cents..
johannielscom
Snorting silver salts
did some sfx yesterday on the 2 sample images...
Best conversion of the Chinese girl in this thread.
My M2, a slow 35mm lens and RolleiRetro 100 will continue to serve me just fine!
ChrisN
Striving
First, my thanks to Jono for making the files available, and to Jaap for bringing this to out attention. I like the idea of the M M, and if I had the resources I'd love to have one. Here's my version of Jono's fisherman.

I've processed this in Lightroom Version 3, my normal editing software. Started with the RAW file, zeroed all values, then auto-tone. Brought the exposure down a little, burned the shoulder a bit darker locally, and brought the highlights down a touch and strengthened the blacks. I usually use a fair bit of clarity slider (mid-tone contrast) but found that any more than a small amount produced a dark halo around the hat and other edges. Played with grain but didn't like it - prefer a clean appearance. Finally added a fair bit of vignetting to darken the corners and edges, the same as I would with a wet print. I'd be very happy if I'd made this capture. I've not played with Leica M9 RAW files before, so can't make any comparisons. Results seem to be at least as good if not better than I'd expect from my Pentax K5 RAW files made with a decent lens.
Conversion to JPEG and display in Firefox always seems to lose a little. I'd like to see this printed from a high-quality file.
Share:
-
This site uses cookies to help personalise content, tailor your experience and to keep you logged in if you register.
By continuing to use this site, you are consenting to our use of cookies.