keytarjunkie
no longer addicted
Well, I figured it was time to start my own thread.
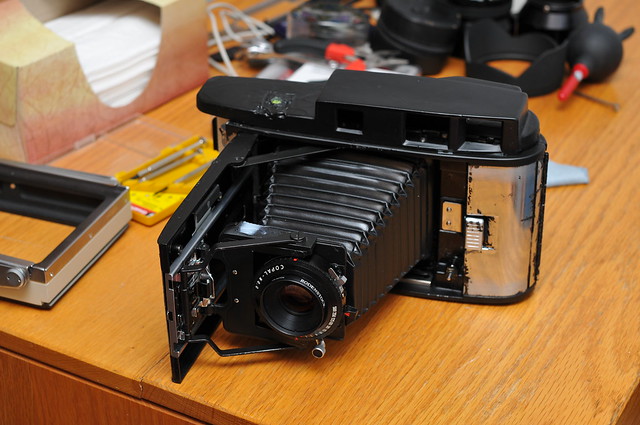
First, a photo of the camera itself:

It folds up nice and neat, a very compact package:


The back of the camera was entirely designed by me (which is why it looks so rough! LOL), the most important part is the grips which hold on the standard double darkslide, but I'll talk about the design in a minute.

There's also a secret storage compartment, I wish I had a light meter or something convenient that fit in here...

Okay. I guess I'll start with the design. This camera has no tilts, shifts, etc. and cannot accept any other back than a standard double darkslide. Some people might think this is crazy. But, then again I don't think a 4x5 rangefinder is for them. In my opinion, the whole idea of a 4x5 with a proprietary viewfinder is to be as convenient as possible. You don't want a system that requires you to use ground glass for every photo. If you did, you'd be shooting on a tripod with a viewing hood and all sorts of crazy stuff. And that's cool, I like shooting 4x5 that way too.
This camera does not belong on a tripod. I think that's the most important part for me. I'm a young photo student (well, not even a photo student) and I still find shooting 4x5 to be a little uncomfortable. I love the quality but I'm not a fan of the time it takes. Don't get me wrong, I love taking time to make the photograph (example), but for certain things it's just not practical at all. I wanted a large format camera that did away with all of the conventional aspects of large format photography, and was simply just a camera. So that's why the back is small enough to only accept double darkslides...it's one of the smallest backs I've seen designed for this type of project. Most people bolt a graflok on there and it's really bulky. I used springs (scraps from the camera back) and attached them to L-shaped aluminum pieces, and attached those onto the back of the camera. They stick out a bit, but it's the best I could come up with.
I'd also like to talk about the process of building the camera.
I started with your typical Polaroid 160 camera:

And a Polaroid 900:

The 900 has a wonderful rangefinder (not by Leica standards, but just in the sense that the rangefinder and viewfinder are actually in one window), but the body has an electric lens and is a bit crappy. The 160 on the other hand, as a crappy viewfinder and a really nice body. The 110A and 110B are best, but hey this is what I had. I also had a few lenses in mind, but the only simple way to do this is to stick with the stock 127mm Rodenstock so that you don't have to modify the cam to fit with a different focal length. So I stuck with the Rodenstock.
I took apart the 900's rangefinder:

And started to scrape away at the 160's sticky leather:

And gutted the inside of the 160:

First, a photo of the camera itself:
It folds up nice and neat, a very compact package:
The back of the camera was entirely designed by me (which is why it looks so rough! LOL), the most important part is the grips which hold on the standard double darkslide, but I'll talk about the design in a minute.
There's also a secret storage compartment, I wish I had a light meter or something convenient that fit in here...
Okay. I guess I'll start with the design. This camera has no tilts, shifts, etc. and cannot accept any other back than a standard double darkslide. Some people might think this is crazy. But, then again I don't think a 4x5 rangefinder is for them. In my opinion, the whole idea of a 4x5 with a proprietary viewfinder is to be as convenient as possible. You don't want a system that requires you to use ground glass for every photo. If you did, you'd be shooting on a tripod with a viewing hood and all sorts of crazy stuff. And that's cool, I like shooting 4x5 that way too.
This camera does not belong on a tripod. I think that's the most important part for me. I'm a young photo student (well, not even a photo student) and I still find shooting 4x5 to be a little uncomfortable. I love the quality but I'm not a fan of the time it takes. Don't get me wrong, I love taking time to make the photograph (example), but for certain things it's just not practical at all. I wanted a large format camera that did away with all of the conventional aspects of large format photography, and was simply just a camera. So that's why the back is small enough to only accept double darkslides...it's one of the smallest backs I've seen designed for this type of project. Most people bolt a graflok on there and it's really bulky. I used springs (scraps from the camera back) and attached them to L-shaped aluminum pieces, and attached those onto the back of the camera. They stick out a bit, but it's the best I could come up with.
I'd also like to talk about the process of building the camera.
I started with your typical Polaroid 160 camera:
And a Polaroid 900:
The 900 has a wonderful rangefinder (not by Leica standards, but just in the sense that the rangefinder and viewfinder are actually in one window), but the body has an electric lens and is a bit crappy. The 160 on the other hand, as a crappy viewfinder and a really nice body. The 110A and 110B are best, but hey this is what I had. I also had a few lenses in mind, but the only simple way to do this is to stick with the stock 127mm Rodenstock so that you don't have to modify the cam to fit with a different focal length. So I stuck with the Rodenstock.
I took apart the 900's rangefinder:
And started to scrape away at the 160's sticky leather:
And gutted the inside of the 160:
keytarjunkie
no longer addicted
The film back is made out of some obscure olympus 4x5 microscope adaptor, a $20 ebay score:

Once all the leather was off, I cut down the back of the camera and started to get a sense of where I wanted the film plane to be:

I built the front standard (this was before I found the Rodenstock):

Aaand found some spraypaint
Cut down the 4x5 back and measured it to be where I wanted it:

Applied some freakin strong glue! And attached the new leather.

Designed the clamps:

Made a few test shots:

And then basically decided I was ready to go! Here are some of the images I've taken with it over the summer. Unfortunately I'm still waiting on my ground glass screen which I cracked so the rangefinder isn't calibrated, but I just scale focused.


The Rodenstock has enough sharpness to be acceptable and yet is so dreamy wide open at short distances! I can't wait to calibrate the rangefinder and use this on people. It will be so much fun.
I probably spent a grand total of $100 on this project. And many, MANY hours. But it was worth it. I'm not a very technical person, but I set my mind to it! Hope you enjoyed the photos.
Once all the leather was off, I cut down the back of the camera and started to get a sense of where I wanted the film plane to be:
I built the front standard (this was before I found the Rodenstock):
Aaand found some spraypaint
Cut down the 4x5 back and measured it to be where I wanted it:
Applied some freakin strong glue! And attached the new leather.
Designed the clamps:
Made a few test shots:
And then basically decided I was ready to go! Here are some of the images I've taken with it over the summer. Unfortunately I'm still waiting on my ground glass screen which I cracked so the rangefinder isn't calibrated, but I just scale focused.
The Rodenstock has enough sharpness to be acceptable and yet is so dreamy wide open at short distances! I can't wait to calibrate the rangefinder and use this on people. It will be so much fun.
I probably spent a grand total of $100 on this project. And many, MANY hours. But it was worth it. I'm not a very technical person, but I set my mind to it! Hope you enjoyed the photos.
planetjoe
Just some guy, you know?
KJ:
That's a sweet little conversion, and you used the right cameras for it. The door-mounted knob of the 160 is the key to ease of use, IMO, and it's the only 100-series that has the right RF post for direct swap.
I think the secret to doing one of these is finding a back donor like you did; I'd never seen the Oly adapter before! Was setting the film place/infinity a difficult task? I suppose you set it with ground glass focus?
Right now I'm seriously thinking about simply fabbing my own graflok plate (groove, traps, etc.) because eBay has become a $#@!show when it comes to "$$$*** P0laroid C0nversi0n! ***$$$" parts.
Nice images, too, by the way.
Cheers,
--joe.
keytarjunkie
no longer addicted
KJ:
That's a sweet little conversion, and you used the right cameras for it. The door-mounted knob of the 160 is the key to ease of use, IMO, and it's the only 100-series that has the right RF post for direct swap.
I think the secret to doing one of these is finding a back donor like you did; I'd never seen the Oly adapter before! Was setting the film place/infinity a difficult task? I suppose you set it with ground glass focus?
Right now I'm seriously thinking about simply fabbing my own graflok plate (groove, traps, etc.) because eBay has become a $#@!show when it comes to "$$$*** P0laroid C0nversi0n! ***$$$" parts.
Nice images, too, by the way.
Cheers,
--joe.
The Olympus back was really my lucky day. Without it, I don't know if I could have really done this project! I don't know how common they are but I haven't seen another one starting at 0.99. There is one on ebay right now with a viewing hood thingie for $125 or best offer. I think you could find another one for cheap eventually, and I'm sure olympus wasn't the only one to make 4x5 microscope adaptors.
In order to properly set up the film plane, I figured out about how far the flange focal distance was, then figured out where the film had to go in order to not really be vignetted by the polaroid's smaller bellows, and then once I attached the back I readjusted the front standard to be a bit farther back (with ground glass of course). I would have liked to have the front standard and the back of the camera farther forward (so that the back doesn't stick out as far), but the closer it gets to the bellows the more area you lose around the edges of the film. I don't think I'm losing any right now, which is how I want it!
pinkarmy
Well-known
always want one like this.
i wish i am as handy.
i wish i am as handy.
Harry S.
Well-known
My gosh! Im very impressed. A 4x5 folder RF would be a camera Id buy in a heartbeat if someone was crazy enough to mass produce that!
Atom
Molecular.Atom
Love this! Makes my old speed graphic a honkin' beast in comparison! Great work on making a wonderful camera. Awesome potential, looking forward to seeing more images. Any chance a Polaroid back will fit in there? I forget if they are thicker than a standard film back.
MikeL
Go Fish
Nice work Keytarjunkie! I have a Razzle 900, and I've been thinking about converting another to have some tilt and shift. I like the back clips. Might be easy to modify/adjust to handle a Grafmatic?
As for this:
You might check out some ideas mentioned here:
http://www.ebaumsworld.com/video/watch/989437/
As for this:
There's also a secret storage compartment, I wish I had a light meter or something convenient that fit in here...
You might check out some ideas mentioned here:
http://www.ebaumsworld.com/video/watch/989437/
Last edited:
planetjoe
Just some guy, you know?
... I figured out about how far the flange focal distance was, then figured out where the film had to go in order to not really be vignetted by the polaroid's smaller bellows, and then once I attached the back I readjusted the front standard to be a bit farther back ...
Awesome, awesome. Yes, more photos, please!
There are folks (Dean Jones/Razzle is one) who have made a handy living making really very nice pieces of kit using these techniques. Their gear is very expensive, and generally you get what you pay for (well, sometimes; Dean's stuff is very nice, and may be an exception).
The irony, though, is that the conversion is actually quite simple in practice, and doesn't have to look great in order to work well. Your example here, though, shows a lot of care. Nice leather work, etc.!
Summary: anyone who wants to do this probably can. And should.
Cheers,
--joe.
ps. I realize that I'm stoking the fires of a price rush on Polaroid gear, which I regret as an unapologetic collector of said gear. Oh, well.
Jamie123
Veteran
Looks great! I have a 110A on the way which I want to do a packfilm conversion on. Unfortunately I think I overpaid on it as the lens doesn't seem to be in the best condition. I might have to get another one further down the line and replace the lens.
keytarjunkie
no longer addicted
Nice work Keytarjunkie! I have a Razzle 900, and I've been thinking about converting another to have some tilt and shift. I like the back clips. Might be easy to modify/adjust to handle a Grafmatic?
As for this:
You might check out some ideas mentioned here:
http://www.ebaumsworld.com/video/watch/989437/
HAHAHAH! Thanks for the ideas.
If I had a Grafmatic, it would be perfect! I could definitely modify or create a different attachment piece that accomodated for the size of the Grafmatic. Just gotta be able to afford one first...
RFH
rfhansen.wordpress.com
Good work and a very nice result.
CK Dexter Haven
Well-known
My gosh! Im very impressed. A 4x5 folder RF would be a camera Id buy in a heartbeat if someone was crazy enough to mass produce that!
Me too.
Every few years i convince myself i'm going to get a Razzle, and then the idea fizzles away.
Well done, though, friend. I wish i had the ingenuity and skill to make one myself.
keytarjunkie
no longer addicted
Thanks guys. This camera is so fun, I regrettably haven't had a lot of time to use it, but I'm going out today with three sheets of film and two 4x5's so hopefully at least one sheet will be with the rangefinder

Matus
Well-known
You did a great job. Do I see it correctly that you shortened the body? The Rodenstock lens - is it the Geronar 150/6.3 ? Looking forward to see more results
citizen99
Well-known
Awesome and inspirational!
keytarjunkie
no longer addicted
Added a cable release today!

Rotarysmp
Established
Are you still usng this camera? What has been your experience after a couple of years? Anything you would do differently?
B-9
Devin Bro
Bump, any updates for us?
I've been collecting pieces for a similiar conversion for the last few years.
So far I've got a 900 and CB103 and a 150 Geronar, just need to find time to put it all together.
I see you had planned to use the Rodenstock, are any of the photos above with this lens?
I chose the Geronar for its super compact front cell, multi coatings, and typically they come mounted in the latest version of Copal 0 shutter, which is a gem in its own right easily worth the price of the lens mounted inside of it.
Its funny you can knab great lenses like the Geronar for only a few hundred (I paid 200$) while the price of a Pola 110a is slowly reaching 150$ unconverted. My advice to any potential DIY'er, grab a much more affordable model 150 or 900 and find a nice modern lens with a new'ish shutter to mate to your body. Personally I've had enough fun dismantling graphex and Seiko shutters to last me a lifetime, and typically if your a bargain hunter, all the older graphex, Seiko, Copal, and Ilex shutters will need some form of service/repair.
Hogarth Ferguson
Well-known
Say I would like to use a different lens, a 135/150 or even 100, how does this fellow, myself, go about adjusting the rangefinder for that lens?
Share:
-
This site uses cookies to help personalise content, tailor your experience and to keep you logged in if you register.
By continuing to use this site, you are consenting to our use of cookies.