Harry Caul
Well-known
My other main hobby besides photography is collecting vintage film posters. And while I collect posters from nearly every country and time period, my main focus as of late is Easter European posters from the Soviet-era. Some of you may be familiar with these posters -- they can be quite abstract and IMHO are more art than advertisement. The Polish posters get the most attention, but I also have many Czech, Hungarian, Romanian, East German and Russian posters. I also have some Cuban posters which share many of the unique communist production and design characteristics. Aside from the Polish and Czech posters, most are not documented on the internet at all so I'm thinking of starting a reference website dedicated to these posters as whole. My posters are not for sale, but I'm considering selling some limited edition reproductions (for modest prices) to help recoup the costs of setting up the reference site. I already have a fairly nice copy setup with a pair of SB128 flashes with remote triggers and DIY vacuum board to hold the posters perfectly flat. I'm pretty happy with the results from my 16mp Olympus EM5, however, when extreme pixel peeping there is still quite a bit of noise at the base 200 ISO. This never bothered me for regular photography, but if I'm going to go to the trouble to document all these posters (750+ and growing) I'd like to do it right the first time -- especially if the images might be used to make full size (~23x33") reproductions at some point.
So with that background info out of the way, what setup would you recommend? I need a good combination of sharpness across the whole frame, color accuracy, and resolution. Two options that quickly come to mind:
1. Sony A7r + 55/1.8 Zeiss
Pro = Sensor -- 36mp, no AA filter, basically state of the art bayer.
Pro = Lens -- The Zeiss lens is also getting rave reviews for sharpness (especially in the corners at smaller apertures).
Pro = Flexibility -- I could use other cheap/sharp legacy lenses if needed and I could easily see this being used for my personal photography as well.
Con = EXPENSIVE at approximately $3300.
2. Sigma DP2m or DP3m
Pro = Sensor -- While lower mp, I read many reviews where the print quality holds it's own against the D800/e (which is basically the same sensor as the A7r).
Pro = Lens -- Sharp at higher apertures. I'd likely be shooting at 5.6 to maximize sharpness and minimize diffraction.
Pro = CHEAP -- I mean like not even comparable cheap at only $600-700, probably less if I wait a few weeks for the new models to come out.
Con = Flexibility -- Lack of high ISO, fixed lens, etc... not cons for my documentation needs, but harder to integrate with my personal photography.
Con = Post-processing workflow -- I mainly use LR/PS now. I currently adjust rotation (each poster gets sucked to the vacuum board at random), white point, black point, exposure, sharpening, noise reduction, color temp, and sometimes skew (my only need for PS). The Sigma workflow is still a big unknown to me. Could I just export TIFFs and continue to use LR/PS? Or does the Sigma software allow batch processing (without crashing )?
)?
Other considerations:
I would welcome any advice across all aspects of my project. I'm normally a candid/available-light shooter so this is about as far from my comfort zone as you can get. It's the first time I'll ever be documenting anything with such precision (hopefully) -- and that includes camera/lens selection, lighting, color/monitor/printing calibration, and post-processing for accuracy. It's all brand new to me so any tips/links you can share would be hugely helpful. I was planning to use something like Alien Skin Blow Up 3 to create the final files for printing, but if I should be using other software as well please let me know.
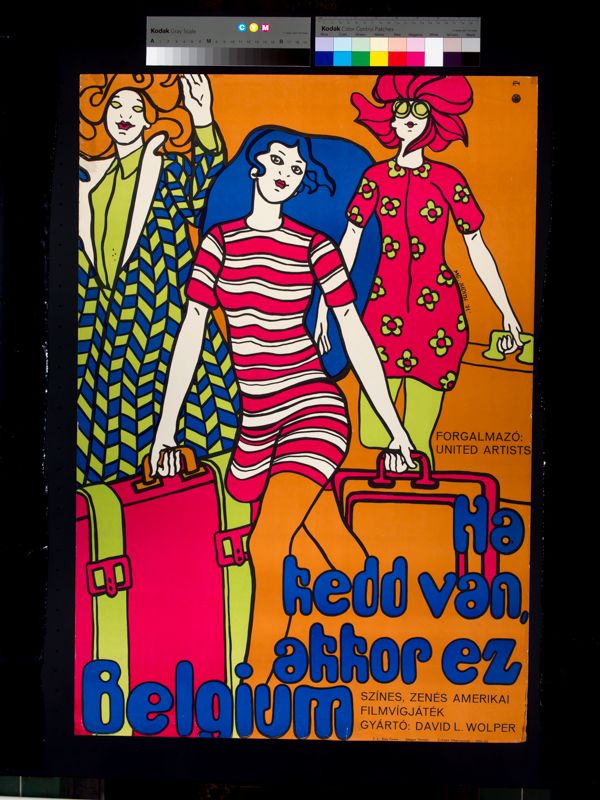
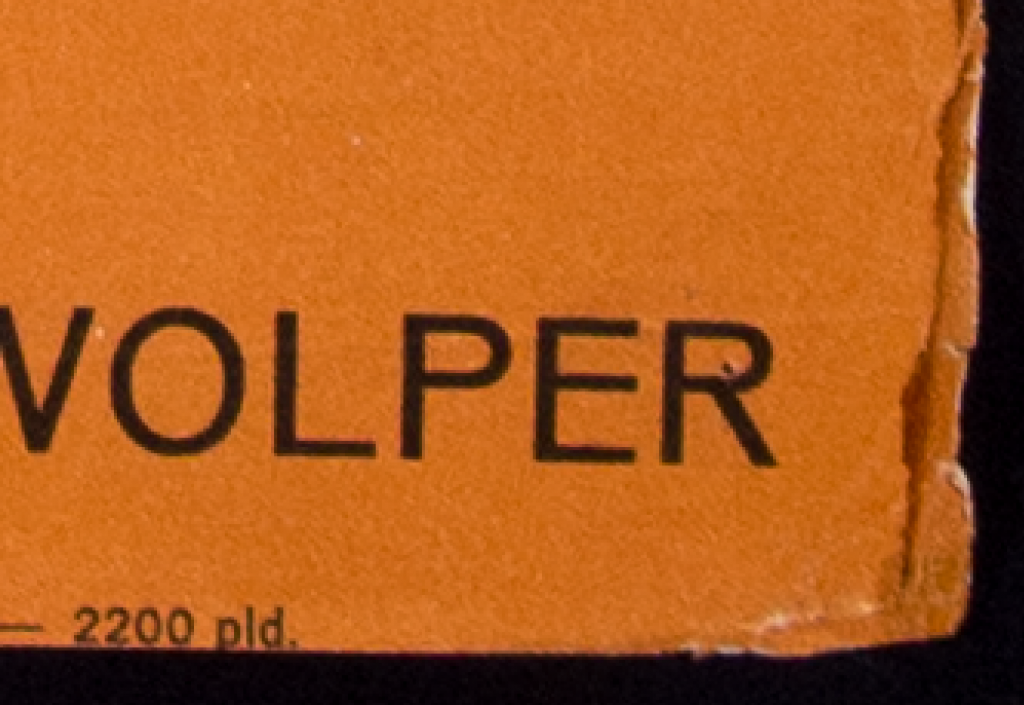
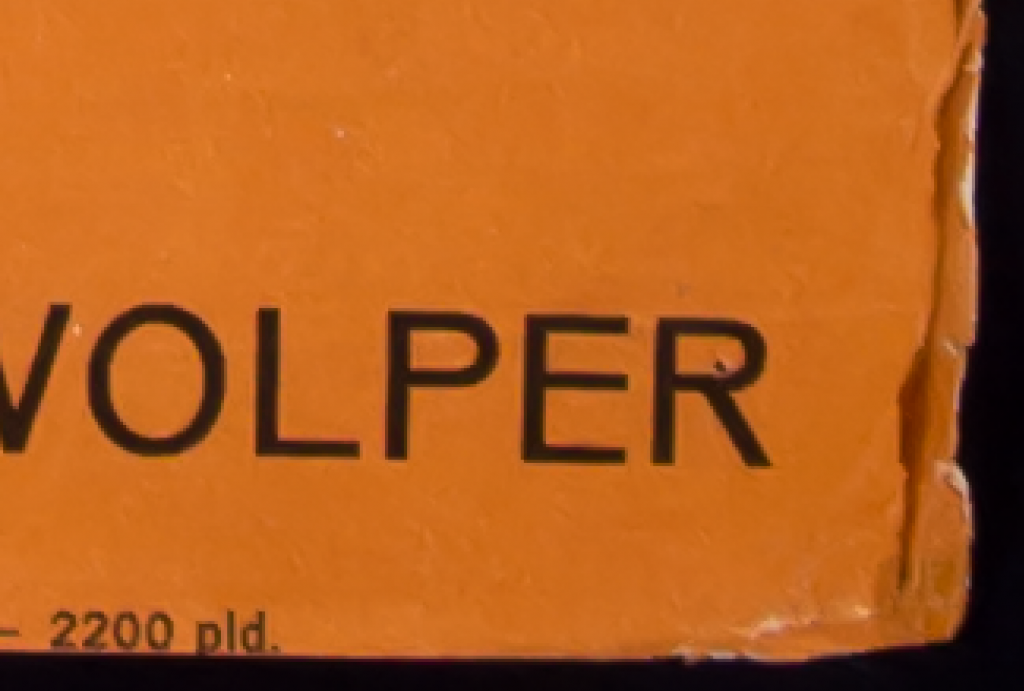
I'm including an example of the current results I'm getting with my OMD. To my knowledge, images of this Hungarian pop-art design for "If it's Tuesday, this must be Belgium" exist nowhere else on the internet. I'm including a full shot as well as 4:1 close-up comparisons of 0 and 79 luminance noise reduction. I really need to crank the slider with the OMD to get back to the smooth/even colors of poster -- which is what prompted this question. This was one of my earlier attempts so the lighting has been tweaked a bit since then. I currently use LR tweak the local exposure on an all matte black image test image and batch apply to the whole set. Another option would be to use the money savings of the DPXm to move to a 4 flash setup (at corners instead of sides) for more even lighting. Anyway, the gear/setup permutations still seem endless at this point and my head is spinning...
Thank you for your input!
If it's Tuesday, this must be Belgium (1969)
Hungarian poster from 1971
0 Luminance Noise Reduction in LR
79 Luminance Noise Reduction in LR
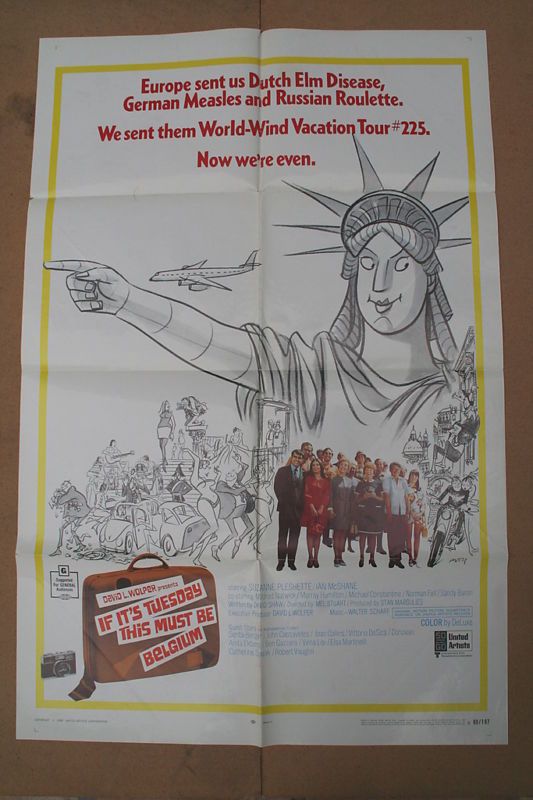
And just for fun, here is a comparison image of the US poster if it helps to understand the attraction to these unique communist-era poster designs. It's not even a fair comparison IMO. This is not a very popular movie -- which is why I'm using it as an example here -- but some of my posters are for very well known movies and I think the designs will attract quite a bit of attention once documented.
So with that background info out of the way, what setup would you recommend? I need a good combination of sharpness across the whole frame, color accuracy, and resolution. Two options that quickly come to mind:
1. Sony A7r + 55/1.8 Zeiss
Pro = Sensor -- 36mp, no AA filter, basically state of the art bayer.
Pro = Lens -- The Zeiss lens is also getting rave reviews for sharpness (especially in the corners at smaller apertures).
Pro = Flexibility -- I could use other cheap/sharp legacy lenses if needed and I could easily see this being used for my personal photography as well.
Con = EXPENSIVE at approximately $3300.
2. Sigma DP2m or DP3m
Pro = Sensor -- While lower mp, I read many reviews where the print quality holds it's own against the D800/e (which is basically the same sensor as the A7r).
Pro = Lens -- Sharp at higher apertures. I'd likely be shooting at 5.6 to maximize sharpness and minimize diffraction.
Pro = CHEAP -- I mean like not even comparable cheap at only $600-700, probably less if I wait a few weeks for the new models to come out.
Con = Flexibility -- Lack of high ISO, fixed lens, etc... not cons for my documentation needs, but harder to integrate with my personal photography.
Con = Post-processing workflow -- I mainly use LR/PS now. I currently adjust rotation (each poster gets sucked to the vacuum board at random), white point, black point, exposure, sharpening, noise reduction, color temp, and sometimes skew (my only need for PS). The Sigma workflow is still a big unknown to me. Could I just export TIFFs and continue to use LR/PS? Or does the Sigma software allow batch processing (without crashing
)? Other considerations:
- How the new DPs will compare to the Merrils/Sony sensor
- If there are better/cheaper legacy lens options for the Sony
- If there is another combination I should be looking at altogether
- Given that I could use the Sony for my personal shooting as well, I could probably justify the cost. However, there is no way I could justify moving up to digital MF even those results would be superior for this type of documentation work.
- Will none of these options will even result in much of a difference to my OMD at poster-sized print resolutions?
I would welcome any advice across all aspects of my project. I'm normally a candid/available-light shooter so this is about as far from my comfort zone as you can get. It's the first time I'll ever be documenting anything with such precision (hopefully) -- and that includes camera/lens selection, lighting, color/monitor/printing calibration, and post-processing for accuracy. It's all brand new to me so any tips/links you can share would be hugely helpful. I was planning to use something like Alien Skin Blow Up 3 to create the final files for printing, but if I should be using other software as well please let me know.
I'm including an example of the current results I'm getting with my OMD. To my knowledge, images of this Hungarian pop-art design for "If it's Tuesday, this must be Belgium" exist nowhere else on the internet. I'm including a full shot as well as 4:1 close-up comparisons of 0 and 79 luminance noise reduction. I really need to crank the slider with the OMD to get back to the smooth/even colors of poster -- which is what prompted this question. This was one of my earlier attempts so the lighting has been tweaked a bit since then. I currently use LR tweak the local exposure on an all matte black image test image and batch apply to the whole set. Another option would be to use the money savings of the DPXm to move to a 4 flash setup (at corners instead of sides) for more even lighting. Anyway, the gear/setup permutations still seem endless at this point and my head is spinning...
Thank you for your input!
If it's Tuesday, this must be Belgium (1969)
Hungarian poster from 1971
0 Luminance Noise Reduction in LR
79 Luminance Noise Reduction in LR
And just for fun, here is a comparison image of the US poster if it helps to understand the attraction to these unique communist-era poster designs. It's not even a fair comparison IMO. This is not a very popular movie -- which is why I'm using it as an example here -- but some of my posters are for very well known movies and I think the designs will attract quite a bit of attention once documented.
Roger Hicks
Veteran
What about copyright?
Cheers,
R.
Cheers,
R.
Harry Caul
Well-known
What about copyright?
Cheers,
R.
To be clear, the main intention of my post is to figure out the best way to properly document this unique period in graphic design. Between the website, and photograph setup alone I will be putting up thousands in my own money to share the knowledge and posters I've collected over the last decade. That doesn't even include the 10s of thousands I've spent on posters. It is going to be a huge undertaking and I want to do it correctly.
That said, it's a really good question and from all my research appears to be a grey area. Collecting posters in general is also somewhat of a grey area as it deals with copyright, first-sale, and fair-use laws. For the most part studios don't care about collectors (but some have had eBay auctions pulled for modern posters still in theaters or DVD release). As for poster reproductions, Moviegoods is probably the largest of many companies that take images from the internet and prints them out at poster sizes (with terrible, blurry results). They were sued by Sony a while back and they took down most of the modern repros, but classic films from their archives are still available. However, the studios own the copyrights to those designs. In the case of Eastern European posters, the studios didn't have any involvement in the poster production and design. And the distribution houses that commissioned and printed these posters are long since defunct (except for the Cuban communist-run film distro company which is still going strong -- and prints their own repros). I imagine the designs were never copyrighted as well.
As far as printing reproductions, that was a suggestion from a friend as way to recoup some of my costs. Given all the classic posters that are for sale I hadn't really given as much thought to the legality of it all. I know some reprints are licensed, but the vast majority are not. And in my case, how and from which companies would I even get licenses? I'll need to give this aspect more thought as I definitely don't want to distract from my main goal -- to share these great posters. If anyone has thoughts on that aspect I would appreciate hearing them as well. In the mean time if you want to edit my title to remove "for reproduction" that might help keep the thread focused on the technical complexities of accurately photographing 2D objects. If you would like me to remove the whole thread I of course understand as well.
mfogiel
Veteran
On the technical aspect, I would just bring your attention to the lighting - you need to set the strobes quite far away from the posters, at 45degrees - if the distance from the camera to the poster is 2 meters, each lamp needs to be about 4 meters away, else you will get uneven lighting effect.
On the rig: I am not familiar with digital cameras, but from what I hear, wide angle lenses can create problems for light fall off and colour casts, etc, so it should make more sense to get a good quality 50mm macro lens. When you stop it down to f 5.6 they should all be good enough - personally I can recommend the Makro Planar 50/2, but there are also some good Nikkors around, that are much cheaper.
As to copyright on such old stuff, I would not know, if you want, I can investigate on the Polish internet.
nongfuspring
Well-known
Hi Harry, I'm an artist and I often have to document my work for publications/web, plus I often do book illustration work that I "scan" with a camera. I use an X-E1 with 50mm C/Y Zeiss 50mm 1.4, a tripod and usually at least two lights with some DIY silk diffusers. In my experience the most important thing to nail is evenness of the lighting, the camera and even the lens isn't nearly as important as really decent lighting, which can be quite challenging, especially with large or uneven surfaces.
To tell you the truth, I'd say you'd be better served with a decent scanner than a new camera. I know of a few people who take the lids off scanners and place them face down onto the image, take multiple scans and stitch in PS. It's not as fun as a new camera but you'll get far better results.
To tell you the truth, I'd say you'd be better served with a decent scanner than a new camera. I know of a few people who take the lids off scanners and place them face down onto the image, take multiple scans and stitch in PS. It's not as fun as a new camera but you'll get far better results.
kxl
Social Documentary
I would suggest a "flat field" lens, which would imply a macro or even better, IMHO, an enlarger lens, specifically the El Nikkor 55/2.8.
If you go with the El NIkkor (M39 mount - 39mm x 1m pitch) you will obviously need to mount it onto a focusing helicoid to enable focusing, which then mounts onto your body.
I actually own such a setup - an El Nikkor 55/2.8 with an M39 to M42 adapter ring, mounted to an M42 to NEX adapter (focusing helicoid), which I use with my NEX6. It's sharp and compact, and perfect for flat field needs.
Harry Caul
Well-known
On the technical aspect, I would just bring your attention to the lighting - you need to set the strobes quite far away from the posters, at 45degrees - if the distance from the camera to the poster is 2 meters, each lamp needs to be about 4 meters away, else you will get uneven lighting effect.
Yes, I'm running into that problem due to my room size. I'm getting slight hotspots at the center/sides as my light isn't diffuse enough. At the suggestion of pro friend I'm now pointing the flashes away from the art and bouncing them off big pieces of foam core. That has helped, but it's still not perfect. My future options are to:
- Move to 4 flashes in softboxes, positioned in the corners.
- Find a different space -- although that involves setting up from scratch and breaking everything down on the days I photograph. It also means transporting A LOT of fragile and in some cases valuable posters. I'd really like to avoid that if possible.
On the rig: I am not familiar with digital cameras, but from what I hear, wide angle lenses can create problems for light fall off and colour casts, etc, so it should make more sense to get a good quality 50mm macro lens. When you stop it down to f 5.6 they should all be good enough - personally I can recommend the Makro Planar 50/2, but there are also some good Nikkors around, that are much cheaper.
Yes, I'm definitely avoiding wides for that reason. I'm currently shooting with my Pana-Leica 25mm (50mm equivalent FOV on 35). I researched all my lenses and that has the highest sharpness when stopped down. It's not a macro, but it's pretty darn sharp in my experience so far. Again, due to room limitations I can't do longer than ~75mm equivalent FOV -- which is too bad as I have a Tokina 90mm 2.5 macro. From my understanding, that is one of the sharpest lenses ever tested. That acts like a 180mm on my OMD, but it could be possibility (if I end up changing rooms) if I got the Sony. I was definitely thinking of something like the Sony A7r over a D800e as it opens the possibility of adapting lenses from nearly any manufacturer. Anyway, for now I'm just planning on using a 50-75mm equivalent.
As to copyright on such old stuff, I would not know, if you want, I can investigate on the Polish internet.
Thanks for the offer. If I go that route I might ping you. The artists are pretty well documented for Polish posters so that is where I would start investigating. However, most of the Hungarian, Romanian, and especially East German artists are completely unknown even by the most die-hard collectors.
Harry Caul
Well-known
In my experience the most important thing to nail is evenness of the lighting, the camera and even the lens isn't nearly as important as really decent lighting, which can be quite challenging, especially with large or uneven surfaces.
Yes, I've read that as long as you nail the lighting, some people even use point and shoots for documentation with great results. I may need to bite the bullet and move to a bigger space. A print-maker friend has a large studio and would let me setup there. Again, it's the hassle of moving so many posters that has me dragging my feet.
To tell you the truth, I'd say you'd be better served with a decent scanner than a new camera. I know of a few people who take the lids off scanners and place them face down onto the image, take multiple scans and stitch in PS. It's not as fun as a new camera but you'll get far better results.
Ugh. I'm already dreading having to photograph 750+ posters -- I shudder think of waiting through 6-10 high res scans for each one! And then stitching too
I know quality would probably improve (and lighting), but I'm not sure I'm ready for that hassle. I have 2 kids under 4 and already very little free time -- my wife is suspect of this project to begin with! I guess another pro of a scanner is that I wouldn't have to run a shop vac for several hours at a time after the kids are in bed Harry Caul
Well-known
I would suggest a "flat field" lens, which would imply a macro or even better, IMHO, an enlarger lens, specifically the El Nikkor 55/2.8.
If you go with the El NIkkor (M39 mount - 39mm x 1m pitch) you will obviously need to mount it onto a focusing helicoid to enable focusing, which then mounts onto your body.
I actually own such a setup - an El Nikkor 55/2.8 with an M39 to M42 adapter ring, mounted to an M42 to NEX adapter (focusing helicoid), which I use with my NEX6. It's sharp and compact, and perfect for flat field needs.
Hmmm... here is an interesting review of that lens. It says there are better options for corner performance, which is very important to me. But that might be only in comparison to other enlarger lenses -- it's probably better than what I'm using now. Still, while sharpness may improve I'm thinking sensor noise is my main limitation at this point (and lighting of course).
http://coinimaging.com/nikon_el50-28n.html
Dwig
Well-known
... if the distance from the camera to the poster is 2 meters, each lamp needs to be about 4 meters away, else you will get uneven lighting effect...
Not quite correct. The distance from the camera to the poster is not part of the equation. What matters is the width of the poster relative to the distance to the lamp. In general when using 2 lamps, you need to place the lamps so that the lamps are at least 3x the distance from the poster (measured to the near side of the poster) than the longest dimension of the poster. This is, of course, an approximation, but it serves as a starting point. when using 4, or more, lights the lighting arrangement can be such that shorter distances work.
The 45 degrees is generally correct, but only when dealing with longer than "normal" (FL=sensor diagonal) camera lenses. It should also be measured from the plane of the artwork to the part of the light/diffuser that is nearest to the camera, not to the center of the light.
With creased or highly textured surfaces it is often better to use a rather long FL so that you can place the lamps at a higher angle, avoiding the shadows in the crease or texture.
Another thing that can help is to use cross polarization. This requires that you put polarizers on the lights and one on the camera. The one on the camera is orientated 90 degrees to those on the lights. This can be very effective to eliminated the micro-reflections that occur on slightly textured glossy surfaces.
Back in the previous millennium I did a good bit of copywork with both my 4x5 and my 35mm Nikons. With the Nikons, I used a 105 Micor-Nikkor whenever possible, falling back to a 55mm Micro when space required. The little that I did with 4x5 was generally done with a Vivitar VHE 150 f/5.6 enlarging lens, which was actually a Schneider Componon-S with single layer coating instead of MC and rebranded as Vivitar. I lacked a longer lens of that caliber.
brusby
Well-known
Good tips. Ditto the suggestion regarding polarizing filters. That's how we did it.
redisburning
Well-known
flattest field at a good price = Leica R 60 Macro-Elmarit R
put one on a Sony A7r and youll save a few hundred over the 55/1.8 FE which while being a fantastic lens is not ideal for your setup I think. you want precise manual focus and a very flat field = good macro lens.
also the sigma is a good camera but the colors aren't quite right and I think for your project you want the camera with the best color filter array (ie sony).
IanBiggar
Member
Art Repro
Art Repro
When I was photographing paintings for repro, the standard way was either two lights or four for even lighting - sometimes six! - but with polarizing material over the lights (make sure you get it oriented the correct way) and a polarizing filter over the lens - this will knock out all the reflections and give you the most saturation. Occasionally I would have to pop the flashes more than once to get enough light for the Fstop I needed - so also a room that you could darken. A copy stand is a definite help if tall enough.
Hope this helps
Ian
P.S. Macro lens preferable for flat field benefit.
nongfuspring
Well-known
Don't bother with a camera, get something like this: http://www.amazon.com/HP-ScanJet-46...m_sbs_e_8?ie=UTF8&refRID=0V75D8R4DPP8KSP2G034
Transparent "lid/bed" so you can see exactly what is in the scanning area, place over poster, stitch afterwards. You'll get far better resolution than with any camera, and won't have to worry about lighting, lens falloff, distortion etc.
Transparent "lid/bed" so you can see exactly what is in the scanning area, place over poster, stitch afterwards. You'll get far better resolution than with any camera, and won't have to worry about lighting, lens falloff, distortion etc.
nongfuspring
Well-known
Yes, I've read that as long as you nail the lighting, some people even use point and shoots for documentation with great results. I may need to bite the bullet and move to a bigger space. A print-maker friend has a large studio and would let me setup there. Again, it's the hassle of moving so many posters that has me dragging my feet.
Ugh. I'm already dreading having to photograph 750+ posters -- I shudder think of waiting through 6-10 high res scans for each one! And then stitching too
Oh, sorry I didn't read your last post. You can set up a workflow in photoshop with the auto stitch tool which is quick, it's also possible to scan at lower resolution at a faster speed. With even a cheap modern scanner you're looking at 3 or 4 seconds per A4 area size at 1200 DPI (which is double what you'd need for printing). I'd wager you'd spend more time adjusting your lighting rig in between posters than it'd take for you to scan an A0 poster in parts.
Harry Caul
Well-known
Oh, sorry I didn't read your last post. You can set up a workflow in photoshop with the auto stitch tool which is quick, it's also possible to scan at lower resolution at a faster speed. With even a cheap modern scanner you're looking at 3 or 4 seconds per A4 area size at 1200 DPI (which is double what you'd need for printing). I'd wager you'd spend more time adjusting your lighting rig in between posters than it'd take for you to scan an A0 poster in parts.
I hear you and I don't disagree that scanning could be a viable, possibly superior, alternative. However, for what ever reason taking photos of posters seems so much more enjoyable and less cumbersome than sitting in front of a computer for hours on end moving a flatbed scanner around.
The beauty of my current setup is that nearly all the LR tweaks can be done as a batch to everything shot in that set. As long as the tripod doesn't move I can start my session with an empty board (painted matte black) save for the color/grayscale bars. Then in LR I can adjust black/white points, exposure, correct for local exposure issues, white balance, sharpness, and noise -- and then apply them to the whole set. If I wasn't lined up exactly, I can batch adjust the skew in PS as well. Then the only adjustment that each individual image would only need is rotation. The posters won't be vacuumed to board perfectly straight each time but they are usually quite close so, again, it would just be a single small tweak to each image. On my initial test run, after 20 minutes of tweaking the lighting and squaring up the camera, I blew through 51 posters in about an hour. That was with 3 pictures of each poster -- the longest delay was waiting for the flashes to recharge. And I imagine that the setup will go faster once I figure out the optimal lighting configuration and measure it all out. I can't imagine going that fast manually moving a flatbed around.
Harry Caul
Well-known
A couple people have recommended polarizing filters. Can you please provide links to the equipment I would need? I assume I could just get a polarized filter for my lens, but what would I need for the flashes? Does the polarization effect still work if you are bouncing it off foam core or putting them in flash boxes?
Harry Caul
Well-known
Not quite correct. The distance from the camera to the poster is not part of the equation. What matters is the width of the poster relative to the distance to the lamp. In general when using 2 lamps, you need to place the lamps so that the lamps are at least 3x the distance from the poster (measured to the near side of the poster) than the longest dimension of the poster.
My vacuum board is 48" tall x 36" wide, but the size of the posters that I'll be shooting will change. I am trying to group them so I'm shooting roughly the same size poster in each session. My most common size is A1 or approximately 23"x33" -- although every poster is different. The range can vary as much as +/- 3" in either dimension.
I think that must be the source of my hotspot lighting problems. The farthest I can get the flashes from the edge of my vacuum board is about 8 feet or 2x the longest dimension.
The 45 degrees is generally correct, but only when dealing with longer than "normal" (FL=sensor diagonal) camera lenses. It should also be measured from the plane of the artwork to the part of the light/diffuser that is nearest to the camera, not to the center of the light.
I'm not sure I'm understanding this correctly. If I do end up shooting in a bigger room, where would the flashes be setup in relation to my 3' wide vacuum board? Would the right side of the right flash be positioned 12' away and pointed at a 45 degree angle to the right side of the board? That would mean the center line of the flash would be point several inches into the right edge of the board. My pro fried suggested that I do not the point the flash directly a the board at all, but instead point the right flash well past the left edge of the board... that way I'm not using the direct light from the center of the flash and instead the softer, more diffuse light the emanates from the edges. His optimal placing was to put the two flashes each about 10' away from the board, and 2-3 feet in front of the plane of the board. Then fire the flashes directly at each other so you only use the more diffuse lighting and it arrives from the sides to eliminate reflections. Does that make sense? I feel like we are entering back of the envelope diagram territory...
Another thing that can help is to use cross polarization. This requires that you put polarizers on the lights and one on the camera. The one on the camera is orientated 90 degrees to those on the lights. This can be very effective to eliminated the micro-reflections that occur on slightly textured glossy surfaces.
I have friends who collect mostly modern, glossy posters. They said they have to turn off all the lights and wear black clothing to help reduce reflections. One guy said his wife walked in on him and just sighed, shook her head and left!
Harry Caul
Well-known
My pro friend and I are going to test the impact of using his full-frame D610 and 60mm macro. That should be a good approximation of stepping up to an A7R + Leica 60mm macro. If the jump in quality/noise is enough I may look into getting a better camera. He also has an Epson flatbed (I forget the model) so we may also test that option. Stay tuned!
Ranchu
Veteran
I would suggest an enlarger lens for a medium format enlarger, longer lenses will help with glare from the lighting (saturation) and distortion.
Share:
-
This site uses cookies to help personalise content, tailor your experience and to keep you logged in if you register.
By continuing to use this site, you are consenting to our use of cookies.