Chad
Established
I made the jump to developing and printing at home. One thing that concerns me is that my printing exposure times seem extremely short. For normally exposed, normally devolped negatives I am exposing the paper for 3 to 5 seconds for most of my (8 x 10) prints. This is with a Beseler 23C II with a black & white head, 75 watt bulb, and a Fujinon 50mm at f/11.
I don't have a lot of experience with enlargers and printing but these exposure times seem really short. I've tried two types of paper and they both respond the same. What do you folks think might be the problem? Is this a problem?
~Chad
I don't have a lot of experience with enlargers and printing but these exposure times seem really short. I've tried two types of paper and they both respond the same. What do you folks think might be the problem? Is this a problem?
~Chad
NickTrop
Veteran
My Omega 22 gives me times like these 8-12 seconds on medium format prints. It's a condenser head enlarger (as opposed to a diffusion enlarger). When I do 6X6 stuff (which is mostly what I do), I have to remove a thick condenser lens from the enlarger head. This extra lens is used only for 35mm. With this lens in, when doing 35mm, times increase dramatically to 25 to 30 seconds.
When I first started doing my own printing, I had the same question. I posted on Harry Taylor's http://www.classic-enlargers.com/ site, who has a web business selling enlargers and enlarger parts. His solution was to simply plug the enlarger into a common dimmer switch and do some tests to get the proper time. Since I don't do much in the way of dodging and burning thus far, the short times don't matter to me and I never bothered with the dimmer solution. As long as I get a decent print, who cares?
When I move on to more "fine art" stuff on fiber paper where I want to massage the image more and do more dodging and burning on a MF print I intend to hang on a wall, I might consider this solution.
Short answer, hook your enlarger light up to a dimmer switch.
Bryce
Well-known
Chad-
First, a warm (O.K., 70 degree F.) welcome to the darkness. May it prove rewarding for you.
I use the same enlarger, similar lens for 35mm negatives and have had similar results. Here are a couple of suggestions.
First, there is an adjustment at the top of the enlarger for negative size. I leave mine at '2x3' all the time in an effort to cut down on light. Basically you are spreading the light over a larger area and reducing its intensity.
Next, I found a 49mm 2 stop ND filter (exact size not important) that I place on top of the lens before putting the lensboard in the enlarger head. I only use it when necessary, but it usually is.
For maximum sharpness, you'll want to print around F/8. You can see the diffraction effects of various iris settings while looking through a grain focuser. By F/11, softness is setting in.
I hope this proves useful to you!
Wayne R. Scott
Half fast Leica User
Chad,
Have you done a test strip to make sure that your safelight is truly safe? Place a strip of printing paper onto your easel on the enlarger base. Place 10 coins in a row on the strip of paper. Leave your safelight on and remove one coin every minute. At the end of ten minutes develop your test strip as you have normally been doing. If you can not see the outlines of any of the coins then you have a very safe safelight. If you can see all ten coins you need to make some changes in your safelight.
What paper developer are you using, Dektol? What dilution are you using and how long are you developing the paper?
Wayne
Bryce
Well-known
Chad, Nick-
I think moving the 'negative size' adjustment on a Beseler is analogous to adding or subtracting a lens on your model. My condenser assembly doesn't look like it is intended to come apart.
I've heard of using a dimmer, but some say they aren't very stable and can cause problems with exposure consistency. People who complain about that sy to use something called a variac... I don't know what that is though.
Either way, I haven't actually tried altering the light output at the bulb.
Another possibility is to use a poor quality ND filter in the filter drawer above the condenser. Maybe an evenly exposed piece of sheet film would work?
Chad
Established
Thank you everyone for the input. It sounds like there may be nothing wrong with my enlarger. I had gotten use to a Beseler 23C III with a VC head. For some reason, a 'normal' exposure time on that machine was around 30 seconds using white light (contrast inactivated). I had thought that the head style (i.e. light output) on that enlarger was essentially the same as on my older 23C II(?).
Do I loose any image quality with having only a 4 seconds exposure (which is about my norm now)?
~Chad
Do I loose any image quality with having only a 4 seconds exposure (which is about my norm now)?
~Chad
Bryce
Well-known
You won't lose anything but the ability to manipulate the image during exposure, which of course you will want to do. Somehow, you'll have to lengthen the exposure time in order to dodge and burn.
Maybe I misunderstood, you enlarger head is what type? I have a 23c, with condenser head and no built in filtration. To change contrast, I have to slide filters into a drawer above the condenser.
So is yours a condenser type or not? And is there a height adjustment near the top of the head that moves only the lamphouse?
Mine has this adjustment, and moving it changes the amount of light reaching the negative, as well as how large a negative will be fully illuminated.
Chad
Established
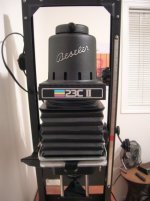
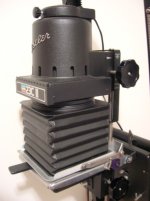
I don't know what type of head I have. To change the contrast I have to either slide in little VC filters below the negative or in the big tray below the lightbulb. I think that we have similar enlargers though. The 23C III that I mentioned in my last post was owned by the local community college. The 23C II pictured below is mine. I agree, I need to figure something out to increase my exposure times so I can dodge/burn. The adjusting knob that you mentioned is the the top most one, correct? I can only bring that down about 1/3 of the way before I get vignetting (although bringing it down did help a little bit).
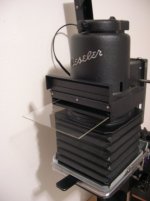
On a side note, what is the purpose of the plexiglass that is in the third picture?
~Chad
On a side note, what is the purpose of the plexiglass that is in the third picture?
~Chad
Bryce said:You won't lose anything but the ability to manipulate the image during exposure, which of course you will want to do. Somehow, you'll have to lengthen the exposure time in order to dodge and burn.
Maybe I misunderstood, you enlarger head is what type? I have a 23c, with condenser head and no built in filtration. To change contrast, I have to slide filters into a drawer above the condenser.
So is yours a condenser type or not? And is there a height adjustment near the top of the head that moves only the lamphouse?
Mine has this adjustment, and moving it changes the amount of light reaching the negative, as well as how large a negative will be fully illuminated.
Attachments
Bryce
Well-known
Chad-
That is the same design head as I have.
The uppermost knob will adjust both coverage and brightness of the light reaching the negative. You should be able to set it for any size negative the same as or larger than the one you're printing from and get full coverage.
Assuming you are printing 35mm negatives, that would be anywhere within the adjustment range. I leave mine set at "2 1/4x 3 1/4" since I almost always wish for less light, not more.
Makes for one less variable to screw up when I go to re print an old negative or a larger one anyway, since I have a 6x9 camera.
The plexi piece is there to support contrast control filters. You'd have to buy 6" square ones and cut them to fit, but that is better than the ones that go under the lens. Filters at the top can be very dirty and fingerprinted without degrading image quality, unlike the beneath lens type.
It is also a possible place to put a ND filter. If you reasonably can, developing an evenly exposed piece of sheet film and placing it here could solve your excessive light problem, and having sheets of a few different densities would make it easy to always print with the lens stopped down to near optimum aperture.
Of course you could use some method of lowering the voltage to the bulb instead.
However you proceed, proceed!
Chad
Established
Thanks Bryce. I might try to put together a voltage reducer tonight as I don't have a large format camera.
So does my enlarger have a condenser head?
~Chad
So does my enlarger have a condenser head?
~Chad
sepiareverb
genius and moron
Chad- your version may have a standard light-bulb threaded socket- if so you should easily be able to go with a lower watt bulb.
There should also be a lower watt bulb available if you have the smooth base bulb with two little catch pins. We have the whole range of 23C's at work (state college) and there is a surprising variety of bulb types for the different versions.
There should also be a lower watt bulb available if you have the smooth base bulb with two little catch pins. We have the whole range of 23C's at work (state college) and there is a surprising variety of bulb types for the different versions.
Bryce
Well-known
Chad-
Yes, that is a condenser type head. YOu can expect the maximum sharpness and contrast possible from your negatives with this type.
Using household bulbs may well be a possibility, but check carefully- there have been reports of the bulb's brand name being visible in prints. I haven't actually tried that...
Chad
Established
sepiareverb said:Chad- your version may have a standard light-bulb threaded socket- if so you should easily be able to go with a lower watt bulb.
There should also be a lower watt bulb available if you have the smooth base bulb with two little catch pins. We have the whole range of 23C's at work (state college) and there is a surprising variety of bulb types for the different versions.
It appears that the bulb is the smooth type with two pins sticking out. I'll see what my options are when I go to the hardware store tonight.
Bryce said:Chad-
Using household bulbs may well be a possibility, but check carefully- there have been reports of the bulb's brand name being visible in prints. I haven't actually tried that...
 That's the kind of bad luck/funny thing that often happens to me. Thanks for the heads-up.
~Chad
sepiareverb
genius and moron
Yeah you might get "GE" staring out of your subjects face- the two pin bulbs are more of a specialty thing- there are a few good bulb sources online.

Share:
-
This site uses cookies to help personalise content, tailor your experience and to keep you logged in if you register.
By continuing to use this site, you are consenting to our use of cookies.