Novembersierra
Venice, ITA
As I might have said in an earlier thread, I inherited a retina IIa, really lovely camera, still it showed its age and needed some care.
The shutter was jammed, the 'lens standard' took a bump and other minor parts showed wear or damage. I couldn't use it like this, and a simple cla wasn't enough.
After a brief period to think about it while working on another camera, the decision eventually was made and well..
sometimes you just have to restart from scratch.

It will be a sort of 'special' version in black and chrome, the top and front 'clamshell' will be stripped to brass and then painted black while replacement parts will be sourced from a donor camera. It's going to take some time, but it will be fun.
EDIT: I decided to attach the photos to the messages too, so if the hosting site takes them down they'll still be available. Sorry for the double images - if it's against something mods please let me know.
The shutter was jammed, the 'lens standard' took a bump and other minor parts showed wear or damage. I couldn't use it like this, and a simple cla wasn't enough.
After a brief period to think about it while working on another camera, the decision eventually was made and well..
sometimes you just have to restart from scratch.
It will be a sort of 'special' version in black and chrome, the top and front 'clamshell' will be stripped to brass and then painted black while replacement parts will be sourced from a donor camera. It's going to take some time, but it will be fun.
EDIT: I decided to attach the photos to the messages too, so if the hosting site takes them down they'll still be available. Sorry for the double images - if it's against something mods please let me know.
Attachments
Last edited:
thawkins
Well-known
Hooray for you!! I have a Retina IIa that is a favorite. Right now it is loaded with Fuji Sensia. The 50mm Xenon lens is the sharpest in my collection and that includes some Nikon and Leica lenses. Please post some progressive pictures as you go through your rebuild process.
Moto-Uno
Moto-Uno
Ohhh boy this looks like a project!!!! +1 for photo progress, (as other members here gratefully have done in the past ). Peter
KoNickon
Nick Merritt
Neat! Keep us posted on this project.
Novembersierra
Venice, ITA
catching up with the progess so far..
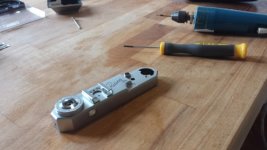
as the original cold-shoe showed a slight bump and rust pitting, I thought it might be the only part to be replaced with something more modern looking, and who's got a modern, already black, readily-available, not awfully expensive accessory shoe to buy as replacement? Yes, the Canon 5Dc.

Here I was testing the looks and placement with my 40D shoe, which is the same one, but silver.
The purists will hate me but whatever, it will look the part in the finished camera, I promise.

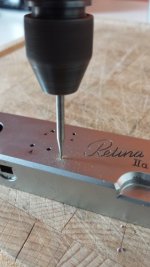
After some guesstimation work about the holes I started drilling: as it was all freehand, precision meant a lot of time spent switching drill bits and carefully advancing in the process. Brass is a beautiful material to work with.
Eventually I finished this stage and left a half mm for the screws to thread on the brass. These are much longer than the original and would interfere with the rangefinder underneath, so I'll cut them down to the correct lenght.

While I was at it I rounded the eyepiece hole on the back, and this (with some other more specific mods) should hopefully make the Retina's VF less 'squinty'.
as the original cold-shoe showed a slight bump and rust pitting, I thought it might be the only part to be replaced with something more modern looking, and who's got a modern, already black, readily-available, not awfully expensive accessory shoe to buy as replacement? Yes, the Canon 5Dc.
Here I was testing the looks and placement with my 40D shoe, which is the same one, but silver.
The purists will hate me but whatever, it will look the part in the finished camera, I promise.
After some guesstimation work about the holes I started drilling: as it was all freehand, precision meant a lot of time spent switching drill bits and carefully advancing in the process. Brass is a beautiful material to work with.
Eventually I finished this stage and left a half mm for the screws to thread on the brass. These are much longer than the original and would interfere with the rangefinder underneath, so I'll cut them down to the correct lenght.
While I was at it I rounded the eyepiece hole on the back, and this (with some other more specific mods) should hopefully make the Retina's VF less 'squinty'.
Attachments
farlymac
PF McFarland
Very interesting. Can't wait to see how it comes out. I don't plan on going that far with mine.
PF
PF
Particular
a.k.a. CNNY, disassembler
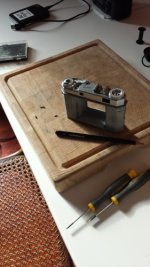
Kodak on a chopping block. Is that a metaphor for something?
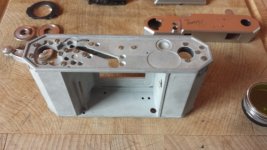
I'm amazed at how clean that body casting is. I think it will turn out really nice. Good luck.
I'm amazed at how clean that body casting is. I think it will turn out really nice. Good luck.
thambar
Shouldn't it be sharper?
I've been a huge fan of the IIa/IIIc Retinas: exceptional optics, sturdy construction, and dirt cheap. For years when someone asked for a 50mm lens recommendation, I'd say without hesitation the 50mm Schneider Xenon, which is attached to a really great camera as well. Unless you're going to use the accessory shoe for a meter (such as the VC meter, which is a great choice) why not add a 50mm brightline finder, and avoid the squinty one on the camera?
hausen
Well-known
I have the Leica 50mm finder on my IIa and it makes it a great user.
Novembersierra
Venice, ITA
I'm amazed at how clean that body casting is. I think it will turn out really nice. Good luck.
It sure didn't look like this before the disassembly!
Unless you're going to use the accessory shoe for a meter (such as the VC meter, which is a great choice) why not add a 50mm brightline finder, and avoid the squinty one on the camera?
Yeah, that's another idea.
Too bad the SBOOI finder is available only in chrome, it gets better reviews than the Voigtlander.
Novembersierra
Venice, ITA

Steve M.
Veteran
"sometimes you just have to restart from scratch".
Or in my case, sometimes you just have to buy another camera! Quite a tear down you're doing. I don't have the eyes or the patience anymore for something like this, but it will sure be rewarding when you get it back together.
It reminds me of the chopper I once built from scratch back in the olden days. The engine sat in the living room, being used as a coffee table for over a year while I got the rest of the bike together. Amazingly I heard this story from other people, so it goes with the territory I suppose. Right now I have a couple of Retina 1a cameras that have been sitting in pieces on the kitchen table, crammed into a corner. The wife is tired of cleaning around them. All I can say is, I sure would like to get my hands on the person who designed the film counter mechanism. The shutter cocking arm w/ serrated teeth on top is no thing of beauty either. These cameras are fascinating marvels of engineering, but the further you dig into them, the more you start to shake your head and wonder why they did things like they did.
Particular
a.k.a. CNNY, disassembler
Right now I have a couple of Retina 1a cameras that have been sitting in pieces on the kitchen table, crammed into a corner. The wife is tired of cleaning around them.
I got a couple of plastic serving trays from a kitchen supply store. I keep each project on its tray, so I can easily clear my desk if I need it for important stuff.
Novembersierra
Venice, ITA
I have some fresh news about a possible engraving of the top... I'll keep you posted
turbine930
Newbie
any news to this interestin restoration?
Novembersierra
Venice, ITA
oh well.. I was quite busy with university exams (summer session is tough) but thankfully I had a bit more time to work on it.
First things first: the donor camera arrived!
It was cheap on the bay, but had all the right things: straight folding mechanism, unscratched front element, good coating all around and most of all a pristine backdoor latch paint!
It was the toughest thing to look for, since the paint after 60 years is quite fragile.
At least I'll be good for the first months (I hope).

On the other hand I finished some other small parts like this one that locks the front clamshell in place when closed:
the button underneath the camera that opens the shell was marred, so it was sanded to bare brass and then painted black.
(I'll keep a spare chrome one if there'll be too much brassing going on )
)

pic is before paint!
Another thing that bugged me was the rewind knob having some play..
upon disassembly of the part I found out the reason.
When you rewind, you can lift the knob a bit without the sprocket disengaging from the roll: easier rewinding.
Fact is, the small screw that is free to go upward when you lift the knob
presses against the soft brass walls of the inner cylinder when you rewind,
creating a bigger and bigger gap.

notice the screw and the curvature of the brass on the right side.
the solution was a compromise:
I've cut a hard black plastic piece that fills the whole cutout of the cylinder,
so when the screw is replaced its tight and there's no more play, at the cost of a slightly slower rewind
(not being able to lift it more that few mm without disengaging the roll).
First things first: the donor camera arrived!
It was cheap on the bay, but had all the right things: straight folding mechanism, unscratched front element, good coating all around and most of all a pristine backdoor latch paint!
It was the toughest thing to look for, since the paint after 60 years is quite fragile.
At least I'll be good for the first months (I hope).
On the other hand I finished some other small parts like this one that locks the front clamshell in place when closed:
the button underneath the camera that opens the shell was marred, so it was sanded to bare brass and then painted black.
(I'll keep a spare chrome one if there'll be too much brassing going on
)
pic is before paint!
Another thing that bugged me was the rewind knob having some play..
upon disassembly of the part I found out the reason.
When you rewind, you can lift the knob a bit without the sprocket disengaging from the roll: easier rewinding.
Fact is, the small screw that is free to go upward when you lift the knob
presses against the soft brass walls of the inner cylinder when you rewind,
creating a bigger and bigger gap.
notice the screw and the curvature of the brass on the right side.
the solution was a compromise:
I've cut a hard black plastic piece that fills the whole cutout of the cylinder,
so when the screw is replaced its tight and there's no more play, at the cost of a slightly slower rewind
(not being able to lift it more that few mm without disengaging the roll).
Novembersierra
Venice, ITA
ok now let's move to the latest work.
I knew there was still much to do and couldn't stand the old and dirty bellows.
I contacted a well regarded bellows maker in England that needed the exact dimensions.. Something that couldn't be figured out from the outside.

I carefully disassembled the whole folding and focus mechanism, most importantly cleaning off thoroughly decades old gunk and lubricants.
I also managed to keep the screws intact and 99% pristine, I must say I'm getting quite good at this and enjoying it too.
While I was at it I switched the feet distance scale for a more friendly metric one.

What suffered from my attempts was the rear part of the standard: as the rear lens element was stuck like nothing ever before,
after two days of washing gloves and other grippy material I needed careful use of pliers (sigh) to get it off,
and access the ring that locks the shutter in place on the standard, scratching a bit the black paint.

notice the remains of the old velvet on the outer part, near the holes

If cameras had their skeleton equivalents, this would be one!
No worries tho, as it came out really well after some dremel sanding and a fresh coat of flat black paint.
Where the bellows and the front standard meet, where you can see the holes in the picture just above,
there was a layer of old velvet to keep thing light tight,
that was replaced it with a new layer of adhesive light trap material for cameras and telescopes.

here's the finished part, with fresh paint and new velevet.
Notice the holes punctured for the screws that hold the bellows to pass thru.
The front of the bellows uses four 1.2mm screws, while Kodak chose glue on the rear, where the body casting meets the bellows.

I'm planning to replace those black visible screws too for sake of completeness.
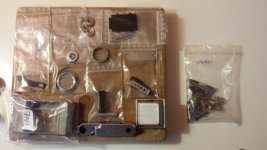
Talking about screws, I finally got some from in the mail from a knife maker in Finland. Just beautiful, I could't decide between
gold plated (it's a special edition, right?) and stealth black for the two on the sides of the top plate, so I got both,
and also some for the advance lever and rewind knob in brass, with correct fitting cheese heads.
The search for the right screws was tough!

I also bought some computer screws with very large and slim heads, to replace the countersunk ones
in the film roll housing that I broke and had to drill out months ago (I was still inexperienced back then).
These particular screws serve the purpose of covering the ugly drill holes
and are still slim enough to allow the film canister to sit perfetcly in its place.

with the black body they'll be barely noticeable!
That's it for now, more updates soon!
I knew there was still much to do and couldn't stand the old and dirty bellows.
I contacted a well regarded bellows maker in England that needed the exact dimensions.. Something that couldn't be figured out from the outside.
I carefully disassembled the whole folding and focus mechanism, most importantly cleaning off thoroughly decades old gunk and lubricants.
I also managed to keep the screws intact and 99% pristine, I must say I'm getting quite good at this and enjoying it too.
While I was at it I switched the feet distance scale for a more friendly metric one.
What suffered from my attempts was the rear part of the standard: as the rear lens element was stuck like nothing ever before,
after two days of washing gloves and other grippy material I needed careful use of pliers (sigh) to get it off,
and access the ring that locks the shutter in place on the standard, scratching a bit the black paint.
notice the remains of the old velvet on the outer part, near the holes
If cameras had their skeleton equivalents, this would be one!
No worries tho, as it came out really well after some dremel sanding and a fresh coat of flat black paint.
Where the bellows and the front standard meet, where you can see the holes in the picture just above,
there was a layer of old velvet to keep thing light tight,
that was replaced it with a new layer of adhesive light trap material for cameras and telescopes.
here's the finished part, with fresh paint and new velevet.
Notice the holes punctured for the screws that hold the bellows to pass thru.
The front of the bellows uses four 1.2mm screws, while Kodak chose glue on the rear, where the body casting meets the bellows.
I'm planning to replace those black visible screws too for sake of completeness.
Talking about screws, I finally got some from in the mail from a knife maker in Finland. Just beautiful, I could't decide between
gold plated (it's a special edition, right?) and stealth black for the two on the sides of the top plate, so I got both,
and also some for the advance lever and rewind knob in brass, with correct fitting cheese heads.
The search for the right screws was tough!
I also bought some computer screws with very large and slim heads, to replace the countersunk ones
in the film roll housing that I broke and had to drill out months ago (I was still inexperienced back then
).These particular screws serve the purpose of covering the ugly drill holes
and are still slim enough to allow the film canister to sit perfetcly in its place.
with the black body they'll be barely noticeable!
That's it for now, more updates soon!
farlymac
PF McFarland
Looking good!
PF
PF
Share:
-
This site uses cookies to help personalise content, tailor your experience and to keep you logged in if you register.
By continuing to use this site, you are consenting to our use of cookies.