hlockwood
Well-known
I didn't want to hijack another thread on Vuescan vs NikonScan because I have a very specific question that applies to either. I've tried Vuescan several times, and NS just works better for me - on a Mac.
To the question: my scans of C41 B&W (Ilford XP2) always require a black point adjustment. I always do this after the scan, in PS. I make no adjustments at all in NS (nor would I if I were using Vuescan.) Is there an advantage, at least theoretically, to adjusting the BP, i.e., filling the histogram, before the scan? Practically, I am unable to see a difference, but this may depend on the tonal values of the particular negative. So, I'm unable to say that the limited comparisons I've made make the case one way or another. If there is an advantage, I'll incorporate it into my workflow.
Harry
Sparrow
Veteran
I scan as a 16bit tiff, and get this sort of thing from viewscan, (Minolta dImage 5400 mkI) then set levels in PS, if I do the setting in viewscan I have to use a jpg and I don’t think I get as much data. I don’t know about Nikon however

hlockwood
Well-known
I scan as a 16bit tiff, and get this sort of thing from viewscan, (Minolta dImage 5400 mkI) then set levels in PS, if I do the setting in viewscan I have to use a jpg and I don’t think I get as much data. I don’t know about Nikon however
i also scan as 16-bit tiff in NS, but no jpeg involved.
Harry
diwolf
Newbie
I use vuescan with the quato intelliscan 5000 to scan my slides. I always set white and blackpoint to zero 0 to get most detail in shadows and highlights out of the picture. Adjustment and optimisation is done afterwards in photoshop, in my case I use Corelphotopaint.
Dietmar
Dietmar
rxmd
May contain traces of nut
I didn't want to hijack another thread on Vuescan vs NikonScan because I have a very specific question that applies to either. I've tried Vuescan several times, and NS just works better for me - on a Mac.
To the question: my scans of C41 B&W (Ilford XP2) always require a black point adjustment. I always do this after the scan, in PS. I make no adjustments at all in NS (nor would I if I were using Vuescan.) Is there an advantage, at least theoretically, to adjusting the BP, i.e., filling the histogram, before the scan? Practically, I am unable to see a difference, but this may depend on the tonal values of the particular negative. So, I'm unable to say that the limited comparisons I've made make the case one way or another. If there is an advantage, I'll incorporate it into my workflow.
I use VueScan, a LS-4000 and XP2, so we're somewhere in the same boat. I do a lot of batch scanning using a converted SA-21 adapter. When scanning XP2, what I normally do is to adjust exposure (using "Lock Exposure") to compensate for the film base. This gives me black blacks. I guess scanning in 14 bits, I could do that in Photoshop as well without losing too much detail, but as I do batch scans it's much less work to do the setting once (lock it for one batch of films) and then to just have VueScan apply it to all frames. When scanning JPEGs, it's better to have VueScan do it, because it does it before breaking the data from the scanner down to 8-bit quantisation, saving you some quality in the shadows and highlights.
I find that XP2 looks pretty similar every time, the value for the exposure lock doesn't differ too much. Depending on whether your lab gives consistent results, you can save the VueScan parameters and reuse them, then you don't even have to find the exposure lock value for the film base (my XP2 settings file currently says RGBExposure=2726, InfraredExposure=2142).
There's an excellent tutorial on how to do the exposure lock. It's literally a matter of twenty seconds and saves you one step in Photoshop.
mackigator
Well-known
I also scan to get the most information recorded in the file - ie flat scans, with white and black points that are just outside the last usable information in the histogram. I do this so that I have the most leeway when I work on the image later, and I've found it to be a good practice.
I never have to wonder if I should rescan something because I threw away the wrong pixels at the time of scan. That's the danger, IMHO, of editing too much with the scanner software - it's time consuming to scan, my edits change over time as I learn and grow or find different uses for images (web or print), and it's easy to post process images with your tool of choice. So it seems best to have a reasonably large file with as much information represented as possible.
I never have to wonder if I should rescan something because I threw away the wrong pixels at the time of scan. That's the danger, IMHO, of editing too much with the scanner software - it's time consuming to scan, my edits change over time as I learn and grow or find different uses for images (web or print), and it's easy to post process images with your tool of choice. So it seems best to have a reasonably large file with as much information represented as possible.
srtiwari
Daktari
I have read somewhere, that it should be corrected in the Scanner, rather than in PS later. I iomagine this is for correct exposure from the scanner, much like working to get perfect exposure from a film camera.
This tutorial addresses some of these questions, I think. Hope it helps.
http://www.marginalsoftware.com/HowtoScan/using_histograms_as_a_tool.htm
This tutorial addresses some of these questions, I think. Hope it helps.
http://www.marginalsoftware.com/HowtoScan/using_histograms_as_a_tool.htm
hlockwood
Well-known
I have read somewhere, that it should be corrected in the Scanner, rather than in PS later. I iomagine this is for correct exposure from the scanner, much like working to get perfect exposure from a film camera.
This tutorial addresses some of these questions, I think. Hope it helps.
http://www.marginalsoftware.com/HowtoScan/using_histograms_as_a_tool.htm
Thanks, Subash. That is a great tutorial; so good, in fact, that I will order the book.
Harry
mackigator
Well-known
@srtwari nice tutorial link.
I agree with that tutorial and my own scanning tweaks mimic the moves in that tutorial, particularly the last illustration:
"[FONT=Times New Roman, Times]Figs. 6 and 7 are histograms for scans of the same image without curve adjustment and illustrate making use of the available density range. Even if the scan represented in fig. 6 had resulted in an image visually closer to the desired final image, the image represented by fig. 7 is preferred because it spans the range of available tone values and as a result contains more information than 6. With more information, the user has greater latitude for subsequent manipulations of the image. ..."
[/FONT]I note that the tutorial is still stopping short of actually moving into the the meat of the histogram during scanning in an attempt to get something you like, or to move the image closer to what you have in your mind's eye. They reserve those decisions, as I do, for later.
Since the tutorial makes a point of starting with a well exposed bell curve, it might make some think that all good images look that way on a histogram. This is not the case, of course - there is no ideal histogram and the bell curve shape represents one type of exposure, the ski slope another. You just work with what you have - lots of blacks, lots of whites, or whatever.
mfogiel
Veteran
As shown in the above tutorial, there are 2 things to remember:
1 - do the preview - I often batch scan in CS9000, but initially I do a batch preview
2 - adjust the cropping of the image, so it does not include film base, or even worse, an area without film. If this is not sufficient for the histogram to fill the useful range without clipping or without being too contracted, you can adjust the black and white points manually, or scan as negative
3 - do all the editing in PS
hlockwood
Well-known
As shown in the above tutorial, there are 2 things to remember:
1 - do the preview - I often batch scan in CS9000, but initially I do a batch preview
2 - adjust the cropping of the image, so it does not include film base, or even worse, an area without film. If this is not sufficient for the histogram to fill the useful range without clipping or without being too contracted, you can adjust the black and white points manually, or scan as negative
3 - do all the editing in PS
I agree with and do all of the above. But what do you mean by "scan as negative"? I do scan my negatives - as negatives.
Harry
hans voralberg
Veteran
Some peple scan negs as slide then invert, saying that give better tonality, dunno where that comes from though
rxmd
May contain traces of nut
Some peple scan negs as slide then invert, saying that give better tonality, dunno where that comes from though
I'd say that's either an illusion, or bad scanning software, or both.
srtiwari
Daktari
Some peple scan negs as slide then invert, saying that give better tonality, dunno where that comes from though
I have read this being recommended, but for B+W only.
See here http://robertdfeinman.com/tips/tip11.html
rxmd
May contain traces of nut
I have read this being recommended, but for B+W only.
See here http://robertdfeinman.com/tips/tip11.html
Note the words "8 bit", "256 levels" etc. spread generously over the page!
hlockwood
Well-known
I didn't want to hijack another thread on Vuescan vs NikonScan because I have a very specific question that applies to either. I've tried Vuescan several times, and NS just works better for me - on a Mac.
To the question: my scans of C41 B&W (Ilford XP2) always require a black point adjustment. I always do this after the scan, in PS. I make no adjustments at all in NS (nor would I if I were using Vuescan.) Is there an advantage, at least theoretically, to adjusting the BP, i.e., filling the histogram, before the scan? Practically, I am unable to see a difference, but this may depend on the tonal values of the particular negative. So, I'm unable to say that the limited comparisons I've made make the case one way or another. If there is an advantage, I'll incorporate it into my workflow.
Harry
Well, there is no substitute for sitting down and slogging through the experiments necessary to come to the right conclusion. And I've done that. First, thanks to all who jumped in with their suggestions.
Briefly, my previous workflow for XP2 was this: Scan in NikonScan as RGB with no adjustments. This results in a tiff that I would open in PS and covert to Lab. I would then discard the a and b channels and set the Mode to grayscale. All further adjustments, setting black and white points, curves,etc., would follow in PS.
In developing my new workflow, it's important to note that my final output is a print, typically on Han Photo Rag using piezography K7 inks. If your workflow ends in a screen image only, you may not see much of a difference, if any, in adopting this one.
The principal difference in the new workflow is to make important adjustments in the preview stage and incorporate these into the scan. Keep in mind that the evidence is in the final print, detail in the shadows and no clipping of highlights.
The first radical departure is to scan as "neg., mono; grayscale" rather than as RGB.
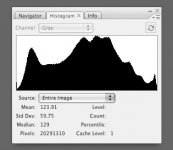
One of the most important of histogram adjustment is the white point. If the histogram falls short of the right side axis, I now nudge the histogram rightward by by increasing exposure rather than simply moving the white point leftward. (In NS this is accomplished with Analog Gain.) I then adjust the black point as necessary. If the preview image can be improved further by a gamma adjustment, I incorporate that as well. I then scan, with Multiscan set to 4x and ICE on normal.
The resulting histogram in PS (see attached for an example) should show most of the pixels occupying the tonal range between the end points.
Again, the path to this workflow is strewn with many hard proofs, prints looked at very closely for small differences in tonal separation and smoothness. It works for me; YMMV.
I should acknowledge that my thinking was greatly influenced by the site
http://marginalsoftware.com/HowToScan/using_histograms_as_a_tool.htm as recommend here by Subhash. I also purchased the book available there. And who knows, by the time I finish the book, I may abandon this workflow for another.
Harry
Attachments
mfogiel
Veteran
@hlockwood - Sorry, that was a typo... If the histogram "overflows" on the right, scan as positive, this way you can use the scanners' higher dmax range, normally reserved for slides.
hlockwood
Well-known
Well, there is no substitute for sitting down and slogging through the experiments necessary to come to the right conclusion. And I've done that. First, thanks to all who jumped in with their suggestions.
Briefly, my previous workflow for XP2 was this: Scan in NikonScan as RGB with no adjustments. This results in a tiff that I would open in PS and covert to Lab. I would then discard the a and b channels and set the Mode to grayscale. All further adjustments, setting black and white points, curves,etc., would follow in PS.
In developing my new workflow, it's important to note that my final output is a print, typically on Han Photo Rag using piezography K7 inks. If your workflow ends in a screen image only, you may not see much of a difference, if any, in adopting this one.
The principal difference in the new workflow is to make important adjustments in the preview stage and incorporate these into the scan. Keep in mind that the evidence is in the final print, detail in the shadows and no clipping of highlights.
The first radical departure is to scan as "neg., mono; grayscale" rather than as RGB.
One of the most important of histogram adjustment is the white point. If the histogram falls short of the right side axis, I now nudge the histogram rightward by by increasing exposure rather than simply moving the white point leftward. (In NS this is accomplished with Analog Gain.) I then adjust the black point as necessary. If the preview image can be improved further by a gamma adjustment, I incorporate that as well. I then scan, with Multiscan set to 4x and ICE on normal.
The resulting histogram in PS (see attached for an example) should show most of the pixels occupying the tonal range between the end points.
Again, the path to this workflow is strewn with many hard proofs, prints looked at very closely for small differences in tonal separation and smoothness. It works for me; YMMV.
I should acknowledge that my thinking was greatly influenced by the site
http://marginalsoftware.com/HowToScan/using_histograms_as_a_tool.htm as recommend here by Subhash. I also purchased the book available there. And who knows, by the time I finish the book, I may abandon this workflow for another.
Harry
Well, time to pay the piper. I have definitively determined from further study and directly from Nikon something that others have maintained all along, and which I seem to dispute in the above remarks. I was wrong. :bang: Apologies to anyone who was mislead.
Any Curves adjustments to the histogram shown in the Preview are not incorporated into the scan; they are incorporated only after the scan. So, there is definitely no advantage to adjusting Curves in NS; better to do it in PS.
The important exception is that Analog Gain (exposure) can push the histogram to the right when the white point is not at the right hand margin. And this change to the histogram is, of course, incorporated into the scan.
Harry
Share:
-
This site uses cookies to help personalise content, tailor your experience and to keep you logged in if you register.
By continuing to use this site, you are consenting to our use of cookies.