mirnuj_atom
Newbie
Hello, everyone!
Recently I purchased late German ver4 summicron 35 2 in really nice condition overall except for one small issue, looks like it's aperture ring needs cleaning, it becomes sticky, especially if I do not use it for a few days then it is difficult to move for the first time so I have to make effort to budge it. Not a big deal for now but I'm afraid that with time it may cause more serious problems since the 4th one is known as not the sturdiest from 35mm summicrons.
So I was thinking about cleaning the ring out.
I was searching for disassembly instructions and found several great videos on youtube from a user called mikeno62. Unfortunately, there are videos for ver2 and asph summicrons and the 4th gen looks different since it does not have that ring which holds other crons together. It's back part looks exactly as the one on summilux 35 pre-asph in another mikeno62's video, but I afraid to break the lens without exact instructions.
Does anyone have information about how to disassemble the 4th summicron? I'm not planning to go deep inside, just take off the focusing mechanism and take a look on what may cause issues with the aperture ring.
PS: Sorry for my poor English")
Thanks.
Andrii.
Recently I purchased late German ver4 summicron 35 2 in really nice condition overall except for one small issue, looks like it's aperture ring needs cleaning, it becomes sticky, especially if I do not use it for a few days then it is difficult to move for the first time so I have to make effort to budge it. Not a big deal for now but I'm afraid that with time it may cause more serious problems since the 4th one is known as not the sturdiest from 35mm summicrons.
So I was thinking about cleaning the ring out.
I was searching for disassembly instructions and found several great videos on youtube from a user called mikeno62. Unfortunately, there are videos for ver2 and asph summicrons and the 4th gen looks different since it does not have that ring which holds other crons together. It's back part looks exactly as the one on summilux 35 pre-asph in another mikeno62's video, but I afraid to break the lens without exact instructions.
Does anyone have information about how to disassemble the 4th summicron? I'm not planning to go deep inside, just take off the focusing mechanism and take a look on what may cause issues with the aperture ring.
PS: Sorry for my poor English
Thanks.
Andrii.
ferider
Veteran
Your English is just fine. Have a look here:
https://sites.google.com/site/kamer...naked-repairing-leica-summicron-35mm-pre-asph
and here
https://www.photo.net/discuss/threads/plastic-king-of-bokeh.432072/
Good luck,
Roland.
https://sites.google.com/site/kamer...naked-repairing-leica-summicron-35mm-pre-asph
and here
https://www.photo.net/discuss/threads/plastic-king-of-bokeh.432072/
Good luck,
Roland.
mirnuj_atom
Newbie
Your English is just fine. Have a look here:
https://sites.google.com/site/kamer...naked-repairing-leica-summicron-35mm-pre-asph
and here
https://www.photo.net/discuss/threads/plastic-king-of-bokeh.432072/
Good luck,
Roland.
Thanks, Roland!
But both the articles are missing the information I need, i.e how to begin disassembly, I see the parts apart but still can't figure out how to remove the focusing part from the lens.
michaelwj
----------------
Thanks, Roland!
But both the articles are missing the information I need, i.e how to begin disassembly, I see the parts apart but still can't figure out how to remove the focusing part from the lens.
It just unscrews - but hold the front where the hood attaches and the mount at the back. Don't hold the aperture ring or the focus ring.
mirnuj_atom
Newbie
It just unscrews - but hold the front where the hood attaches and the mount at the back. Don't hold the aperture ring or the focus ring.
Thanks a lot, Michael!
michaelwj
----------------
mirnuj_atom
Newbie
Don't thank me till it's undone
Well, it behaves much better when the square hood is not mounted, so maybe I'll wait with repair attempts
Last three times I tried to fix my Leicas ended up with sending them to Youxin...
tester23
Newbie
Summicron 35 V4 disassembly guide needed
Hello,
I am newcomer here so thank you and this is my first post.
Recently I finally managed to become Leica owner (M6) with first lens. It's Summicron 35 V4.
I bought the lens with very attractive price but it requires some maintenance.
I have experience with lenses from SLRs (Minolta, Canon) where disassembly is extremely simple. Usually start with removal of back part, removal of helicoids blockers and then the whole construct is just splitting into 2 parts. Finally lenses are removed from optical block and back group of lenses is removed as final step.
So I removed the back 6 screws on the Summicron and removed the metal bayonet - just to discover that it does not give access to anything. What's the correct first and second step to open this particular lens?
I am googling since 3 days and found a lot of videos and pictures for other versions of this lens; but it does not match. For example I tried for unscrew the whole optical block from the focusing helicoid as in older models but it does not move, and I do not want to put too much force on it. Anyone?
rlouzan
Well-known
tester23
Newbie
Hi,
Yes, i found it also before. But it does not say how to actually open the lens.
It shows you already opened body.
First link is broken but there is a copy in “way back machine”.
EDIT: I think I found it. It does not simply unscrew. It has the locking ring on the back side of the lens. It is barely visible between the inner helicoil and the optical block. There is 0,8-1mm of space and two small locking notches. Will need to machine the tool for it. Something like here but different size of tube.
https://youtu.be/6yUnGzboiU8?t=42
tester23
Newbie
Don't thank me till it's undone
Hi all, I have exactly the same question. Did you managed to get to focusing mechanism?
tester23
Newbie
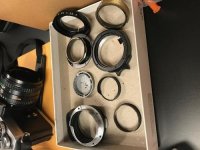
completed this disassembly
completed this disassembly
ok - i managed to solve this.
I cleaned, relubed and reassembled everything. Works normally.
I did not dare to fight with the actual glass. I do not have clean enough conditions or necessary tools.
Do not try to replicate actions from my description - I will not be held responsible for any damage.
So... steps for 35mm summicron ver4 pre-asph version disassembly are:
0. Focus on infinity
1. remove bayonet - do necessary markings
2. Remove the ring that is below bayonet (the one that was bolted together with bayonet using screws) - it is not attached. Little resistance expacted. Wiggle it a bit and it falls off without any force.
3. Just removed ring has 1 helicoil (the one that is visible and touches the rangefinder level in camera). Make pictures for later assembly.
4. Mark helicoil vs ring as it comes off. Notice and mark the release point. This part (point 4) took me half an hour - take your time. Make marks, photos etc.
5. Clean, lubricate, re-assemble helicoil with ring - put it away.
6. Slowly and again very carefully with all marks, photos etc unscrew the lens block from chassis helicoil. Mark the release point etc.
7. Optionally for me: on the main ring that is now empty you can unscrew 3 points to remove the focusing ring. In my case I had some glue securing the screws and I chosen not to touch it as I did not have any issue with this ring.
8. Back to optic block. Unscrew the yellow metal ring nearest to the rear lens.
9. Main helicoil is now almost loose. It is blocked by wire pin. In my case I pushed the pin gently into the lens body and it gave me enough space to remove the helicoil itself. This point only took me 20-30 minutes. Again take your time.
10. Make a few photos and remove the thin metal rings (washers?)
11. Remove o-ring slowly.
12. Very slowly remove aperture plastic ring - DO NOT LOOSE the metal ball and spring
That's it.
I still have some dust inside but I did not dare to touch the glass. I only unscrewed the front ring, removed the front lens only to discover that next lens is not easily removable. Because of risk of coatings damage or addtional dust I immediately re-assemebled this part.
After reassembly everything works correctly.
Now my lens body is refreshed, without oils, grease etc etc. One day I will send it to Leica to remove the dust.
Pictures are showing the level I reached. Seems like the chassis of lens block is single piece of plastic.
Attachments

Share:
-
This site uses cookies to help personalise content, tailor your experience and to keep you logged in if you register.
By continuing to use this site, you are consenting to our use of cookies.