Pete B
Well-known
I'm trying to improve my use of, development of and scanning of TriX in Perceptol. I know there are other chemicals but please try to keep on topic.
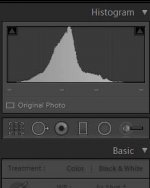
With Erik's guidance, using Tmax 400 @ 200 in Perceptol, I get this histogram:

This is very easy to work with.
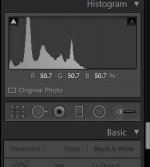
Now, shooting TriX400 at iso 200 and developing in Perceptol 1:1 for 12 mins at 20C gives me this histogram:

I can use this file, but what would I alter in my process to try to get the histogram more central like the Tmax file? Should I try shooting at 100? Should I again shoot at iso200 but try developing for only 10 minutes?
Ultimately, I'll compare my results with D76 or HC110, but for now I'm interested in Perceptol. Any help gratefully received.
Pete
With Erik's guidance, using Tmax 400 @ 200 in Perceptol, I get this histogram:

This is very easy to work with.
Now, shooting TriX400 at iso 200 and developing in Perceptol 1:1 for 12 mins at 20C gives me this histogram:

I can use this file, but what would I alter in my process to try to get the histogram more central like the Tmax file? Should I try shooting at 100? Should I again shoot at iso200 but try developing for only 10 minutes?
Ultimately, I'll compare my results with D76 or HC110, but for now I'm interested in Perceptol. Any help gratefully received.
Pete
Pete B
Well-known
Or am I thinking about this all wrong?
Pete
Pete
Erik van Straten
Veteran
When you want to compare the histograms of two different films - an interesting idea - you should have two negatives (one from each film) made with the same camera, the same lens, the same light and the same developer from the same object. It is hard to believe that the histograms you show meet these conditions.
Erik.
Erik.
Pete B
Well-known
They are not, but assuming they are, where do I go next with my experiment? Will shooting at iso 100 move the histogram to the right, or should I perhaps try less developing time?
Pete
Pete
Erik van Straten
Veteran
I think the main difference between the two histograms is the "ground tone", the tone of the film were no image is (between the perforations for example). 400-2TMY has a clear groundtone (like glass) and TriX will have a greyish groundtone. That makes a difference in the histogram. So the 400-2TMY has a (much) wider dynamic range. This leads finally to a much longer (broader) histogram and richer tones in the photograph. You can use a softer grade paper to print them when you make a wet print.
Erik.
Erik.
retinax
Well-known
When you want to compare the histograms of two different films - an interesting idea - you should have two negatives (one from each film) made with the same camera, the same lens, the same light and the same developer from the same object. It is hard to believe that the histograms you show meet these conditions.
Erik.
In addition, they need to have the same "exposure" from the scanner. You'd need to make sure the scanner doesn't auto-expose or apply levels.
Pete B
Well-known
I use vuescan so preview the rebate then set lock exposure. I think I might be barking up the wrong tree. How do you decide if there might be a more optimal exposure/ development regimen? I'm assuming exposure determines the shape of the histogram, and development determines the contrast. Basically what I'm asking for is what shall I try next.
Pete
Pete
Erik van Straten
Veteran
The best thing you can do is to put a film in a camera and shoot away. When the film is exposed, you just do what the manufacturer says about developing. I am sure that you can find suggestions on the internet how to develope the film. When the negs are ready, you start scanning. When you run into trouble, you'll ask us what to do.
Erik.
Erik.
Pete B
Well-known
I think the main difference between the two histograms is the "ground tone", the tone of the film were no image is (between the perforations for example). 400-2TMY has a clear groundtone (like glass) and TriX will have a greyish groundtone. That makes a difference in the histogram. So the 400-2TMY has a (much) wider dynamic range. This leads finally to a much longer (broader) histogram and richer tones in the photograph. You can use a softer grade paper to print them when you make a wet print.
Erik.
I completely missed this post. I think this answers my query.
Thanks Erik and Retinax.
Pete
Pete B
Well-known
I got around to scanning some TriX images this morning. I'm interested in your comments. I found the negatives more difficult to scan than Tmax.
These images were from a film run off at lunch time at 200iso. 1+1 perceptol for 12 mins @20C
 Test: TriX @200 Perceptol 1+1 by Pete, on Flickr
 Test: TriX @200 Perceptol 1+1 by Pete, on Flickr
 Test: TriX @200 Perceptol 1+1 by Pete, on Flickr
 Test: TriX @200 Perceptol 1+1 by Pete, on Flickr
 Test: TriX @200 Perceptol 1+1 by Pete, on Flickr
Pete
These images were from a film run off at lunch time at 200iso. 1+1 perceptol for 12 mins @20C
 Test: TriX @200 Perceptol 1+1 by Pete, on Flickr
 Test: TriX @200 Perceptol 1+1 by Pete, on Flickr
 Test: TriX @200 Perceptol 1+1 by Pete, on Flickr
 Test: TriX @200 Perceptol 1+1 by Pete, on Flickr
 Test: TriX @200 Perceptol 1+1 by Pete, on Flickr
Pete
Erik van Straten
Veteran
Congratulations! The scans are nice and sharp! The lightests and the darkests tones seems to be OK. I like #2 the best.
However, I think that the effect will be better still when you load these results again in Photoshop and pull the grey (middle) lever in "levels" a bit more to the right (darker). Just leave the other two levers where they are.
Erik.
However, I think that the effect will be better still when you load these results again in Photoshop and pull the grey (middle) lever in "levels" a bit more to the right (darker). Just leave the other two levers where they are.
Erik.
Pete B
Well-known
Cheers Erik, yes, I think I brought them up a little too far. Good to know I'm on the right track.
Pete
Pete
Pete B
Well-known
Redone:
 Test: TriX @200 Perceptol 1+1 12 mins @20C by Pete, on Flickr
 Test: TriX @200 Perceptol 1+1 12 mins @20C by Pete, on Flickr
 Test: TriX @200 Perceptol 1+1 12 mins @20C by Pete, on Flickr
 Test: TriX @200 Perceptol 1+1 12 mins @20C by Pete, on Flickr
 Test: TriX @200 Perceptol 1+1 12 mins @20C by Pete, on Flickr
Pete
 Test: TriX @200 Perceptol 1+1 12 mins @20C by Pete, on Flickr
 Test: TriX @200 Perceptol 1+1 12 mins @20C by Pete, on Flickr
 Test: TriX @200 Perceptol 1+1 12 mins @20C by Pete, on Flickr
 Test: TriX @200 Perceptol 1+1 12 mins @20C by Pete, on Flickr
 Test: TriX @200 Perceptol 1+1 12 mins @20C by Pete, on Flickr
Pete
Erik van Straten
Veteran
Much better! Great!
Erik.
Erik.
charjohncarter
Veteran
I'm not sure if I'm going to give information you don't want, but before I scan I look at the software of the scanner like Epson, or 3rd party like Vuescan. I want to be sure that I will not clip either the white or black points, you have done this with the Trix example. So I move my arrows to be sure there is extra room on both ends. Then when I go to my editing program I can move the levels arrow to the white and black points I desire. Sometime, this isn't all the way to the traditional B&W points. The one beauty of digital editing is you really have more control than with wet printing. So mistakes in development whether they are contrast or midtone curve are easily corrected.
Here is a recent photo that I was way off in development but I was able to not have the center light area not blown out using this method:
 Arista EDU ultra 100 HC-110h by John Carter, on Flickr
Here is a recent photo that I was way off in development but I was able to not have the center light area not blown out using this method:
 Arista EDU ultra 100 HC-110h by John Carter, on Flickr
Flat Twin
Film Shooter
Pete,
I think your Results with Perceptol/Tri-X look stunning, well done!
Regards
Simon
I think your Results with Perceptol/Tri-X look stunning, well done!
Regards
Simon
Pete B
Well-known
Thanks guys.
Pete
Pete
teddy
Jose Morales
Great balance in contrast on Pete's photos. Lovely.
Pete B
Well-known
Thanks Teddy
Pete
Pete
Gbull
Member
I am new to film photography. I am lost when said "Tmax 400 @ 200" ? 1) Is that means you exposed the film ISO400 with ISO200 EV or 2) exposed the ISO400 as box speed and deliberately develop the exposed ISO400 film at ISO200 developing process?
Sorry to side track the thread.
Sorry to side track the thread.
Share:
-
This site uses cookies to help personalise content, tailor your experience and to keep you logged in if you register.
By continuing to use this site, you are consenting to our use of cookies.
