navdra
Member
Y.A.C.S. (Yet Another Canonet Story)
Hi there!
I'm lurking on RFF for quite some time now, even had a few posts. But this time, it's truly RF related. I got my first rangefinder! Weee!
After doing some research, I, as many before me, decided that Canonet QL17 is a good RF to start with. Black was imperative to me, for purely cosmetic reasons and it pumped up the price a bit.
After careful watching I managed to snag one "as-is" black sample from eBay. In fact, I wasn't even serious about that auction at all, because I thought that I'll wait till next month, to refresh my bank account. I've set up miserably low snipe, just in case and was pretty much caught by surprise when I got "You won..." email from eBay. Fifty bucks for black one! Not bad, is it?
Seller didn't even say "as-is" but, I quote, "more for collection, not for use". Sounds ugly? And, oh yes, it is!
But I decided to take my chances, and, so far I'm pretty contempt!
Here are some problems that I've encountered and solved with it
Problems:
1) Stuck shutter (solved)
Trough the front, using chart divider with big tweezers across as lever for central element removal. This one was a bitch. Really though to unscrew. I even scratched that central element retaining ring before blunted divider's tips to better fit into those grooves.
My first idea was to use those walker's gum tip - those are 25mm inner diametar, so safe to use on central element which is 21mm, I think. BTW, you can also get those rubber tips for pole (18mm inner dia.) and crutches (22mm inner). Best thing is that they cost $1 or $2.
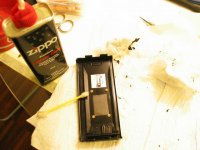
Anyway, I gently applied Zippo lighter fluid (great bottle with very nice cap) using Kleenex pieces held by tweezers, applied very light or no pressure at all, repeated untill there was no residues left over after exposure for both aperture and shutter blades. Works great now.
2) Badly deteriorated seals (solved)
Was a bit of pain in the ass to remove old gunk, but enjoyed it with Jon Goodman's instructions - these amuse me every time I read 'em.
New seals look sooo goood! Thanks Jon!
3) Wind lever not locking film advance (solved)
Used Rick Oleson's instructions. Peeled off leatherette, removed front plate, took out that lever and skewed it a bit to the left. Works ok now.
4) Dust and dirt all over (in progress)
Till now, removed and cleaned top, bottom, battery comp., three front rings, front, shutter area, viewfinder ...
5) Wobbly lens barrel (partially solved)
Tightened four screws that hold shutter plate fixed to the camera body behind leatherete and front plates. Took me some time to figure out that advance lever must me pulled if I want to screw in that lower right screw, and this one was the worst of all.
Wobbliness is much better now, but there is still some movement. I've checked that lefthand rear retaining ring. Seems tight in place. It looks like leftover wobble starts between focus ring and front part of lens. Suggestions? I've read about worn focusing threads and lubricant migrating out of focus helicoid. I'm thinking about relubricating it to see if it helps. White lithium grease should do the trick, I guess?
Camera is wide open anyway")
6) Stuck lightmeter needle (in progress)
I could really use help on this one... Feel free to share ideas.
Poped in silver oxide battery (see "7"). Battery check light works. But won't fire, nor move the needle below 1.7. It looks like it's stuck in red area.
I've read few threads about the roblem, but never read about solution. I believe there is one.
That serrated yellow thingie is suspicious to me. Shouldn't it be out of the lightmeter's needle way when camera is set to automatic?
When I short-circuit solderings on the back of galvanometer, needle moves nicely and even a light blow will move it, so it seems that wiring is fine, and so is friction.
7) Recalibrate to silver oxide voltage (to-do)
Decided to use silver oxide and recalibrate meter to 1.55 V.
After spending a day fiddling around camera, it seems that it'll be the smallest problem.
Will do it following excellent dmr's instructions here on RFF.
8) Lube where needed (to-do)
I have no idea where should I put any or what stuff to use. I'm anxious to get camera fully working and will probably get some white lithium grease now. I believe it would do good. Other than that, I have some "decanted" WD-40 left over from curing A-series squeal. As I've read, it's as good as best machine oils.
Help please. Where and what to put?
I'm sure I forgot something. Have to go home now, my "working" hours are over. Will be back to fill in later.
Few quick thankyous to some of you that helped me already:
@xayraa33
For measuring your Vivitar metal 48mm screw in hood. Thanks to you, I've got what it seems to be the last remaining identical hood available on eBay -wasn't marked as Vivitra, but friendly seller measured it up for me.
@dmr
For great spirit and ideas sharing. Reading your posts about your Canonet experience really inspires.
You asked for post summary when I'm done. Here ya go! Pics on it's way - have lots of 'em.
@Jon Goodman
For great re-seal kit, but even more for being so friendly and helpful. Jon, you rock!
@Rick Oleson
For fantastic sketches and tips. By looking at these, a kid could repair Canonet!
... sorry if I missed someone. I'm in a hurry now. As I've said, I'll add some pics later on. Interesting ones at least.
Regards
Hi there!
I'm lurking on RFF for quite some time now, even had a few posts. But this time, it's truly RF related. I got my first rangefinder! Weee!
After doing some research, I, as many before me, decided that Canonet QL17 is a good RF to start with. Black was imperative to me, for purely cosmetic reasons and it pumped up the price a bit.
After careful watching I managed to snag one "as-is" black sample from eBay. In fact, I wasn't even serious about that auction at all, because I thought that I'll wait till next month, to refresh my bank account. I've set up miserably low snipe, just in case and was pretty much caught by surprise when I got "You won..." email from eBay. Fifty bucks for black one! Not bad, is it?
Seller didn't even say "as-is" but, I quote, "more for collection, not for use". Sounds ugly? And, oh yes, it is!
But I decided to take my chances, and, so far I'm pretty contempt!
Here are some problems that I've encountered and solved with it
Problems:
1) Stuck shutter (solved)
Trough the front, using chart divider with big tweezers across as lever for central element removal. This one was a bitch. Really though to unscrew. I even scratched that central element retaining ring before blunted divider's tips to better fit into those grooves.
My first idea was to use those walker's gum tip - those are 25mm inner diametar, so safe to use on central element which is 21mm, I think. BTW, you can also get those rubber tips for pole (18mm inner dia.) and crutches (22mm inner). Best thing is that they cost $1 or $2.
Anyway, I gently applied Zippo lighter fluid (great bottle with very nice cap) using Kleenex pieces held by tweezers, applied very light or no pressure at all, repeated untill there was no residues left over after exposure for both aperture and shutter blades. Works great now.
2) Badly deteriorated seals (solved)
Was a bit of pain in the ass to remove old gunk, but enjoyed it with Jon Goodman's instructions - these amuse me every time I read 'em.
New seals look sooo goood! Thanks Jon!
3) Wind lever not locking film advance (solved)
Used Rick Oleson's instructions. Peeled off leatherette, removed front plate, took out that lever and skewed it a bit to the left. Works ok now.
4) Dust and dirt all over (in progress)
Till now, removed and cleaned top, bottom, battery comp., three front rings, front, shutter area, viewfinder ...
5) Wobbly lens barrel (partially solved)
Tightened four screws that hold shutter plate fixed to the camera body behind leatherete and front plates. Took me some time to figure out that advance lever must me pulled if I want to screw in that lower right screw, and this one was the worst of all.
Wobbliness is much better now, but there is still some movement. I've checked that lefthand rear retaining ring. Seems tight in place. It looks like leftover wobble starts between focus ring and front part of lens. Suggestions? I've read about worn focusing threads and lubricant migrating out of focus helicoid. I'm thinking about relubricating it to see if it helps. White lithium grease should do the trick, I guess?
Camera is wide open anyway
6) Stuck lightmeter needle (in progress)
I could really use help on this one... Feel free to share ideas.
Poped in silver oxide battery (see "7"). Battery check light works. But won't fire, nor move the needle below 1.7. It looks like it's stuck in red area.
I've read few threads about the roblem, but never read about solution. I believe there is one.
That serrated yellow thingie is suspicious to me. Shouldn't it be out of the lightmeter's needle way when camera is set to automatic?
When I short-circuit solderings on the back of galvanometer, needle moves nicely and even a light blow will move it, so it seems that wiring is fine, and so is friction.
7) Recalibrate to silver oxide voltage (to-do)
Decided to use silver oxide and recalibrate meter to 1.55 V.
After spending a day fiddling around camera, it seems that it'll be the smallest problem.
Will do it following excellent dmr's instructions here on RFF.
8) Lube where needed (to-do)
I have no idea where should I put any or what stuff to use. I'm anxious to get camera fully working and will probably get some white lithium grease now. I believe it would do good. Other than that, I have some "decanted" WD-40 left over from curing A-series squeal. As I've read, it's as good as best machine oils.
Help please. Where and what to put?
I'm sure I forgot something. Have to go home now, my "working" hours are over. Will be back to fill in later.
Few quick thankyous to some of you that helped me already:
@xayraa33
For measuring your Vivitar metal 48mm screw in hood. Thanks to you, I've got what it seems to be the last remaining identical hood available on eBay -wasn't marked as Vivitra, but friendly seller measured it up for me.
@dmr
For great spirit and ideas sharing. Reading your posts about your Canonet experience really inspires.
You asked for post summary when I'm done. Here ya go! Pics on it's way - have lots of 'em.
@Jon Goodman
For great re-seal kit, but even more for being so friendly and helpful. Jon, you rock!
@Rick Oleson
For fantastic sketches and tips. By looking at these, a kid could repair Canonet!
... sorry if I missed someone. I'm in a hurry now. As I've said, I'll add some pics later on. Interesting ones at least.
Regards
Last edited:
anirbax
Member
If you've got it fully working, congratulations! These are difficult to work with for the amateur tinkerer.
dmr
Registered Abuser
navdra said:Wobbliness is much better now, but there is still some movement.
Both of mine do this to an extent. Consensus is that a wee bit of movement is expected. The GIII just does not have the "silky" feel to the focus like others do.
That serrated yellow thingie is suspicious to me. Shouldn't it be out of the lightmeter's needle way when camera is set to automatic?
I'm not really sure what "thingie" you mean, but if it's the thingie that "traps" the needle to set the exposure, it's supposed to be out of the way of the opposide side of the meter needle until you press the shutter release partly, then it "traps" the needle and uses the position of the trapped needle to select how far to stop down the aperture.
When I short-circuit solderings on the back of galvanometer, needle moves nicely and even a light blow will move it, so it seems that wiring is fine, and so is friction.
The meter circuit is really very simple, but looks complex on the schematic since it's intertwined with the Canolite flash circuit. The two active parts of the exposure circuit are the meter and the light-variable resistor.
This light dependent resistor does sometimes go bad, and there was chat on one of the boards (Classic Camera Repair Forum?) of using a readily available one (Radio Shack?) or even a photo-diode as a replacement.
I would say a good ohm-meter and a flashlight can check this, at least for basic function.
7) Recalibrate to silver oxide voltage (to-do)
Decided to use silver oxide and recalibrate meter to 1.55 V.
After spending a day fiddling around camera, it seems that it'll be the smallest problem.
Will do it following excellent dmr's instructions here on RFF.
Thanks {blush}.
If all you're doing is compensating for that 15% or so higher voltage, you can probably get very close by just adjusting the variable resistor (potentiometer - not sure of the spelling there) at the high (bright) end of the scale. My major surgery was really to shift the whole thing by one f-stop in order to use 1600 film.
8) Lube where needed (to-do) I have no idea where should I put any or what stuff to use.
Consensus seems to be that you don't ever lube the shutter or aperture. I'm really not sure on the best practice here. Minority opinion is that things such as light sewing machine oil or graphite dust USED VERY SPARINGLY may be a Good Thing, but for every opinion that says to do this, you get 5 opinions telling you not to.
My one shutter freed up quite nicely with a bit of Ronsonol on a q-tip.
Hope this helps.
M C H
Member
Great post, Navdra. Did you buy your Canonet from the US? I remember a black one recently that matches your description.
Anyway, sounds like you're doing really good work. I look forward to seeing your photos on the board.
Anyway, sounds like you're doing really good work. I look forward to seeing your photos on the board.
navdra
Member
Thanks for answers and support!
Will answer to those later on. I'm anxious to finish the camera work.
For now, here are few pics that I've promised...
I'm not sure how it works, I believe that there's 5 pics per post limit. Ah, I'll try and see... Oh, 3 pics limit... Ah well, here we go:
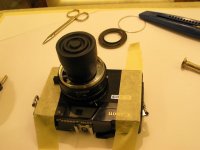
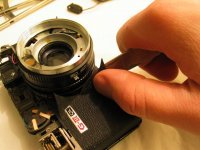
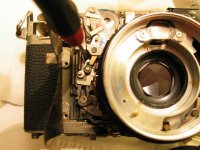
1. walker's rubber tip in action on central element collar - no go.
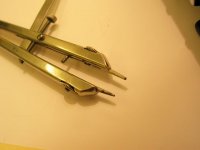
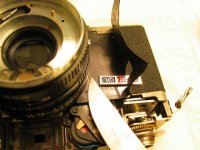
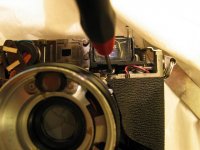
2. blunted chart divider's tips
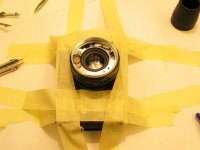
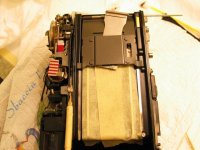
3. masking tape clamp (had to use both hands to get that central element collar going)
Will answer to those later on. I'm anxious to finish the camera work.
For now, here are few pics that I've promised...
I'm not sure how it works, I believe that there's 5 pics per post limit. Ah, I'll try and see... Oh, 3 pics limit... Ah well, here we go:
1. walker's rubber tip in action on central element collar - no go.
2. blunted chart divider's tips
3. masking tape clamp (had to use both hands to get that central element collar going)
Attachments
navdra
Member

navdra
Member
navdra
Member
dmr
Registered Abuser
navdra said:3. masking tape clamp (had to use both hands to get that central element collar going)
If you got the central lens element out without the use of major surgery, you did much better than I did! I had to drill two very small holes into the slanty part of the lens collar so I could use a lens spanner on it. I used a dremel tool and a jewelers bit for this.
Once the central lens element was out, I just applied a wee bit of Ronsonol on a Q-tip to the shutter blades, let it seep in, massaged it a bit, and the shutter snapped!
It actually startled me, I wasn't expecting it.
navdra
Member
navdra
Member
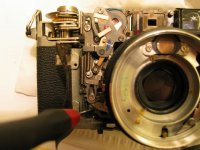
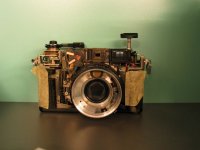
16. end of Day #1
Her ya go you voyeurs Enjoy.
I hope someone will have use from this.
Sorry about crappy pics. Taken without careful focusing and most of them with low shutter speed and left handedly (my shaky one).
Will get back to comment on your answers. Have to go to finish the camera.
Regards
Her ya go you voyeurs
Enjoy.I hope someone will have use from this.
Sorry about crappy pics. Taken without careful focusing and most of them with low shutter speed and left handedly (my shaky one).
Will get back to comment on your answers. Have to go to finish the camera.
Regards
Attachments
navdra
Member
anirbax said:If you've got it fully working, congratulations! These are difficult to work with for the amateur tinkerer.
Heh, keep congrats for later. That meter is still giving me headaches... The rest went fine. Lots of patience, some skill and clear head is all that one needs.
Thanks for support!
Regards
navdra
Member
I love "silky" feel. For now, it looks that I won't get it from this one. I've read elsewhere (kyphoto) about wobbliness and they pretty much say the same as you do. Too bad.dmr said:Both of mine do this to an extent. Consensus is that a wee bit of movement is expected. The GIII just does not have the "silky" feel to the focus like others do.
I localized wobbless, though. Small one between focus ring and the body and another small one between focus ring and the rest of the barell. That leads to conclusion that relubricating focus helicoid could at least minimize the wobble. Check this link and read what Rick say about it:
http://www.kyphoto.com/classics/forum/messages/6900/4493.html?1114545690
I was about to do it. Even bought white lithium grease as suggested but couldn't find instructions how to do it and didn't feel like trying my luck.
The biggest was coming from shutter plate screws. Got rid of that one at least....
Wobble. I love the word, though. Fills my mouth. Wobble, wobble!
You guessed right. That thingie. Figured it out. It works as it should.dmr said:I'm not really sure what "thingie" you mean, but if it's the thingie that "traps" the needle to set the exposure, it's supposed to be out of the way of the opposide side of the meter needle until you press the shutter release partly, then it "traps" the needle and uses the position of the trapped needle to select how far to stop down the aperture.
Got it. By short-circuiting the metar and observed needle movement I think I ruled out meter itself...dmr said:The meter circuit is really very simple, but looks complex on the schematic since it's intertwined with the Canolite flash circuit. The two active parts of the exposure circuit are the meter and the light-variable resistor.
...and this is what I should be checking next. Will borrow ohm-meter in day or two and take a closer look at schematcis. Do you maybe already know which wire does what and save me the trouble of finding it out myself?dmr said:This light dependent resistor does sometimes go bad, and there was chat on one of the boards (Classic Camera Repair Forum?) of using a readily available one (Radio Shack?) or even a photo-diode as a replacement. I would say a good ohm-meter and a flashlight can check this, at least for basic function.
I dropped the idea of modifying it for 1600. Nice work on that one, though!dmr said:If all you're doing is compensating for that 15% or so higher voltage, you can probably get very close by just adjusting the variable resistor (potentiometer - not sure of the spelling there) at the high (bright) end of the scale. My major surgery was really to shift the whole thing by one f-stop in order to use 1600 film.
I was thinking about other places, not just shutter or aperture. Ah, well. If it ain't broke don't fix it, heh? I'd like to lube up that focus helicoid though, if I could figure out how...dmr said:Consensus seems to be that you don't ever lube the shutter or aperture. I'm really not sure on the best practice here. Minority opinion is that things such as light sewing machine oil or graphite dust USED VERY SPARINGLY may be a Good Thing, but for every opinion that says to do this, you get 5 opinions telling you not to.
Sure does! Cheersdmr said:Hope this helps.
Regards,
Drazen
Last edited:
navdra
Member
Thanks.M C H said:Great post, Navdra.
Nah, France.M C H said:Did you buy your Canonet from the US? I remember a black one recently that matches your description.
http://cgi.ebay.com/ws/eBayISAPI.dll?ViewItem&item=260206585380
I hope you enjoyed 'em.M C H said:Anyway, sounds like you're doing really good work. I look forward to seeing your photos on the board.
Regards,
Drazen
navdra
Member
Yes, I did! Chart divider idea struck my mind yesterday in the office, the same day Canonet arrived (just in time!). Tweezers across it when I was trying to unscrew it.dmr said:If you got the central lens element out without the use of major surgery, you did much better than I did! I had to drill two very small holes into the slanty part of the lens collar so I could use a lens spanner on it. I used a dremel tool and a jewelers bit for this.
Mine was actually firing, but in very, very slow motion. So it wasn't cocked in the first place. I was repeating lighter fluid drill until there was no visible leftover (thin film of residue, probably that shellac that Matt Denton mentiones on his Canonet page).dmr said:Once the central lens element was out, I just applied a wee bit of Ronsonol on a Q-tip to the shutter blades, let it seep in, massaged it a bit, and the shutter snapped!
It actually startled me, I wasn't expecting it.
Well, at least, you were pleasantly surprised!
Regards,
Drazen
Jon Goodman
Well-known
Nice work! There is a trick to minimizing lens wobble (although it can probably never be eliminated). You go in from the bottom to perform it. I will charge the battery in the old Sony Mavica I use for instruction work and make an image for you...please let me have a day for this. I'm whipped and going to hit the hay tonight. The meter is likely to be a lost connection. Could be a dead solder joint, bad wire or maybe the hairspring wire of the coil itself. This can be a needle in a haystack hunt, though. I'll follow with more in an e:mail...
Jon
Jon
navdra
Member
Thanks Jon. I did my best.Jon Goodman said:Nice work!
You're really a friend! Will be waiting to hear from you. I'm on to shooting a test roll, so put everything back together.Jon Goodman said:There is a trick to minimizing lens wobble (although it can probably never be eliminated). You go in from the bottom to perform it. I will charge the battery in the old Sony Mavica I use for instruction work and make an image for you...please let me have a day for this.
Haystack hunt. Doesn't sound amusing :bang:Jon Goodman said:I'm whipped and going to hit the hay tonight. The meter is likely to be a lost connection. Could be a dead solder joint, bad wire or maybe the hairspring wire of the coil itself. This can be a needle in a haystack hunt, though.
But, I have time. Will start playing with ohm meter when I get it and will probably manage to locate the problem precisely.
I put everything together for the time being. Used two-sided thin adhesive foil for letherete which turned up really nice and should be easy to remove again if needed, and it will be...
I want to shoot a roll or two. Will use 1/16 sunny rule.
Ah, yes... After assembling it I've payed more attention to focus ring and realized it's pretty stiff. Can even hear it moving. This one goes to my main list:
9) Grease focus helicoid (to-do)
Focus is stiff and loud. Both sides - to the body and to the lens barell are wobbly. I'm pretty sure that cleaning and relubricating it will do good for it. I just have to figure out how to do it. Will try to search for help on KYphoto...
And #6 can easily be changed to
6) Dead meter (to-do)
First, I must localize the problem and see what to do next. Is it dead meter, od dead diode, or dead solder joint, or ... or....
That's it for now. Keep your fingers crossed for me.
Regards,
Drazen
Jon Goodman
Well-known
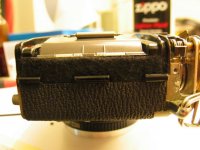
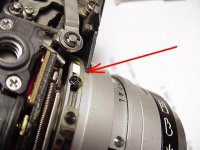
The Canonet lens/shutter "wobble" is always going to be present to some extent. There are no less than three reasons. Here is the first: The red arrow points to the area where the bottom of the lens is left with nothing to back it up. What would keep us from simply shimming a thick piece of cardstock between the two pieces? Nothing. But the cocking arm will not work correctly if we do this.
Attachments
Jon Goodman
Well-known
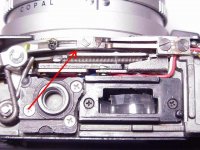
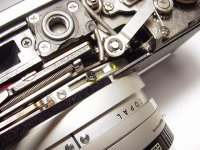
So, we can forget about that idea and concentrate on area of wobble number 2 (or dos as us bi-guys might say)...bi-lingual, that is. Area 2 is that area between the body cutout and the ledge around the lens. You can see it at the tip of the red arrow. What we're going to do is cut a piece of 1/32" thick self-adhesive fabric seal (from the stuff in my lightseal kits). Cut this about 2mm wide. You'll see what we do with it shortly...
Attachments
Jon Goodman
Well-known
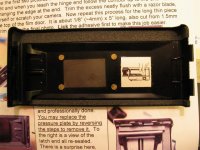
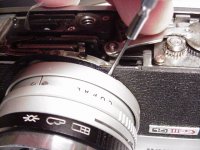
Take a piece of the self-adhesive fabric which is about 1 or 1.5 inches by 2mm, remove the backing paper and lick it well. Put it in your mouth to get it really wet if you want. Go ahead, Alice. It won't hurt you. Then, using a tiny screwdriver slide it under the body cutout and into the channel of the lens (you'll see it...you can see what I'm doing here). You may work the focus back and forth to help pull the fabric seal under. Keep it centered in the channel. Now you see why having it wet is important.
Attachments
Share:
-
This site uses cookies to help personalise content, tailor your experience and to keep you logged in if you register.
By continuing to use this site, you are consenting to our use of cookies.