HuubL
hunter-gatherer
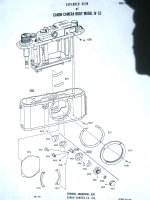
After gathering some info on its innards, yesterday I cleaned and lubricated my Contax IIa and I'm very happy with the results! The slow speeds run beautifully and everything works just silky smooth. This strengthened my confidence that I should also be able to fix the slow speeds on my Canon IVSb. However, before I start unscrewing it would be nice to have a general idea of where to start and what to expect... Anybody knows a link to a IVSb repair manual??
xayraa33
rangefinder user and fancier
It should be easier than the work on your Contax.
you have to unsolder the flash contact wire at the bottom of the camera after the diagram cover removal.
then it is the removal of the lens mount, any paper shims, screws and the body screws, the three on the vulcanite and the perimeter top cover screws.
the body shell can now be slid out along with the pressure plate and the springs.
you can now clean and lub the shutter drum and roller pivot points.
the slow shutter speed escapment unit can be removed from the base of the crate and thrown in a small container of Ronsonol for a good soak cleaning for a few hours.
then it is a matter of re- assembly in reverse order.
xayraa33
rangefinder user and fancier
the work should be similar to this on this IIIf, actually a little easier even.
http://www.mediajoy.com/en/lrc/loh/index.html
ZorkiKat
ЗоркийК&
Those paper shims found under the lens mount flange are important- their relative positions that is. Note where you find them, and make sure that they are positioned exactly as found them during reassembly. Sometimes the shims -spacers which ensure that the lens mount flange is precisely at 28.8mm at all points from the focal plane. Some of the shims are not even full- they may just be half or a quarter or even bits strategically placed, to compensate for some uneveness in the body and mount surfaces.
One difficult part of disassembling the bottom loading Canons is the slow speed dial. These would have a lot of parts consisting of spacers, rings, tiny cams, and more screws. In fact, one of the fastening screws which hold the shutter crate to the body is found under the slow-speed dial. The crate cannot be accessed without removing the slow speed dial. Again try to memorise the positions and orientations of the various parts you find as you take the camera apart.
Canons and similar cameras have much simpler mechanisms than any Contax. Servicing them is also much easier.
You might find the info here http://jay.fedka.com/index_files/Page455.htm useful for taking Canon bottom loading cameras. FED and Zorki Leica II clones have a lot in common with Canons in terms of basic assembly, though the slow speed mechanism is absent.
Jay
ZorkiKat
ЗоркийК&
the work should be similar to this on this IIIf, actually a little easier even.
http://www.mediajoy.com/en/lrc/loh/index.html
Actually, the Canon II, III, and IV disassembly have more in common with pre-IIIc Leica (like the III or IIIa) because of the slow-speed dial component. In these Leicas, the slow speed dial has to be removed before the crate can be pulled out of the body shell. Leica IIIc and IIIf, as well as IIIg allow the crate to be pulled out without removing the slow speed dial.
Jay
xayraa33
rangefinder user and fancier
The slow speed dial removal was not a big chore to get at that screw.
I cleaned a Canon III with sticky slow speeds when away from home in my hotel room in 1992.
a note pad and a pen are very helpful in making diagrams of what you did.
I cleaned a Canon III with sticky slow speeds when away from home in my hotel room in 1992.
a note pad and a pen are very helpful in making diagrams of what you did.
Last edited:
payasam
a.k.a. Mukul Dube
Youxin Ye told me some months ago that he had stopped working on Canon RFs because they use aluminium parts which become brittle with age.
xayraa33
rangefinder user and fancier
HuubL
hunter-gatherer
He guys, great! And many thanks for the diagram and link xayraa33. It's too dark now, but I'm going to try it first thing tomorrow when the sun is up 
xayraa33
rangefinder user and fancier
Good luck, it has been a while since I worked on the Canon bottomloader and more recently, a Leica IIIc with sticking slow shutter speeds.
good light and a magnifying lupe, + patience are a must.
HuubL
hunter-gatherer
Just to let you know. I did it! The slow speeds are running beautiful again! The problem wasn't that the slow speed escapement was dirty or sticking, the bar transferring the setting from the slow speed dial to the escapement was displaced. With a lot of trial and error and fiddling around with tweezers and screwdrivers, I finally got it locked in place again.
I was impressed by the high quality of the innards. All brass and fitting beautifully. The only aluminum item was the transfer bar and it wasn't oxidized or deteriorated. These Barnack Canons are extremely high quality!
That was the second classic RF that I fixed the last two days. Maybe I'm going to offer my services as a cla-er here
Xayraa, Thanks again for your guidance!
xayraa33
rangefinder user and fancier
that is good to hear, we got to keep these old gems running in tip-top shape.
VictorM.
Well-known
While cla'ing my IIF, I removed the lens mount and discovered no shims! I cut shims from a brown paper bag using an x-acto knife using the mount as a guide.
radiocemetery
Well-known
Thanks from me too. I needed this info. especially about the slow speed mechanism to do the same work on my Canon IIf. I have been hesitant to do this because the camera almost looks like new and I didn't want to make any mistakes I would regret later.
Xayraa33, Is this as far as one needs to go to lube the shutter drum and roller mechanisms? My IIf has a definite squeak or sort of a high pitched whistle when the shutter is released. The shutter does work at all speeds.
Last edited:
xayraa33
rangefinder user and fancier
it should do if your high shutter speeds are ok and the shutter curtains are in good condition.
as you are not adjusting the high shutter speeds or replacing the shutter curtains, as these really take more skill and a shutter speed tester might be needed.
if you are not too sure about your camera repair skills, you are much better off sending your pristine camera to a qualifed camera tech.
it will be cheaper in the long run.
Last edited:
nodyad
Member
Victor, the shims are present mainly to adjust each corner of the mount individually to an exact distance from the film plane. They are much thinner than brown paper bag--more like very thin foil or tissue paper strips about 1.5 cm long. If your camera did not have any, perhaps an earlier owner lost them, not knowing what they were for. Since they are so thin, you might be better off going back to no shims since a thick gasket is most likely to affect true infinity focus. There is an enlightening discussion of Canon shim adjustment toward the end of this particular p.net thread.
HuubL
hunter-gatherer
My camera had two shims, not paper but one very thin brass and one even thinner alu foil like. They were positioned from approx. 7 to 11 o'clock and 3 to 5, respectively.
Another thing is, the slow speed escapement is located in the bottom of the crate and it's impossible to reach it with regular straight screwdrivers, without dismantling the shutter form the crate. Mine was clean and didn't need a ronsonol treatment. The problem was a dislocated transfer rod that I could fiddle back with a little trial and error. If your slow speeds don't run because of a dirty slow speed escapement, let it be fixed by a pro!
One other thing, when you do the dismantling, make notes and photos!
VictorM.
Well-known
I removed the shims because the camera focused fine without them-even using a 135mm Hektor. The only shim it really seemed to need was in one corner-the other dimensions were exactly 28.8mm.
The slow speed escapement cover is held in place with two screws-the one at the rear is easily accessed if the shutter is held open on 'B'. The escapement is removed after removing only two screws from the bottom of the crate. The shutter stays in place.
HuubL
hunter-gatherer
I removed the shims because the camera focused fine without them-even using a 135mm Hektor. The only shim it really seemed to need was in one corner-the other dimensions were exactly 28.8mm.
The slow speed escapement cover is held in place with two screws-the one at the rear is easily accessed if the shutter is held open on 'B'. The escapement is removed after removing only two screws from the bottom of the crate. The shutter stays in place.
I couldn't reach it with my screwdrivers, not enough grip on the screws. But good to know that it worked out for you.
nodyad
Member
I removed the shims because the camera focused fine without them-even using a 135mm Hektor. The only shim it really seemed to need was in one corner-the other dimensions were exactly 28.8mm.
Thanks for the background--sounds exactly right. Your description sounded like you might have made an overall "gasket" for the mount, which would be overkill. I'm glad that all is well!
Share:
-
This site uses cookies to help personalise content, tailor your experience and to keep you logged in if you register.
By continuing to use this site, you are consenting to our use of cookies.