M2 DIY repaint - Too bad it won't last...

sanmich

Veteran
Local time
10:28 AM
Joined
Nov 3, 2006
Messages
3,420
I am working for a while now on my M2 repaint project.
Buying clamps, gathering info from the web about dismantling and painting and so on.

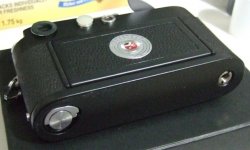
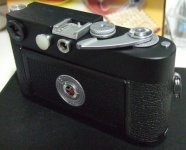
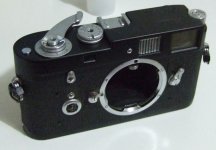
Today it came to an end and here are the results.

My first thoughts after:

1- Many great people around helped a lot. Tom A, Zen shooter, Martin Tai, and others that were kind enough to share their knowledge. Kudos!:cool:

2- It looks just like I want. IMHO, much better than before in any case (lots of scratches and marks). the silver on black is a remanence of older black barnacks. I'm just sorry that it won't last. The first scars have appear during reassembly. I expect the painting on brass to be a major problem here. I will start gathering info on paint stripping and tougher coatings for brass:D . Some have suggested the Brownwell stuff for guns:confused: any suggestion?

3- Technical stupidity: I broke the screw of the self timer lever in an attempt to open it to renew it. It will have to go to some tech for that.

4- the back door is really nice and it seems to me that the paint has a better grip on the aluminum.
 

Attachments

  • DSCF1537.jpg
    DSCF1537.jpg
    158.9 KB · Views: 0
  • DSCF1538.jpg
    DSCF1538.jpg
    188.5 KB · Views: 0
  • DSCF1534.jpg
    DSCF1534.jpg
    153.4 KB · Views: 0
Last edited:
Hoppe's Gun Bluing will put a pretty sturdy black finish on brass but it tends to be a matte finish, not the high gloss that it puts on polished steel. If you're looking to be a stealthy street shooter that would be a good thing. Also a small bottle and a cotton swab would be all you'd need to touch up any brass that might appear from time to time along the edges.
 
Hi,the Brownells Gun-Kote or Baking Laquer are top shelf items and work as described.I've finished several barrelsand receivers and wouldn't touch anything else.Tough stuff.................Robin
 
Looks nice Michael. The self-timer screw is a LH thread which is probably how you broke it. Drill a very small hole in the screw with a wire size bit and a pin vise. You don't have to drill too deep. A small jewelers screwdriver wedged in the hole and turned CLOCKWISE should easily remove the broken stud. Stu
 
Thanks for the tips on the gun coatings.
Yes, I do want a dull mat look.
I have seen a thread proposing the gun-kote but they won't ship outside the US...
My thought was also: It is said to be very strong. I better have my first try done on a stuff that I can repair if I mess it.

If it come to that (I will give it a run for the next month in any case), what would you advise for the paint stripping?
 
A Dremel Mototool might be easier to handle with tiny drill bits than a full sized electric drill. You can but the Dremel and bits at any hobby shop catering to model builders. A foot pedal like sewing machines have allows for adjusting the speed. Dremel offers a supply of tiny drills as well as burrs like dentists use, tiny grinding stones, and a little thingie for 25mm (1 inch) sandpaper discs that looks like a miniature sanding attachment for an electric drill.

Dremel sees ya comin' and starts drooling when they discover you want sandpaper discs...LOL They ain't cheap! They sell them in little carded blister packs. If you think you'll be doing a lot of this kind of thing then buy a one inch hole punch, the kind that you hit with a hammer. Take six or eight sheets of sand paper stapled together at the corners. I put about a three foot length of 2" X 8" board across my thighs under the sandpaper and start pounding. I do that sitting in a lawn chair on the front porch so I can just sweep the bits of paper and sand into the grass. It's too messy to do in the house!

Do NOT buy cheap sand paper. It wears out too fast and you'll spend more money in the end. Also you'll waste a lot of time changing discs. 3M brand 414N TRI-M-ITE Fre-cut Paper A wt. Open Coat 220 should have you in business. It's grey in color and this batch at least is made in Canada. My ex restores porcelain antiques and has all the goodies, tools, air compressor with air brushes, and half a million colors of lacquer. It pays to stay friendly with the ex. I'll make her a few hundred discs and either get invited to dinner or some of her homemade German pastries in exchange.
 
Last edited:
Michael, will you use a paint stick to restore the engravings?

I would if I knew where to get one. Any idea?
The paint stick price is very low but shipping outside the US from Microtools is a bit crazy.
In any case, I want to see how the finish lasts before worrying about the engravings. No points to repaint them if I have to redo the paint job right?
Also it looks quite ok like this....
 
Michael, I like the look of your M2 - I had my doubts before you started, but the black and chrome works for me.

http://www.micro-tools.com should have the paint stick that you are looking for.

Question: Does anyone here on the forum have experience using the Micro Tools paint stick?
 
Michael, I like the look of your M2 - I had my doubts before you started, but the black and chrome works for me.

http://www.micro-tools.com should have the paint stick that you are looking for.

Question: Does anyone here on the forum have experience using the Micro Tools paint stick?

Thanks Andrew

I was looking for another source (not micro-tools) for these paint sticks.
Are these dedicated for camera use or is there other applications/shops where I can find them?
 
Encaustic/Hot wax (similar to Oil Paint Sticks) from an Art Supply Store:D.

http://en.wikipedia.org/wiki/Encaustic_painting

I would if I knew where to get one. Any idea?
The paint stick price is very low but shipping outside the US from Microtools is a bit crazy.
In any case, I want to see how the finish lasts before worrying about the engravings. No points to repaint them if I have to redo the paint job right?
Also it looks quite ok like this....
 
Last edited:
Back
Top Bottom