You are using an out of date browser. It may not display this or other websites correctly.
You should upgrade or use an alternative browser.
You should upgrade or use an alternative browser.
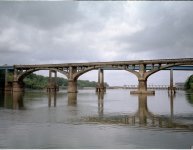
Wow ! Is this grain ??
- Thread starter srtiwari
- Start date
- Latest activity Latest activity:
- Replies 17
- Views 1K
peterc
Heretic
Is that the full frame?
If it is, there was something WAY off in the processing. Looks like reticulation, which can be caused by a big change in temperature from one chemical to another.
Peter
If it is, there was something WAY off in the processing. Looks like reticulation, which can be caused by a big change in temperature from one chemical to another.
Peter
Kevin
Rainbow Bridge
I love grain. This is excessive though. Besides dirt and scratches, improper processing is another risk of using film.
B
boarini2003
Guest
That grain does seem over the top. Never seen grain like that in an 800 film.
Trius
Waiting on Maitani
I'm with Peter; it's reticulation.
Berk Sirman
Member
I sure hope that's not full frame.
I once bought a roll of Superia 800 from a store in Kios island (Greece) in midsummer. The store was not airconditioned. The film had horrible grain. I think the storage plays a very important role in grain especially in these high speed films.
I once bought a roll of Superia 800 from a store in Kios island (Greece) in midsummer. The store was not airconditioned. The film had horrible grain. I think the storage plays a very important role in grain especially in these high speed films.
dmr
Registered Abuser
I hope that's not a full frame!
I use the Fuji 400 and 800 regularly and never get anything nasty like that.
I use the Fuji 400 and 800 regularly and never get anything nasty like that.
Trius
Waiting on Maitani
Post it on flickr and refer to a neat action you created in Photoshop. The crowd will go wild.
srtiwari
Daktari
srtiwari
Daktari
The film was bought a month ago; did lie around NOT in the fridge; processed by CVS, scanned on KM 5400 II at about 3500 resolution, using the KM software, with digital ice, but no other scanner processing; then used PS 7 - slight correction in levels, then Neat Image was used , and finally USM with 190/ radius 1/ threshold about 15.
Hope this helps...
Subhash
Hope this helps...
Subhash
celluloidprop
Well-known
That is a fairly massive crop compared to the original, the grain may not be excessive. Doesn't look excessive full-frame.
pesphoto
Veteran
I'd have to see the actual print or neg under a loupe to determine what the grain looks like. The crop does look reticulated, but its an extreme crop.
srtiwari
Daktari
pesphoto
Veteran
This last one looks much better. Sometimes we can over process images with the computer. Grain with 800 speed film is expected and normal. I like it, in fact. If you want to get rid of it try a slower film rather than use a program.
peterc
Heretic
Yup. That first one was overuse of PS.srtiwari said:This is the crpo WITHOUT any processing.
Peter
Pherdinand
the snow must go on
I guess it is grain wildly exaggerated by a strong Unsharp Mask filter.
Happens to me as well, when i crank it up on a scanned colour neg frame.
USM at 190, with a radius of 1, is a bit too much I'd say. I prefer to apply weaker USM and repeat if necessary.
Happens to me as well, when i crank it up on a scanned colour neg frame.
USM at 190, with a radius of 1, is a bit too much I'd say. I prefer to apply weaker USM and repeat if necessary.
Last edited:
sfb_dot_com
Well-known
Pherdinand said:I guess it is grain wildly exaggerated by a strong Unsharp Mask filter.
Happens to me as well, when i crank it up on a scanned colour neg frame.
USM at 190, with a radius of 1, is a bit too much I'd say. I prefer to apply weaker USM and repeat if necessary.
Threshold of 15? though would result in negligble visible sharpening, however might be enough to conflict with the Neat Image algorithm. The original image looks a bit flat. Might it be also a case of underexposure and a thinnish neg which when scanned, then processed in PS causes exaggeration of grain. Overall, though I'd say the original image looks fine.
Andy
jaapv
RFF Sponsoring Member.
Of course I agree with other posters that this is wildly overworked in post-processing. But there may be some other things to consider:
1. If one has a high-res scanner the grain gets ugly when used at the highest resolution. For instance my Minolta has finer grain at 2700 DPI than at 5400 DPI. Grain aliasing. But the same goes for a 2700 DPI scnner, which will be better at 1300 DPI.
2. It pays to make a mask and only apply Neat Image to the sky, if one wants to reduce grain. I usually reduce grain by about 50% to match the result of a chemical process.
2.It also looks a lot nicer if one only removes the colour from the grain. Make a layer, apply Gaussian blur to the layer to hide the grain, remove the colour and merge visible. Use the opacity slider to control the effect.
3. USM is pretty primitive and tends to produce halo's, artifacts and other horrible effects. A setting of 90%, radius 1 and threshold 1 is often a good starting point. But again, mask and only apply to the parts of the photo you want sharpened, not to sky, snow, etc. After that you can select for instance eyes and add sparkle by sharpening them another 100%. Luminance sharpening is nice as well, or sharpening just one colour, or sharpening a B&W layer and merging.
4. Focal Blade gives far more sharpening control, removes halo's and adds glow.
5. Sharpening is the very last step. Save the final image before sharpening as you may want to apply different settings for different output.
6. Keep experimenting and reading.
Btw. Print film should be easier to scan and postprocess than slide film.
Last edited:
Similar threads
- Replies
- 42
- Views
- 4K
- Replies
- 53
- Views
- 7K
- Article
- Replies
- 72
- Views
- 8K
- Replies
- 41
- Views
- 2K


