douwe
Jazz and Silver
Hi all,
I made a laser alignment tool for my enlarger. Since I really couldn't find much information on this anywhere I decided to share here.
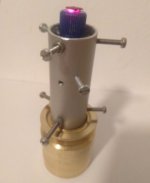
Below you find a short description on how I built it. In its most basic form, the aligner is a disc with three adjustable feet and a cross laser in the middle pointing straight up. See the pictures below.
Once calibrated the laser points exactly 90 degrees upward when you put it on the baseboard of the enlarger. A reflection of the laser beam reflecting from either the glass in the negative carrier or a mirror attached to the lens should return exactly to the source, the laser diode. If so, you have parallel planes. If not, you adjust any of the two planes until the laser beam does return straight down.
I made the apparatus from a 3d-print I designed, a cheap 3-5V cross laser diode, and some M5 heat-set threaded inserts with hex screws inserted from the bottom:


I made a laser alignment tool for my enlarger. Since I really couldn't find much information on this anywhere I decided to share here.
Below you find a short description on how I built it. In its most basic form, the aligner is a disc with three adjustable feet and a cross laser in the middle pointing straight up. See the pictures below.
Once calibrated the laser points exactly 90 degrees upward when you put it on the baseboard of the enlarger. A reflection of the laser beam reflecting from either the glass in the negative carrier or a mirror attached to the lens should return exactly to the source, the laser diode. If so, you have parallel planes. If not, you adjust any of the two planes until the laser beam does return straight down.
I made the apparatus from a 3d-print I designed, a cheap 3-5V cross laser diode, and some M5 heat-set threaded inserts with hex screws inserted from the bottom: