The CV 40/14 is a superb lens. Although it brings up the 50mm frame line without modifications, a simple way to deal with it is to think the frame line as the subject margin, not the frame margin. That way, when composed to the very edge of the frame leaves you a ~15% "print" margin all round...also a great way to visualize framing for eyeglass wearer.
This visualization method works on many lens/frame combo. [I use my ZM 35mm frame composing tightly for a CV 25/4 lens.]
If this visualization method bothers you, filing down that claw about 1mm is easy [you can finger hold the lever to the 35mm position to visualize the effect
before surgery.]
The surgery procedures are:
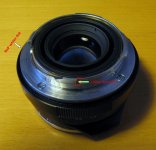
- File the lower edge of the 9 o'clock claw [when the lens DoF white dot is at 12 o'clock position]. The upper edge is where the scoop for the cam follower starts...where the brass helical shows, leave it alone.
- Crank the lens to closest focal distance [rear element most recessed] and cover it with a cap. A Kodak plastic film canister cap is perfect size.
- Tape the cap down and completely seal the rear, also around the work area with masking tape.
- The mount is made of brass and files easy. Use a diamond needle type file...only cost a few dollars, half-round cross section type is best, use the flat side of course. The sharper file edge will help you get a neat corner.
- After removing the claw edge shy of 1mm, you will start to see the 35mm frame line showing up. If the line thickness seems a little thin, file some more. [All that claw edge does is to give enough room for the lens selector lever get to the 35mm position when no lens is mounted.]
- Use a blower to clean the work area when finished.
Now your 35mm frame will be a very tight 40mm, Nikon F2 style. The simple math equation to estimate the actual frame coverage:
Multiply frame focal length by 1.15 (because such frames are only meant to be 85% coverage at 1m)...a 35 is thus really a 40.
I had long verified that by placing a Nikon B-type screen on the top surface of the film plane guide rails, set and hold shutter at "B", and checked using hard objects such as building edge...at all focal distances and apertures. This method also works for checking lens hood vignetting.