6 bit sensor

Andy Aitken

Registered Loser
Local time
6:49 AM
Joined
Aug 2, 2006
Messages
282
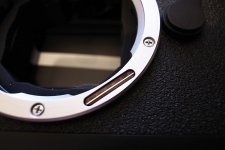
I've noticed that my M8's 6 bit sensor looks quite different from the pictures I've seen of other M8's. My one has a thin metallic strip running along it and I'm wondering what this is, if it should be there or if it is simply a production upgrade.

It wouldn't bother me other than that I've been fiddling around trying to "fool" the sensor into recognising my Kobalux 21mm f2.8 as a Leica 21mm f2.8 with black marker on the LTM-M adapter (as described online) without success. I don't have any 6 bit lenses and am unlikely to be having any any time soon and, while I don't notice any problems with my non-Leica wides I'd now just like to ensure the sensor is working properly. And yes I did remember to enable it in the menu.

Does anyone else have a sensor that has the metal strip and that works fine? hopefully a picture of it can be seen here...

Thanks
 

Attachments

  • 6bitSensor.jpg
    6bitSensor.jpg
    79.3 KB · Views: 0
BTW I'm quite prepared to accept that my inept attempts to "con" the M8 may have run afowl of the M8's superior intelligence...
 
Each bit has a pair of infra red transmitter receiver diodes. The transmitter illuminates a coding dot and the reflected light is detected by the adjacent receiver diode. The thin metal strip is an infra red opaque barrier to ensure there is no direct path for light between each transmitter-receiver, only reflected light from the coding dot.

Yes, mine also has the metal strip.

Bob.
 
I've got the metal strip as well, but i only noticed it after your post. Works fine with Leica as well as Hans-coded lenses.

Hans
 
I've given up for now. I can get the camera to recognise various fake lenses by putting a bit of tape over the sensor but whenever I try to mark the lens flange with a black marker - nada. I did notice that the recognition only works if the appropriate frameline is activated - I hadn't thought that would matter.
Wasted far too long on this already :bang:. I've been using the print-out template so my locations should be ok. Perhaps I have the wrong pen :confused:.

Is there any special trick to faking the 6 bit codes?

And does it even make any difference anyway?
 
I used the black fine point Sharpie brand. It worked on both lens I tried. Here is the trick I used (I tried template first but it wasn't working very well for me).

1. On the camera, with the lens removed create a fine line mark where each sensor is located on the rim of the flange.
2. Put the lens on and lock it.
3. Mark corresponding marks on the lens for the bit positions that the particluar lens calls for in line with the marks on the camera flange.
4. Remove the lens and now create the code marks about the width of the sensors where you marked on the lens flange edge.
5. Use a small amount of nail poslish remover to revoce the marks from the camera and the lens flange edge (the latter only if it bothers you because it saves you doing this again when you need to remark as it wears off).
Be careful and don't get gobs of acetone everywhere. It only takes a little bit on the tip of a cuetip to remove it. You don't want any in your lens or camera body.

Put on the lens and snap a frame. Review the picture and press info. You should see the lens focal length just below the right top part of the frame count.

Good luck and have fun.
 
Some black/blue dyes used in marker pens are transparent to infra red light. You may need to try several different pen types before you find one that is sufficiently opaque.


Bob.
 
Ah! That would explain it. Everyone mentions a "Sharpie" pen but I don't think we can get those in Europe so I'll have to experiment or wait 'til I'm in Florida next month :D:cool:.

PS my 4 year old daughter just walked in and she wants to click on some pink smilies so here she goes: :eek::bang::p:mad::angel::):(:D:eek::cool::rolleyes:;)
:confused::dance:
 
Back
Top Bottom