9000f scan, reasonable?(sample)

mansio

Established
Local time
10:30 PM
Joined
Jun 4, 2013
Messages
95
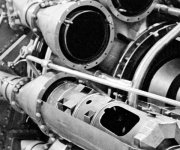
just acquired a canon 9000f and this is the first day toying with it.

i am using tmax400 and used the matching profile from vuescan.

the output was direct to jpeg, scanned at 9600dpi and resize to 2000dpi (as noted by one of the online website suggested that the absolute resolution is ~1700)

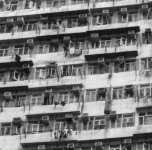
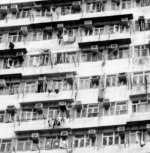
the attached image is a crop from the 2000dpi image

will any betterment from setting be only marginal? or this is just a poor scan output?

thanks
 

Attachments

  • Scan-130828-0006c.jpg
    Scan-130828-0006c.jpg
    126.7 KB · Views: 0
I have a 8800F and I scan with silverfast at 2400dpi as a Tiff file,
here is a 100% crop from a 35mm Arista premium for comparison
 

Attachments

  • London-APremium400-04.jpg
    London-APremium400-04.jpg
    54.4 KB · Views: 0
A really underexposed negative?

You can look at my gallery, most everything is scanned with Canon 9000.

Randy
 
i underexpose on the scan a little on purpose, but it is a shadow area there. the film should be normal

will give a try on tiff. thanks

this is coming from canon default program, 4800dpi tiff ->jpg thru LR, resize to 4.5mp before cropping

is this better now?

the 2nd one is scanned in similar fashion, with vuescan, 9600dpi dng ->4.5mp jpeg and crop

slight difference on exposure
 

Attachments

  • IMG_00012.jpg
    IMG_00012.jpg
    142.8 KB · Views: 0
  • Scan-130828-0001-21.jpg
    Scan-130828-0001-21.jpg
    137.2 KB · Views: 0
Last edited:
Thought I replied, guess it got lost -

I think these look good , given the vagaries of communicating images.

You do need to save tiff , and I generally do a little post processing ( levels adjustment + curves ) in photoshop .

Randy
 
I've changed my scanning method with 9000F a bit, gone from 4800dpi down to 3200dpi/16bit for 35mm and then first thing in PS is Unsharp Mask 300%, 1.5px, 0.
 
Jan, that sounds exactly like a workflow i use from time to time. Right now, i do this: Scan with 4800dpi/8bit (poor silverfast se version). First thing, resizing to about 3500px width in PS using bicubic sharper setting. Already muuuuch better than the results i had before when scanning with 2400dpi only (which in the end is about the same px width so i can compare these pretty good). AFTER that, files go into LR for post and then back in PS for final corrections depending on the final export size.

@mansio
Did you use the vuescan auto exposure mode? Does it have one? Silverfast does and whenever i used it i found that the results were very bad. Your first example looks exactly like some of mine when i have underexposed negatives and the auto exp mode tries to "recover" some of the darks which results in nothing but ugly noisy areas.
Also, always scan as .tiff for more information and more capability to adjust the image afterwards.

cheers
seb
 
I'd argue against using matching film profiles within Vuescan. They simply don't work. I always use "Generic" film setting and always set the white balance to "Landscape" to start with.
 
i am scanning it at 9600 only because i want to see the potential it could achieve, the photo is nothing fancy really

i tried with generic film selection it does seem to look better than choosing the matching profile, i still fiddling with it, so far the canon program looks better than vuescan, which means i m getting things all wrong
 
I've found that the 9000F film holders are basically useless. Put your film flat on the scanner glass, with some ANR glass on top for flatness, and you'll dramatically improve sharpness.
 
Back
Top Bottom