About to give up on scanning

jamiewakeham

Long time lurker
Local time
10:15 PM
Joined
Jan 6, 2005
Messages
362
Hi all

I've had a V700 for a long time and never really been able to get what I want out of it. I've just spent most of today wrestling with it to see if I am just being stupid.

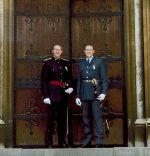
So. This is a crop of about the middle third of a 6x6 Portra VC400 neg. I am sure it's being held almost perfectly flat in the film holder - I've built a slightly Heath Robinson solution to the flimsy Epson holder. I've picked the sharpest of the three heights.

I've scanned using Epson Scan, in professional mode, at 2400dpi. I individually set the histograms for the three colour channels, then shifted the gamma of the overall channel to about 1.4 to pick up as much shadow detail as I could. No scanner enhancements (USM, ICE etc) at all. Saved as jpg at maximum quality.

Then, in the GIMP, I have just tweaked curves on the overall channel to bring out some contrast and try to give it a little pop. Resized from 5000 pixels across to 2000, and then USM (radius 3, amount 0.3, threshold 3). Cropped.

I end up with this.

2latpmo.jpg


It's muddy. It's not very sharp. If I try to bring out any more shadow detail I get awful granularity in the blacks, and if I sharpen any further it haloes.

On the other hand, the back-up shots with my RD1 came out like this:

25qpv83.jpg


Plenty of clarity and sharpness, with clear solid blacks and greys.

I just don't get it. Shouldn't medium format film at least vaguely equal a 15 year old 6MP camera?

I have never, ever got a scan I'm happy with out of the V700, and I start to wonder if it's actually defective. Or am I doing something wrong here?
 
I feel you. Scanning blows and it's hard to get a good workflow going.
That being said, I agree with the other guys. Have a lab scan them and see how they compare. I'm far from an expert at scanning (especially c41), but I feel like your negative might be too thin. Everything seems really dark. Even though Epson's software isn't all that great, even automatic mode should give much better results than that.
 
... It's muddy. It's not very sharp. If I try to bring out any more shadow detail I get awful granularity in the blacks, and if I sharpen any further it haloes...

This would indicate that the levels were set poorly in the original scan.

The same image lacks anything close to white and all of the detail it pushed way to the left per the histogram. I've attached an adjustment that stretches the image data to better fill the range of an 8bit file. It fixes the overall appearance but nothing can be done for the shadows which are compressed into only a narrow range of values.
 

Attachments

  • 2latpmo-adj.jpg
    2latpmo-adj.jpg
    52.8 KB · Views: 0
It looks like your film was underexposed. Scanning is not at fault here. Color Negative film gets grainy and muddy when underexposed even a little bit.
 
Well I am no expert but I will share with you what I know. I have used a V500 for about 3 years now.

A couple of things come to mind looking at your sample. Something is definitely off, 120 film scans usually yield very good results.

1. What camera did you use? Did you expose manually? Your exposure might be off and film is very different from digital, a poor exposure is very difficult to correct in a scan.

2. forget about recovering shadow detail with film. It just creates horrible looking noise and ruins the image. Again, film is very different from digital in this regard. Modern digital files allow for a high degree of shadow/highlight recovery, film scans do not.

3. Use ICE when scanning c-41, it really works very well.

4. Use very little sharpening either at the scanning stage or in PS or something similar. Film scans do not hold up well to much sharpening, unlike digital files.

5. Film looks very different from digital. Perhaps your eyes are accustomed to digital images. Nothing wrong with that, just that scanned film files can look very different.

6. It took me hundreds of scans before I started getting nice results. I pay more attention to getting a good exposure. Digital makes me lazy-I can fix any exposure errors in post without consequence. This really is key for me. A good exposure always leads to a much better scan.

7. Be prepared to accept some amount of grain. Most films will deliver some form of grain, with the exception of some ISO 50 b/w film types. Ektar 100 is also very grain free and a highly detailed c-41 film.

Just some ideas for you. There is a lot I do not know myself, I am still very much learning. Even in full auto mode with the Epson software I can usually get very nice results now, but I too struggled at first. Scanning is indeed frustrating, keep at it.
 
Yeah, something is not right here. I get much better results than this when scanning 120 on my Epson v500. I scan in professional mode at 2400 but don't really adjust the histogram unless I'm scanning B/W. Seems to work pretty well for me. Wish I could be more helpful!
 
I've scanned using Epson Scan, in professional mode, at 2400dpi. I individually set the histograms for the three colour channels, then shifted the gamma of the overall channel to about 1.4 to pick up as much shadow detail as I could. No scanner enhancements (USM, ICE etc) at all. Saved as jpg at maximum quality.

Then, in the GIMP, I have just tweaked curves on the overall channel to bring out some contrast and try to give it a little pop. Resized from 5000 pixels across to 2000, and then USM (radius 3, amount 0.3, threshold 3). Cropped.

I end up with this.

It's muddy. It's not very sharp. If I try to bring out any more shadow detail I get awful granularity in the blacks, and if I sharpen any further it haloes.

I have never, ever got a scan I'm happy with out of the V700, and I start to wonder if it's actually defective. Or am I doing something wrong here?

I'm interested to see what your scanner is giving you at its default settings before you adjust the RGB curves and gamma. Sometimes its hard to outsmart the epson scan software.

In most any photo you will want some blacks, and the amount of pure white you want will depend on your taste. When I was using epson scan I seem to recal not trying to outsmart the scan software too much, I would just make sure the highligts weren't being clipped too much. Also I would export my files as 16bit tiffs and make adjustments in PS as necessary. You won't have much leeway to post process if you export jpgs from the scanner.

Maybe try exporting a 16bit file from you scanner at default settings and post it here to let us take a stab at the postprocess...
 
Whether the film is underexposed or not, you can scan it more optimally.

(I had an Epson V700 but didn't use it much for various reasons, but the same techniques for using it work with my Nikon film scanners as well. BTW, I use VueScan for all my scanners. I find its slightly quirky interface gives me more control and lets me get what I want out of the scanner more easily. But most scanning software can do similar things. )

For me, the goal of scanning is to obtain as much data as possible from the negative to prepare for rendering in an image processor.

Most of the time, I run a preview, show the raw image graph, and then adjust the exposure and curve controls until I see a fully expressed histogram, windowed to fit the data width, with no clipping. I set the output controls to create both a TIFF 16bit per component image and a raw image in DNG format.

That produces the finish result as I imaged it in the preview as TIFF and a linear-RGB DNG file for best editing. Sometimes the TIFF file is enough in itself ... a few minor tweaks and my photo is done. Other times I need the DNG in order to have enough editing range to get what I want out of it.

Color negative poses the additional issues of a) adjusting out the crossover mask, and b) getting the white balance correct. For new work, I often shoot an Xrite Color Checker (or a tri-tone card at least) to get solid references to work with. If you work with a particular film most of the time, color balanceing on a clear part of the film and on the 18% gray will net settings that transfer, in large part, whenever you are using that film. Tuning and tweaking in post (for me anyway) is always required.

G
 
I use Epson scan in auto to TIFF it in LR.
Trashed the GIMP few years ago due to crappy output files from it.
Do not waste your time on pixels. Evaluate it fit on the screen and on prints.
Take it easy.
 
3. Use ICE when scanning c-41, it really works very well.

Which software are you using for the scanning?

I have been very pleased with the scan quality (35mm film) from my Epson, but the dust is completely off the scale with the new V800 perspex backed holders. Enabling ICE in either Epson Scan or Vuescan seems to miss most of the debris - and what it does not miss is turned in to a horrible smear. I usually end up tediously fixing things in PS.

For me, I tend to use Epson Scan with JPEG output and the highest possible resolution. This gives a reasonable file size and the over sampling helps compensate for the bit depth. Scanning 16 bit TIFF at a lower resolution gives more scope for editing, but I find that unless the original is badly exposed the difference is trivial (whereas the file size is not!).

-- Mark
 
I use Epson scan in auto to TIFF it in LR.
Trashed the GIMP few years ago due to crappy output files from it.

Well, GIMP is not trash. It is great for many things, especially when you consider its price.
It does, however, only work with 8bit images. So if you scan with 16 bits and open the image in GIMP, it will automatically convert it to 8bit. That's OK, until you start making lots of edits...

So I think my first advice would be, to use another image editor.

You can try e.g. Rawtherapee. It works in 16bits, has a bunch of great tools, and is very stable. It is also available for Windows and Mac. There are other tools, like Darkroom, or LIghtzone, Everyone has their favorite... but you have to make sure you use one with 16bit support, otherwise scanning in 16bit will be of no use at all, and can very well be the reason for your spotchy images.
 
Or am I doing something wrong here?
Yes, you are trying to get too much of a finished image out of the scan itself.

All you need from the scan is to make sure you aren't clipping the shadows or highlights, and that the colour balance is in the ballpark. You will get a range of muddy tones, that is the idea, because all you want from the scan is all the information the negative can reveal, nothing more. You then use the far more powerful software of Photoshop/Lightroom to do all the adjustments such as brightness, contrast, colour balance etc. to finish the image. Often simply hitting 'Auto' in Photoshop for colour, contrast, and tone gets you right into the zone of a finished image. The simple way to fully finish the image is to use the Nik Suite as a plugin. These tools shortcut a lot of more complicated tasks in Lightroom or Photoshop should any be necessary. Epson Scan is a crude device, you won't get a great finished image from it, you'd be lucky to get an averagely good image from it.

V
 
Thanks for all your replies. Attempting to answer everyone's questions:

I've not yet tried having a lab scan them. This seems to be ridiculously expensive in the UK - Peak Imaging (who I use for my dev) will charge me £16 a roll for a half-decent resolution. I could try my local Snappy Snaps.

The camera was an Arax Hasselblad clone, metered manually. The neg is indeed a little thin - I think I might have metered in a little more daylight and then got caught out by how far back in the doorway they stood. But it does look to me like there's detail there to be captured.

Thing is, though, this is just one negative. I've tried all sorts of negs and slides and never seem to get anything half decent!

I used no ICE, but I can certainly give that a try.

I tried three sets of scanning software: Epson Scan, VueScan and Silverfast. The latter of these crashed every time I tried to set up a scan (looks like it's a conflict with Win7 64bit). I couldn't tell much difference between Vuescan and Epson Scan.

I'm just off to work but I'll be back this afternoon. I will rescan this neg in a few different ways, and record what settings Epson Scan wants me to use, and report back.

Cheers!
 
Jamie,

sorry for your loss in frames and in definition ;)

I hope you have sufficient shots from the R-D1 to hand to the people in your shots? Looks like it was a very classy occasion!

With regards to scanning, I'd change about just everything you do! :eek:

1) Underexposed negative.
I usually set my color film to half the box speed, and meter for the darkest part that I still want detail in. Color film has a 6-7 stop latitude, but that is only 1 stop towards underexposure before it gets problematic, and 5-6 stops overexposure, depending on the contrast in light.
Whenever there is more than 6 stops overall contrast in the scene, I choose the next dark part of the frame to meter for and will have more undetailed darkness in the frame, rather than losing definition in whites or highlights.

2) File format
I'd scan to TIFF or DNG, preferably in 16 bit. Yes the files will be lots bigger but so will the detail that you can edit. JPEG is a compressed format to start with so you'd be tossing image detail right after scanning...

3) Scan resolution.
Scan to 3200 dpi when your scanner can do it, for even more detail that can be edited.

4) Scan adjustments
Usually I choose the film type from the scanner (never profiled anything) and leave it at that. All other editing of color etc gets done in editing software.

5) EpsonScan?
I never was very happy with it but it might have been my mistake. VueScan OTOH I can get very good results from, with different scanners.

6) Ditch The Gimp
I'm sure some people can get The Gimp it sing for them but I never was one of those. I found it fiddly. It might be too detailed in handling and (again) me not capable enough, but I've found that a well-exposed negative or slide can easily be set straight in Lightroom or Photoshop (Elements), with a lot less effort and better results.

7) ICE?
Not in the single malt scotch! :D Nope, never used ICE and see no need to do so either. A relatively dust-free environment, cotton gloves, a rocket blower and I'm good to go, reducing dust to a minimum.


I hope any of this helps you at all!
 
Some additional thoughts, what meter did you use and how did you use it?

My exposure strategy described above relies on an incident reading (not reflective!) at the subject location. In your case, you would have walked up the stairs to read the light from an incident meter at the place those fine young twins were standing.

Sometimes I shoot digital and film alongside, like you did.
My m.o. is to shoot digital first and briefly memorise the lighting details from the digital shot. If the handheld meter reading is very different from that, I must be missing something and check my settings for the film shot again.
 
OK, back home. To answer Johan - this was a few years ago and yes, the RD1 files certainly saved my day! I metered with a handheld incident meter, but I suspect I didn't walk far enough up the steps and into the shadows, and rated (and developed) at ISO400. I begin to wonder if I am a chronic under-developer.

I'd picked 16 bit colour, 2400 dpi and saving as jpeg simply by following recommendations from various tutorials. Maybe I've got this wrong too...

I've gotten used to the Gimp - I started using it as a replacement for PS Elements when my old copy wouldn't play ball with my new Win7 machine, and never though of changing it. What might be the easiest swap (preferably free) in terms of a new learning curve?

Never felt the need for ICE. Dust is one of the few problems I don't have...

FIring the scanner up now to try a few things.

Cheers
Jamie
 
With the flatbeds you need to scan at max resolution, then apply USM TWICE and then resize. After that you should get decent sharpness providing the film was flat and properly focused.
For professional results, you need a professional scanner, however If I wanted to shoot colour I would probably go with digital as well.
 
Back
Top Bottom