RicardoD
Well-known
This post is a big THANK YOU to the entire forum because I have successfully developed my first roll of B&W film in Diafine. It was fun and easy. Why? Because of the many posts here and the guiding hand, via some private emails, of one of our own resident Diafine promoters (aka the Diafine Pimp).
DISCLAIMER: I am not a Diafine expert, heck I just did my first roll a few days ago, this is just a post with the collected wisdom of the forum in one location. If you are a newbie you will see others will follow up with slight modifications or different suggestions. What follows is what worked for me and the resident greybeards can add their 2 cents by continuing the thread. Of course I will edit if major mistakes or no-nos are pointed out to me.
The process I chose to start with is:
Develop Film->Scan Negatives in 35mm film scanner->Walgreens or Pro online lab to make prints
My List of Supplies:
- 2 bottles of Clorox Bleach (purchased for cheap bottles, dump clorox, clean bottles, these are actually 1.25 gallon bottles)
- 1 empty cleaned one gallon bottle of juice (Minute Maid OJ bottle)
- 1 pair of scissors (for cutting negatives)
- 1 can opener (Diafine comes in cans)
(The following 7 items won in one Ebay auction for dirt cheap)
- 2 reel Kindermann Stainless Steel Tank
- 2 35mm Stainless Steel Kindermann reels
- 1 large black changing bag (substitute for pitch black room)
- 1 600ml plastic graduated cylinder
- 1 thermometer
- 1 pair of lint free gloves (to handle negatives after drying)
- 1 plastic mixing spoon (this can be anything used to stir)
- 2 film hanging clips (can use clothspins instead)
- 1 mixing bucket with quart and gallon markings on the side
- 3 plastic funnels
- 1 large plastic tub to store all this gear in one out of the way location away from kids
- 1 roll of paper towels
- 1 childrens medicine syring (not needle kind, came with Infant Motrin, has 1.25ml marking and 1.875ml marking for use with Photo-Flo)
(chemicals)
- 1 kit of Diafine to make 1 gallon (via Adorama.com)
- 1 bottle of generic liquid Fixer concentrate to make 1 gallon(via Adorama.com)
- 1 bottle Photo-Flo (rinse agent to prevent water spots)
- 3 gallons of distilled water (keep one bottle to modify, cut the top off of it, see attached picture below, and drill about a 1/8" hole in the center bottom. This will be your film rinse jug)
PRE-PROCESS
A day or so before you develop your first roll, mix up your Diafine. You want to do this so that whatever particles are left will settle to the bottom overnight and to let the temps stabilize to room temp. It comes in two parts, Part A and Part B. It comes in cans so I took an old junk can opener and dedicated it for this purpose. I don't want my food can opener used for opening chemicals.
1)Clearly mark your Part A and Part B labels. I marked my Part A with Red Ink and Part B with Blue Ink, each label clearly states the chemical and date of mixture, I also labelled the caps. You never want to accidentally mix Part A into Part B.
1) preheat 2 gallons of your distilled water to 120F (49C)
2) empty Part A into your 1 gallon mixing bucket and pour in some of the 120F water, about a quart of it.
3)Use your mixing spoon to dissolve the powder and 1 quart of 120F water
4)Once dissolved, pour in some more 120F water up to the one gallon mark on your mixing container
5)This may be anal, but I dedicated one funnel for Part A, marked in red ink, and one funnel for part B, marked in blue ink. Use the appropriate funnel and fill your mixed up Diafine A into its bottle. Repeat steps 2-5 for Diafine B. Make sure you rinse your mixing bucket with tap water prior to mixing up your B batch.
6)For the fixer just follow the instructions that come on the bottle. I used distilled water to mix up my fixer. I decided to reuse my fixer according to the instructions on the bottle (good for 120 rolls in my case). I also have a dedicated funnel for the fixer.
7)At this point clean up and put all the chemicals into your big storage bin and set aside for things to settle and for all chemicals to reach room temperature.
DEVELOPING PART I - The Changing Bag
Load in the following into your changing bag:
- your exposed film
- a can opener to open up the film canister (this was a pain in the a** for me, next time I will just rewind my film till I feel the tension release and then I will have the film leader sticking out and I can bypass the can-opener process)
- scissors
- your kindermann tank and don't forget the lid
- your stainless steel reels
-Do the following inside the sealed changing bag
1)Open up film can or avoid this process by leaving some film leader sticking out upon rewind
2) Cut off film leader, make a nice straight cut to help loading into SS reels, you can do this in the daylight ahead of time if you leave some film leader exposed upon rewind (see how I learned my lesson!)
3)load stainless steel reels (search for other threads on how to do this, its not that hard) towards end of loading use scissors to cut off film spool
4)place film lloaded reels into stainless tank
5)put light proof cap on tank
I did the above at my desk where I also practiced loading SS reels before hand. Upon completion I then went to my laundry room sink to do my "wet" work.
Developing Part II - using the chemicals
Note: In Kindermann tanks, each 35mm reel takes 250ml of liquid, you can use one reel or two reels in the tank, or 4 reels if you have a 4 reel tank. No need to put all reels in the tank. Just remember 250ml per 35mm reel. The following is my two reel example.
Definitions:
Bang tank = take tank in hand and hit it against the side of your sink (that's what I did)
Inversion = just rotate the tank 360 degrees
1. Measure 500ml of A into graduated cylinder and pour into your tank
2. Bang tank and do an inversion to break up bubbles.
3. Soak in A for 3-4 minutes, don't get anal about the time, no further agitation required.
4. Dump A back into the A jug using A funnel.
5. Measure 500ml of B and pour in tank. Bang tank and do one inversion to break up bubbles. I rinsed out my graduated cylinder with tap water in the 3 minute wait period
6. Soak in B for 3 to 4 minutes with 1 gentle slow inversion half way through. DO NOT over agitate in solution B.
7. Dump B back into the B jug with B funnel
8. Fill tank with tap water and then pour it out, do this twice (takes place of Stop bath)
9. Pour in 500ml of fixer, let soak for 2 minutes. I reused my fixer so upon completion I poured it back into my bottle with fixer funnel. At this point your film is developed and it is safe to open up your tank.
10. 15 minute wash, use modified 1 gallon bottle with the top cut off, and just place reels inside bottle, slowly run tap water and let it fill. It will overfill and some water will also exit out the bottom hole, let the water run for 15 minutes.
11. In one final rinse in Photo-Flo, this stuff just help prevent water drops from forming upon drying, follow directions on bottle. Mix is 1 part flo to 200 parts water. I use my infant motrin syringe to measure out 2.5ml into my kinderman tank then fill it with up with 500ml water. I then dump my reels bank into my tank and head upstairs to hang in shower. Its only a dunk for 30 seconds or so.
12. Take your rinsed reels and then hang them up to dry with film clips or clothespins, glue on a couple of washer for the bottom clothes pins to give it some weight. One clothspin on one end for hanging, the other weighted one at the bottom.
13: Using your wet fingers as a squeegee, middle and index finger(or buy a film squeegee, I did not) wipe off excess water on negatives. Dry in dust free place. Many suggest running the shower for a few minutes to clear dust, turn off water, and then hang negatives in the shower. Should take an hour or so for negatives to dry.
13. An hour or so later, put on lint-free gloves, grab scissors and cut negatives in strips of 6 (that's what my scanner takes) and place them inside, clear archival safe negative holders (I got mine at Adorama). Label holder sheet with date and camera used and development chemical if you want.
That's it! Whew... that's what worked great for me. I like Diafine cause in this post I never had to go into detail about time or temperature. Its forgiving and people I respect on this forum told me it will produce negatives that scan well. Of course before long curiosity will get the best of me and I will venture into other developers (Rodinal comes to mind!). Got my Electro GS, my Canonet and my Bessa R is on its way, I am in the middle of a full GAS attack!
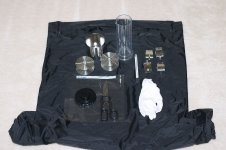
See attached photos of all my development gear.
Links:
Click here for background on Diafine
What is Part A and Part B of Diafine doing in my tank?, click here to find out (thanks to bmattock!)
Forums member seem to recommend to expose Tri-X at 1250, Plus-X at 400 search for other recommendations on this forum.
Again, THANK YOU RFF, for making this fun for me! And a very big public Thank You to Tom O'Meara for patiently answering my many questions. You are Pimptastic! 😀
EDIT: 5/21/2006 after 2nd roll added a bit more about my Photo-flo process
DISCLAIMER: I am not a Diafine expert, heck I just did my first roll a few days ago, this is just a post with the collected wisdom of the forum in one location. If you are a newbie you will see others will follow up with slight modifications or different suggestions. What follows is what worked for me and the resident greybeards can add their 2 cents by continuing the thread. Of course I will edit if major mistakes or no-nos are pointed out to me.
The process I chose to start with is:
Develop Film->Scan Negatives in 35mm film scanner->Walgreens or Pro online lab to make prints
My List of Supplies:
- 2 bottles of Clorox Bleach (purchased for cheap bottles, dump clorox, clean bottles, these are actually 1.25 gallon bottles)
- 1 empty cleaned one gallon bottle of juice (Minute Maid OJ bottle)
- 1 pair of scissors (for cutting negatives)
- 1 can opener (Diafine comes in cans)
(The following 7 items won in one Ebay auction for dirt cheap)
- 2 reel Kindermann Stainless Steel Tank
- 2 35mm Stainless Steel Kindermann reels
- 1 large black changing bag (substitute for pitch black room)
- 1 600ml plastic graduated cylinder
- 1 thermometer
- 1 pair of lint free gloves (to handle negatives after drying)
- 1 plastic mixing spoon (this can be anything used to stir)
- 2 film hanging clips (can use clothspins instead)
- 1 mixing bucket with quart and gallon markings on the side
- 3 plastic funnels
- 1 large plastic tub to store all this gear in one out of the way location away from kids
- 1 roll of paper towels
- 1 childrens medicine syring (not needle kind, came with Infant Motrin, has 1.25ml marking and 1.875ml marking for use with Photo-Flo)
(chemicals)
- 1 kit of Diafine to make 1 gallon (via Adorama.com)
- 1 bottle of generic liquid Fixer concentrate to make 1 gallon(via Adorama.com)
- 1 bottle Photo-Flo (rinse agent to prevent water spots)
- 3 gallons of distilled water (keep one bottle to modify, cut the top off of it, see attached picture below, and drill about a 1/8" hole in the center bottom. This will be your film rinse jug)
PRE-PROCESS
A day or so before you develop your first roll, mix up your Diafine. You want to do this so that whatever particles are left will settle to the bottom overnight and to let the temps stabilize to room temp. It comes in two parts, Part A and Part B. It comes in cans so I took an old junk can opener and dedicated it for this purpose. I don't want my food can opener used for opening chemicals.
1)Clearly mark your Part A and Part B labels. I marked my Part A with Red Ink and Part B with Blue Ink, each label clearly states the chemical and date of mixture, I also labelled the caps. You never want to accidentally mix Part A into Part B.
1) preheat 2 gallons of your distilled water to 120F (49C)
2) empty Part A into your 1 gallon mixing bucket and pour in some of the 120F water, about a quart of it.
3)Use your mixing spoon to dissolve the powder and 1 quart of 120F water
4)Once dissolved, pour in some more 120F water up to the one gallon mark on your mixing container
5)This may be anal, but I dedicated one funnel for Part A, marked in red ink, and one funnel for part B, marked in blue ink. Use the appropriate funnel and fill your mixed up Diafine A into its bottle. Repeat steps 2-5 for Diafine B. Make sure you rinse your mixing bucket with tap water prior to mixing up your B batch.
6)For the fixer just follow the instructions that come on the bottle. I used distilled water to mix up my fixer. I decided to reuse my fixer according to the instructions on the bottle (good for 120 rolls in my case). I also have a dedicated funnel for the fixer.
7)At this point clean up and put all the chemicals into your big storage bin and set aside for things to settle and for all chemicals to reach room temperature.
DEVELOPING PART I - The Changing Bag
Load in the following into your changing bag:
- your exposed film
- a can opener to open up the film canister (this was a pain in the a** for me, next time I will just rewind my film till I feel the tension release and then I will have the film leader sticking out and I can bypass the can-opener process)
- scissors
- your kindermann tank and don't forget the lid
- your stainless steel reels
-Do the following inside the sealed changing bag
1)Open up film can or avoid this process by leaving some film leader sticking out upon rewind
2) Cut off film leader, make a nice straight cut to help loading into SS reels, you can do this in the daylight ahead of time if you leave some film leader exposed upon rewind (see how I learned my lesson!)
3)load stainless steel reels (search for other threads on how to do this, its not that hard) towards end of loading use scissors to cut off film spool
4)place film lloaded reels into stainless tank
5)put light proof cap on tank
I did the above at my desk where I also practiced loading SS reels before hand. Upon completion I then went to my laundry room sink to do my "wet" work.
Developing Part II - using the chemicals
Note: In Kindermann tanks, each 35mm reel takes 250ml of liquid, you can use one reel or two reels in the tank, or 4 reels if you have a 4 reel tank. No need to put all reels in the tank. Just remember 250ml per 35mm reel. The following is my two reel example.
Definitions:
Bang tank = take tank in hand and hit it against the side of your sink (that's what I did)
Inversion = just rotate the tank 360 degrees
1. Measure 500ml of A into graduated cylinder and pour into your tank
2. Bang tank and do an inversion to break up bubbles.
3. Soak in A for 3-4 minutes, don't get anal about the time, no further agitation required.
4. Dump A back into the A jug using A funnel.
5. Measure 500ml of B and pour in tank. Bang tank and do one inversion to break up bubbles. I rinsed out my graduated cylinder with tap water in the 3 minute wait period
6. Soak in B for 3 to 4 minutes with 1 gentle slow inversion half way through. DO NOT over agitate in solution B.
7. Dump B back into the B jug with B funnel
8. Fill tank with tap water and then pour it out, do this twice (takes place of Stop bath)
9. Pour in 500ml of fixer, let soak for 2 minutes. I reused my fixer so upon completion I poured it back into my bottle with fixer funnel. At this point your film is developed and it is safe to open up your tank.
10. 15 minute wash, use modified 1 gallon bottle with the top cut off, and just place reels inside bottle, slowly run tap water and let it fill. It will overfill and some water will also exit out the bottom hole, let the water run for 15 minutes.
11. In one final rinse in Photo-Flo, this stuff just help prevent water drops from forming upon drying, follow directions on bottle. Mix is 1 part flo to 200 parts water. I use my infant motrin syringe to measure out 2.5ml into my kinderman tank then fill it with up with 500ml water. I then dump my reels bank into my tank and head upstairs to hang in shower. Its only a dunk for 30 seconds or so.
12. Take your rinsed reels and then hang them up to dry with film clips or clothespins, glue on a couple of washer for the bottom clothes pins to give it some weight. One clothspin on one end for hanging, the other weighted one at the bottom.
13: Using your wet fingers as a squeegee, middle and index finger(or buy a film squeegee, I did not) wipe off excess water on negatives. Dry in dust free place. Many suggest running the shower for a few minutes to clear dust, turn off water, and then hang negatives in the shower. Should take an hour or so for negatives to dry.
13. An hour or so later, put on lint-free gloves, grab scissors and cut negatives in strips of 6 (that's what my scanner takes) and place them inside, clear archival safe negative holders (I got mine at Adorama). Label holder sheet with date and camera used and development chemical if you want.
That's it! Whew... that's what worked great for me. I like Diafine cause in this post I never had to go into detail about time or temperature. Its forgiving and people I respect on this forum told me it will produce negatives that scan well. Of course before long curiosity will get the best of me and I will venture into other developers (Rodinal comes to mind!). Got my Electro GS, my Canonet and my Bessa R is on its way, I am in the middle of a full GAS attack!
See attached photos of all my development gear.
Links:
Click here for background on Diafine
What is Part A and Part B of Diafine doing in my tank?, click here to find out (thanks to bmattock!)
Forums member seem to recommend to expose Tri-X at 1250, Plus-X at 400 search for other recommendations on this forum.
Again, THANK YOU RFF, for making this fun for me! And a very big public Thank You to Tom O'Meara for patiently answering my many questions. You are Pimptastic! 😀
EDIT: 5/21/2006 after 2nd roll added a bit more about my Photo-flo process
Attachments

Last edited: