mjflory
Accumulator
An attempt at correction
An attempt at correction
Rob, this caught my interest -- and I was trying to avoid getting down to work anyway 😉 -- and as you and I probably represent most of the GIMP users here, I thought I'd try a little correction with the program (version 2.2.17 running on Open SUSE 10.2 64-bit, for the record).
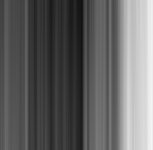
The stripes look very regular top-to-bottom. I opened your image and used the select-rectangle tool as a ruler to confirm that they were pretty close to vertical. Then I selected a 40-pixel-tall stripe from the very top, where there's little detail except the stripes, and pasted it into a new file. Just in case the stripes changed a little from top to bottom, I took another 40-pixel sample from the bottom, pasted it into my new file, gave it 50% opacity and merged the layers, effectively creating an "average" image of the stripes against a featureless background. I then stretched that image to the height of the original image. (To be exact, since I somehow reduced your original to 800x788 when I started to work on it, I stretched the 800x40 image to 800x788.) The result is the first image below.
Using the "levels" dialog, I then adjusted the range of the "stripe" image to 0-255 (that is, I maximized the contrast). I then inverted the image (made a "negative" of it). As some "texture" was apparent in the "stripes" from top to bottom, I used the Gaussian Blur filter to smooth out the top-to-bottom (but not the left-to-right) differences. Gaussian Blur, unlike the generic blur, allows one to set separate radii for horizontal and vertical blurring. I set horizontal blurring to 0 pixels (no blurring) and vertical to 788 (complete blurring). The result was the second image below.
I then selected that entire image and pasted it into the original image. Using the layers dialog, I set the layer to "overlay" mode. (Not really knowing what I was doing, I tried "multiply," "divide," and "screen" modes. "Screen" was almost as good, but "overlay" seemed to work best.) I then experimented with the opacity and found that about 25% opacity seemed to provide a reasonable correction for the stripes in the original. I "anchored" the new layer to the original ("merged down" in Photoshop terms, I think) and the result was the third image below. I'm sure it could stand improvement, and if I understood alpha layers and correction layers better I might have been able to get a more linear correction across the brightness levels in the image, but I think the result is a start. (I'm sure there are many readers who know more about these matters.)
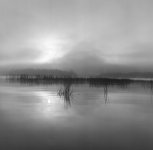
P.S. It's a lovely photograph! I see why you're eager to get to the root of the problem.
An attempt at correction
Rob, this caught my interest -- and I was trying to avoid getting down to work anyway 😉 -- and as you and I probably represent most of the GIMP users here, I thought I'd try a little correction with the program (version 2.2.17 running on Open SUSE 10.2 64-bit, for the record).
The stripes look very regular top-to-bottom. I opened your image and used the select-rectangle tool as a ruler to confirm that they were pretty close to vertical. Then I selected a 40-pixel-tall stripe from the very top, where there's little detail except the stripes, and pasted it into a new file. Just in case the stripes changed a little from top to bottom, I took another 40-pixel sample from the bottom, pasted it into my new file, gave it 50% opacity and merged the layers, effectively creating an "average" image of the stripes against a featureless background. I then stretched that image to the height of the original image. (To be exact, since I somehow reduced your original to 800x788 when I started to work on it, I stretched the 800x40 image to 800x788.) The result is the first image below.
Using the "levels" dialog, I then adjusted the range of the "stripe" image to 0-255 (that is, I maximized the contrast). I then inverted the image (made a "negative" of it). As some "texture" was apparent in the "stripes" from top to bottom, I used the Gaussian Blur filter to smooth out the top-to-bottom (but not the left-to-right) differences. Gaussian Blur, unlike the generic blur, allows one to set separate radii for horizontal and vertical blurring. I set horizontal blurring to 0 pixels (no blurring) and vertical to 788 (complete blurring). The result was the second image below.
I then selected that entire image and pasted it into the original image. Using the layers dialog, I set the layer to "overlay" mode. (Not really knowing what I was doing, I tried "multiply," "divide," and "screen" modes. "Screen" was almost as good, but "overlay" seemed to work best.) I then experimented with the opacity and found that about 25% opacity seemed to provide a reasonable correction for the stripes in the original. I "anchored" the new layer to the original ("merged down" in Photoshop terms, I think) and the result was the third image below. I'm sure it could stand improvement, and if I understood alpha layers and correction layers better I might have been able to get a more linear correction across the brightness levels in the image, but I think the result is a start. (I'm sure there are many readers who know more about these matters.)
P.S. It's a lovely photograph! I see why you're eager to get to the root of the problem.
Attachments

Last edited: