Camera Painting Instructions

w3rk5

Well-known
Local time
3:41 AM
Joined
Jul 1, 2005
Messages
519
Location
Toronto
I've finally finished.......well, sort of. Just keep in mind I'm not a pro, and there are many ways to paint your camera. These instructions are not written in stone. Just one problem....it's 1.3MB in pdf format.

How do I share this file? 😕
 
That's actually quite a small file depending on what's in it. If you want a home, I can add it here http://pentax-manuals.com/repairs.htm

Kim


w3rk5 said:
I've finally finished.......well, sort of. Just keep in mind I'm not a pro, and there are many ways to paint your camera. These instructions are not written in stone. Just one problem....it's 1.3MB in pdf format.

How do I share this file? 😕
 
Sounds like something useful that could find itself on the Kiev Survival Site.
Drop me a PM.

Cheers,

Russ Pinchbeck
 
I've sent copies to some people already. lubitel.....PM your e-mail and I'll send you a copy as well. Thank you for your offer to host it and offer it here.

I just want everyone to know not to expect too much from this tutorial. If people walk away after reading these instructions with a better understanding of how to paint a camera, I'll be happy. 🙂
 
Last edited:
I disassembled my Fed2 to paint it. There are a few things I am not sure about.

1. To the left of the RF is a little "flash contact"? thingy. am I supposed to take it appart as well? and how?

2. under the Flash Shoe, there is a piece of glued cardboard, do you just leave it there?

3. The engravings, do you send them with something like a small file? or just leave them?

thats it for now🙂

thanks
 
lubitel said:
1. To the left of the RF is a little "flash contact"? thingy. am I supposed to take it appart as well? and how?

Yes you should remove it. Wrap the top and bottom jaws of a small plier with masking tape. A small vice grip plier would work best.

Grab the flash contact from the inside of the top plate and turn it counter clockwise.

http://www.rangefinderforum.com/forums/showthread.php?t=12290

lubitel said:
2. under the Flash Shoe, there is a piece of glued cardboard, do you just leave it there?

I think I left mine on. I don't think it really matters.

lubitel said:
3. The engravings, do you send them with something like a small file? or just leave them?

Do the best you can with the sandpaper. It is unlikely that you would accidently scrape the paint out of it because the paint you will apply to the engravings will not be flush/level.


I hope this helps. 🙂 Don't hesitate to post more questions.
 
Last edited:
Cant get this flash contact off. The masking tape rips or slips and I think I am going to damage the contact. I'll keep trying, but it seems to be stuck pretty hard.
 
okay finally got that thingy off 🙂

now, about actual spraying: i dont want to get it wrong as I did with my fed5.

So I went to an Auto Parts store and got a primer, metallic color and lackuer finish. The guy said this finish is a must, otherwise the paint will chip or scrape off.

on the can of primer it says that after spraying I should wait 2-4 hours and then sand it with fine sandpaper before applying the next coat. Is that normal? do I really have to sand it down again and wait that long?

I have a feeling I'll somehow screw it up again. 🙄
 
Hi lubitel. I'm glad you got the flash contact off. I knew that you would. 😉

I have a strange feeling the auto parts store didn't sell you "etching primer". Can you confirm that it is "etching primer" before you start painting? The etching primer I used didn't require that long to dry. 😱 I think the product you need is called "Haftgrund" in German. 😕
http://www.einszettna.com/sys-tmpl/paint/

If there are any real experts out there please chime in anytime. 🙂

Etching primer does two things. First, it actually etches the metal surface and second, it primes it at the same time. This is the most important product you'll need to get a durable/long lasting finish.

I'm sorry I can't give you any solid advice on applying metallic paint lubitel. I'm not qualified to give advice on how to properly apply it because I've never used it on a project like this. Metallic paint is a little tricky to apply and requires more steps to do it right.

Metallic paints have tiny flakes of metal in the paint. When the paint dries, the metal flakes rises to the surface. I don't know what will happen to the finish after you use "rubbing/polishing compound" to remove the excess paint from filling in the engravings. 😕

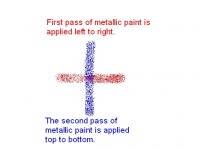
For example......look at the diagram at the bottom of this "reply". Let's say you started spraying your first light coat from the left side and ended at the right side of the part. The second coat should be applied the opposite direction.....top to bottom. If you don't spay metallic paints in a X or + pattern, you could end up with metallic streaks. That means you'll actually see spray lines on your parts.

If you apply 3 coats of "clear coat" after the metallic paint and let it dry.......I'm sure you can fill the engravings and remove the excess paint safely. Instead of using "rubbing compound" to remove the excess paint from the engravings, you might want to use "polishing compound" instead. Again, I'm not experienced enough with using metallic paints.

The paint I use was a non-metallic paint. I'd switch to a non-metallic paint if I were you. To me, solid colour paints are sooo much easier to apply to get a good finish.

I hope this helps you out a bit. Again, if you have any more questions or if you don't understand let me know. Maybe I should redo the painting instructions again. 😛

P.S. You mentioned if it was necessary to wait 2-4 hours followed by sanding. I'll get back to you on that after you confirmed it's "etching primer" that you got.
 

Attachments

  • untitled.jpg
    untitled.jpg
    46.3 KB · Views: 0
Last edited:
Thanks for you detailed answer. Man, didnt think this was going to be so complicated, just picking the right paint.

Here is the thing: Last time when I painted Fed5 I went to a regular store and got Haftgrund and spraypaint, the paint was not meant for cars, but it said on it that its also usable for metal. After I painting the camera paint was coming off pretty easy, just an easy scratch with a nail and its gone. I figured the problem was the wrong paint.

Now I went to an automotive store: they have tons of paint, most of it says "metallic" on it. There are some that dont say metallic. I asked the guy what is the difference, he said they are the same except the metallic one has a bit more of a metallic look, but in BOTH cases I will have to use that finishing lacquer spray.

I will go to that store again and try to find a "non-metallic" paint, but if they dont take my paint back, may be I'll just try it anyway. I mean these are small parts, cant be that bad right? The one thing I am worried about is, after spraying all these layers wouldnt the camera be thickly covered with paint and clear coat etc.?

By the way I did get "haftgrund", looking it up in a dictionary it does say "etching primer", so I guess thats the right kind.

thanks again for your help
 
If the can of "haftgrund" says to wait 2 hours than I would wait. The etching primer I use must be a quick dry formula. Before you start to spray, try this test.

1. Get a empty metal can (canned food) and peel off the paper lable.
2. Sand the surface of the can.
3. Use a degreaser and wipe down the sanded area.
4. Cover the lower half of the can with masking tape.
5. Apply the "haftgrund" on the top half of the can with light coats until you have 100% coverage.
6. After 2 hours (do not sand) apply the metallic paint with light coats until you have 100% coverage.
7. After 10 minutes, remove the masking tape.

Did the masking tape leave a nice edge or did it lift some of the paint from the painted area?

How is the surface of the paint? Does it look good enough for you or is it too rough? I usually don't sand the etching primer because I think it allows the paint to bite on to it better.

I have the same concern as you do regarding too many layers of primer/paint/clear coat filling in the engravings. I'm 85% sure you'll be okay. But you must have good experience/techinique with spraying.

Some tips on using spray paint:
1. Start spraying several inches from the part and end several inches away from the part.
2. Overlap each pass of paint by 50%.
3. Shake the spray paint can for 1 second after every pass.

Let me know how the "test can" turned out.
 
Hey, the test went really good!

After half an hour I figured out how to remove the safety on the can 🙂
Then I sprayed the can with the primer, waited 1 hour not 2 (But the can was standing in the sun)
Then I sprayed the color waited about half an hour, and finally the clear finish.
After another 30 min. I took off the tape without being very careful, to see if the paint chips off. It didnt, and masking tape came off pretty easy and the edge of the paint looks pretty clean. the surface is smooth and not rough.

Best of all is: no matter how much I try to scratch it: the paint stays strong. 😀 (area where i didnt apply the clear lacquer scratches easily)

I think this stuff is good to go on the real thing.

thanks for your help.
 
That's great news lubitel. Don't forget to post your results and make some of your own notes as you go along. 🙂

If anyone else has questions don't hesitate to post them. I'll try my best to answer them.
 
spraying the real thing is proving to be harder than a can of soup! 🙂

I dont know if I sprayed too much paint, but I am noticing that the surface is a lot rougher than my test. I've sprayed numerous clear finish layers yesterday, and its still not really smooth. on top of that the top cover was stuck to the cardboard on which I was spraying and as I was lifting it ( I was too excited to wait) a little piece chipped off. damn. Although overall it looks quite good so far, the edge of the cover is not perfect. seems like it doesnt hold the paint so well. May be it didnt have enough primer?

I'll spray some more finishing layers today and hopefull will have it on the camera soon 😀
 
Hi lubitel. Is it possible for you to provide a "macro" shot of the finish you got? In my instructions I never mentioned how to get a super smooth finish. My cameras finish is not rough enough to call it a bad finish, yet not too smooth to call it perfect. The steps involved isn't difficult, but you need a lot of experience/patients to achieve a perfect finish. I didn't want to go into detail on it cause I know it will cause a lot of problems.

If the surface is way to rough for your liking you can try wet sanding it. Be very careful if you decide to do this. You could end up stripping and re-painting the top and bottom plates and painting it all over again. This could be a good thing because you will be getting good experience. This techinque takes a lot of time/experience/patients/ and a little bit of luck. Make sure you give your top plate at least 3 days to dry if you want to try this.

1. Let the Use 1000 grit wet sand paper and place it in a small bucket with water and a little bit of soap.

2. CAUTION: Be very careful when you are sanding any edges. That's where the paint is very thin. It's very easy to sand though. Just concentrate on the big flat surfaces instead. If you see the colour of the paint you used in the water of your bucket.....STOP. That means you have cut though the clear coat and now sanding the colour coat. You should only be sanding the clear coat to achieve a flat/smooth finish. Rinse the part with clean water and degrease it. Then apply a more light coats of clear and start all over when it's dry.

Ues light even pressure to wet sand the top cover. Let the sand paper do the work for you. Try to use long strokes instead of short ones.

Dip the wet sand paper in the soapy water often to keep it clean.

3. When you get the surface nice and flat do the same thing using 2000 grit wet sand paper.

4. Now you can bring back a little gloss with some "rubbing and polishing" compound. Start with the rubbing and finish with the polishing compound.

If you sand though the paint and primer, you can "spot etching prime/spot paint/spot clear coat" the area. Use masking tape and paper to tape off the the good area leaving approx. 1 cm around the sanded though area. When that's dry, you can "feather the hard edges" left by the "spot prime/paint/clear coat" using 1000 grit wet sand paper.

If you sand though the paint only, do the same mentioned above without the etching primer.

OR

You can just use rubbing compound and see if that will knock down a little bit of the roughness. 🙂

The next time you spray the top or bottom cover try having the part elevated with something so the part isn't touching the ground (match box, eraser, ect.). That should solve the cardboard sticking to your top cover problem.

The little piece that chipped off.........did it remove the etching primer or paint or both? You could fix that by doing "spot fixing" mentione above. But if you're not careful you could end up stripping the paint off everything and start all over again.

Let me know if you don't understand anything I've mentioned. I hope this will bring you one step closer.
 
Last edited:
Back
Top Bottom