Can I Turn My Dinky Bathroom Into a Darkroom?

wgerrard

Veteran
Local time
5:33 AM
Joined
Sep 10, 2007
Messages
2,451
Not too long ago I posted a question about the ins and outs of developing my own b&w with the intention of scanning it. I got lots of fine answers and now await the UPS truck bringing a box of goodies, including 6 rolls of Tri-X and some Xtol. (The Kodak blurb about Xtol's characteristics appealed to me. Most folks pitched Diafine to me, but I like the Xtol images I've seen better. Dissenting opinions welcome.)

Then... I just suffered through another batch of scanning some slides. On my Nikon Coolscan IV ED. Grind grind, whirl, whirl. You all know how it goes.

So, I think, maybe I ought to target doing prints in a real honest-to-God darkroom. Maybe I can do b&w and process and print myself, send my slides and C41 of to a place like NCPS for processing and scanning, and sell the Coolscan. At least I wouldn't have to wonder what those scanned b&w shots would really look like if someone printed them.

Maybe.

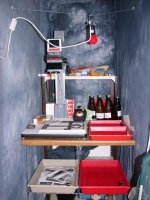
I live in a 2-bedroom flat, with two small bathrooms. No other rooms are practical for this use. I could seal either one to block light. The issue is space, and there isn't much. The largest is about 6x10, before the cabinetry, tub and shower, etc. go in. Counter space is really limited. No ventilation other than an exhaust fan.

What's the smallest practical space in which I can set up, and repeatedly tear down, a wet darkroom? Can I fit it in that dinky bathroom.
 
In college our yearbook darkroom was smaller than what you've got. Go for it. it does not have to be fancy, just a sturdy place for the enlarger and a few safelights. Watching a real black and white print come out in the developer tray is magic. Once it's fixed you can turn the lights on and do the wash and dry in normal light. Try it and Good Luck. Joe
 
As long as it's dark and ventilated, you're good to go. Find a roll-around kitchen cart to store the enlarger, trays and so on so all the equipment stays together.
 
You can use your tub. when I lived in an apartment, my bathroom was smaller than yours.

Get a piece of plywood and seal it with urethane. Screw in strips of wood at the bottom of the board to serve as stoppers so that your plywood board would not slip off the rim of your tub. That is where you'd put your enlarger on. Then place your development trays into the bathtub. That would be your wet area. You should have adequate space for both wet and dry areas with a regular sized bath tub. You'd have to use your sin to wash your prints though.
 
as above i agree, its plenty enough space, I worked in one that size for years, particularly if your prints are only 8x10 (though you can still easy enough do 20x24). setting the enlarger on trolly people often do for quicker set up, setting up and taking down quickly is your main problem, not so much the space. so making things (blackout for window etc) that can go in place and be put away quickly and easily will make it less of a hassle. there are plenty of variations on layout; e.g. you can make a bench over your bath to hold the trays and wash the prints underneath in the bath (or shower) attaching a hose extension to the tap outlet
 
Another idea is to use a closet.

I am building my second darkroom using a closet. I removed the shelving to make vertical space for the enlarger, got a sturdy rolling cabinet with drawers for the enlarger to sit on, the drawers are handy for storing papers, negative carriers, lenses, and whatnot.

I also will replace the closet bulb with a red safelight bulb.

Since the closet is so small, I have to stand in the doorway when operating the enlarger, but the benefit is that three walls within the closet is already light tight. I only have to worry about blacking out the window across the room behind me.

Now I need to hunt for a used long plastic sink (no running water in the room) in which I'll put the trays for development/toning etc. I also plan to build a wooden frame for it to sit on.

NOTE: I am going a bit fancy with the last bit, the trays only need a spill guard surface realistically.
 
I managed a temporary darkroom this way, once upon a time (and worked with a friend of mine with an even more precarious setup, in a tiny closet...which we somehow fit a Beseler 23C into. Never Again!)

When I got my first film scanner (a humble-for-the-time Nikon LS-10), I said Goodbye to All That. If I couldn't have a permanent darkroom setup for printing, I'll take the scanner and printer, please! Others can and do put up with setting up and breaking down, but I was approaching a different sort of breakdown with this arrangement. To each her/his own. :)


- Barrett
 
If its any help, I probably have less space than you, likely abut 4.5 x 8 maybe of actual floor space. The way I work is:

- Get my C41 and E6 done elsewhere, scan and then take to local camera shop or chemists (drug store) and get them to do my prints for cheap and cheerful 6x4s -- it's economical. I'm threatening to try home C41 processing soon but I don't shoot that much colour negative at the moment to take it worthwhile (I'm a slides and B&W girl on the whole)

- B&W I process in the kitchen, it's easy. Changing bag plus processing tank, it's very easy (Well, space wise)

- Darkroom is my bathroom. I live in a 1 bed flat (seperate bathroom). The enlarger lives on top of the washing machine, two of the trays sit on the floor (by the sink and loo -- yes, it's nice and clean in there!) and the 3rd tray sits in the shower basin. It's a bit cramped but it works a treat. If you were to do colour, you'd need more space I think, there's a lot of temperature control to do. I blacked out the windows (there are two in my bathroom) by buying some black material from a local fabric shop and sewing it into thick panels which I then machine stitched some velcro to, and put the other bit of velcro in the same spots around the window frame edges and secure with some staples from a staple gun. Washing I tend to do in the kitchen sink especially for FB paper as my bathroom sink is smaller (like most peoples) and can crease the paper.

All it all, it works just fine :) Notably I have to sit on the floor when processing the paper by stand up for the enlarging part of the process.

Good luck and enjoy!
Vicky

(ps: Tri-X in Xtol is a good combination, I love it. I suggest 1+1 dillution, but 1+0 does very well too; though not all films do in my experience but Tri-X handles it with aplomb)
 
You can use your tub. when I lived in an apartment, my bathroom was smaller than yours.

Get a piece of plywood and seal it with urethane. Screw in strips of wood at the bottom of the board to serve as stoppers so that your plywood board would not slip off the rim of your tub. That is where you'd put your enlarger on. Then place your development trays into the bathtub. That would be your wet area. You should have adequate space for both wet and dry areas with a regular sized bath tub. You'd have to use your sink to wash your prints though.

Ha, when I was in high school I had my trays in the tube and was able to wash the prints in there too. The plywood was built up around the toilet for the enlarger. That took away the convenient seat, but it worked.:)
 
Wow, thanks for the enthusiastic responses. I'll do the developing/scanning thing until I get the hang of it and then might just give this a go.

It makes sense that most folks have jury-rigged setups in bathrooms, basements, and closets. Adding on a purpose-built darkrooms likely costs more than even (gasp!) a new MP3, if it's practical or legal.

A bathroom still looks like the best spot for me. No windows, so darkening it is easy. The ventilator fan is of dubious value, though.

Roger: Thanks for the link, but it pops up a password request.

Dear Bill,

Bugger! Sorry. Try this instead:

http://www.rogerandfrances.com/photoschool/ps how loo.html

I am in correspondence with my webmaster over this...

Oh: and seriously, a ventilator fan is WELL worth having.

Cheers,

R.
 
Last edited:
Dear Bill,

Bugger! Sorry. Try this instead:

http://www.rogerandfrances.com/photoschool/ps how loo.html

I am in correspondence with my webmaster over this...

Oh: and seriously, a ventilator fan is WELL worth having.

Cheers,

R.


Thanks, Roger, that works. I'll ponder it. The bathroom I'll use actually opens, via a short hallway, into another room. I'm wondering... maybe I could put the enlarger in there, although I'd need to block up three doorways and a large 6x6 window.

Re: ventilator fan -- I was just disparaging the fan that's currently in that bathroom. I don't know if it does anything more than whirl around and make noise. I guess I'll find out.
 
You really do not need that much room. My setup needs about 85x200cm and is similar to what Roger postet above. It was "designed" as a tent like setup, but I discovered, that I do not need the extra light protection. Helps whith the ventilation also to keep one side open.

Cheers
Michael
 

Attachments

  • dunkelkkammer.jpg
    dunkelkkammer.jpg
    64.1 KB · Views: 0
ventilation is less of an issue if you use a slot processor like the Nova.

I Googled that. Interesting. They're a UK business in Warwick. I'll be in the UK in a couple of months. Maybe I'll go visit. The prices listed on their site are not prohibitively expensive for my purposes.
 
Back
Top Bottom