Don't just open up the shell and put a couple drops of solvent on the mechanisms, that's a quick and dirty fix but won't address the problems in the longer term (which are most likely dried up lube & dirt... By just putting some solvent on you're only drying it up even more). I would also advise: if the speed adjustments were never messed with before, don't tinker with them, fix the problems that need fixing, if everything is running smooth as intended, the speeds should fall in the right ballpark with the factory set settings.
For the slow speed escapement: you want to take it out (it's held by two screws from the bottom, look at the exploded views in the repair "manual"). Soak it in solvent like naphtha/white spirit and move it a couple times, have an ultra-sonic-cleaner? Good, use it. Let it dry out completely (a rocket blower is good for blowing out rest of the solvent). Take a light watch precision oil (something like Möbius 9010 or some equivalent), take a precision oiler or a needle/pin and put a _miniscule_ amount of it on the bearings:
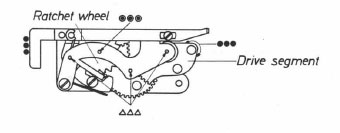
This one if from a screwmount Leica, but the Canon ones are essentially the same. The triangles are where your miniscule amount of watch oil should go (same on bottom = 6 points for the canon escapement).
Stealing from mooges thread about M4 vs Canon7 differences:
See that part at the front in the middle with the black rod going down? That's the part that controls the slow speed escapement. When changing your shutter speeds (1/30 to 1 sec.) this should move to different positions. I haven't worked on a 7, only on a P, but both look to work pretty similar. Is it stuck? If so, it needs a cleaning at its bearing and relubing! On my P it was a dried up and sometimes hanging, which resulted that slow speeds sometimes worked and sometimes not.
See a pattern?
😉 Cleaning old grime out, bringing new lubricants in
😀
If you have the top off. Take out the whole speed cam module (it's held by 3 screws and comes off as a whole unit). Do the same as described with the slow speed escapement, soak it, dry it out, relube all parts that move as needed. For contact points of different rods and cams and stuff that isn't powered by springs and needs low friction you can take some light PTFE-grease.
Take a look at the moving parts below the speed cam module, are they all moving freely? If not: clean&lube
😉
There's another factor which controls the running of the slow speeds: it's the force of the second curtain tension. Of course you want its roller, all gears etc. connected to it to run freely and smoothly. You can take your (not too aggressive) solvent of choice, a syringe or something which lets you apply the solvent in a controlled way, some smallish artists brush to get under the gears and stuff and clean the old lube and dirt out of every gear on the bottom of the camera. Flush it several times... DON'T let solvent get on the curtains and ribbons! Dry everything with a rocket blower each time between flushes and cleanings. If it's all clean: lube the bearings of every gear and of the rollers with a TINY drop of your light precision watch oil and a precision oiler/needle.
Congratulations, here you have pretty much performed a basic CL(without the A) on the shutter
😉
After all that: hope that the curtain tension was never messed up in order to overcome the added friction from dried up lubricants and dirt... otherwise you need to reset it from scratch or your times will be off. It's not that difficult to do, but you'll need some tools for it like a proper shutter speed tester... OR a digital camera + some sort of rig, using the digital camera as a sort of shutter speed tester, but that's a story for another time
😉
Work slow and deliberate, before taking anything apart see and learn how each part goes into another and work together! Don't disassemble parts that you absolutely don't have to (like gears at the bottom, which need to be much likely put in _exactly_ the same position they were in). There's not much documentation on Canon rangefinders, but quite a bit on Leicas... much of the stuff works either the same or very similar.
And less lubrication is more! Don't soak everything up!