Collapsible Sonnar questions.

Grytpype

Well-known
Local time
11:08 AM
Joined
Jul 4, 2008
Messages
328
I've just started the dismantling of a collapsible f2 Sonnar. Three questions (maybe more later!):

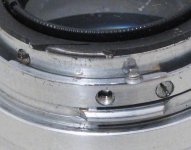
This lens did not "snap into position" as people describe. It wouldn't go fully into position at all. Now I have looked at it I find there are 2 countersunk screws; one is the stop and the other (shown removed in the picture below) is what should presumably be the latching-screw. This is an extremely short screw with a rather mutilated end, which has in turn mutilated the end of the wedge on the locking ring and it would not pass the screw. What should this screw look like, and how does it work with the locking-ring?

If I remove the little countersunk screw at the back of the outer lens-barrel (visible at the left of the picture), should the locking-ring unscrew, allowing me to remove the mounting sleeve, or should I remove the rear element first? I have tried it and the locking-ring is extremely tight, and I don't want to force it.

Am I right in thinking that the basic construction of the lens is the same as the Jupiter-8?

Thanks, Steve.
 

Attachments

  • sonnar_mount.jpg
    sonnar_mount.jpg
    37.4 KB · Views: 1
Thanks, an excellent description. I don't know how I missed that in my searches.

My first question still stands, though. How does the lens lock into position?

Steve.
 
You mean locking the lens into position when you pull it out? Maybe "locking" is a little misleading. It's not a snap or click. Pull out, then rotate clockwise until it stops. You may even find that it pulls out a little further as you rotate, if it wasn't in the proper position at the start. This is easy to see when looking at the dismounted lens, not so when it's on the camera.

It will do all this in one of three possible orientations, by the way.
 
I had the impression from what I have read that the lens should click into place. As it is, the lens comes free if you turn the aperture ring anti-clockwise. If the little countersunk screw is just a stop-screw, what is the function of the wedge-shaped end on the lug that engages in the sleeve?

Another question that has just occurred to me: the main reason I'm stripping the lens is to clean a little fungus, both sides of the rear element. There is separation in the form of 'bubbles' between the elements. Normally I would remove the glass from its housing to clean between the glass and the metal in case there is fungus in there. If I take out the optics, do I run the risk of making the separation much worse?
 
Not having my own lens at hand, I'm not totally sure I understand what you mean, but I'll try. The "locking" mechanism is actually visible in your photo above; the position shown would prevent full pull-out of the collapsible tube. The black tab with the long diagonal cut needs to engage under the chrome tab, near where the screw came out. You can see it has lost its black paint from this action.

As to the separation, I have to leave this to Brian or somebody else who's done the CLA. I haven't taken my copy apart yet (though it badly needs it).
 
I positioned the parts in the photo just so as to show the bits I was describing. The lens does pull forward OK and as you turn it clockwise the tabs engage in the slots in the sleeve until one meets the little countersunk screw (shown removed in the photo). The thing is, it is then just as easy to turn it anti-clockwise so the tabs come out of the slots as it was to get them in, and in practice if you turn the aperture ring anti-clockwise to stop the lens down, it can disengage the lens. Another thing that made me think the tabs should go past the first countersunk screw to engage correctly is that with the lens engaged as far clockwise as it will go, the aperture index mark is still well anti-clockwise of the 12-o'clock position (viewed from the front).

I think, from what you're saying, that perhaps the system simply relies on friction, though it doesn't seem up to Zeiss's usual engineering standards! In that case I just need to open out the diagonal slots a little. But then what is the function of the wedge shaped bit at the end of the tab where it meets the stop-screw?
 
Sometimes part of the problem can be that the aperture ring is very stiff to move and on a collapsible lens it is very easy to disengage it from the extended position. I had that problem with a very stiff aperture ring on a Leica Sumitar which went away after I cleaned the old hardened lube out and relubed the aperture ring. I believe the ring should be movable with light finger tip pressure.

Bob
 
Well mine has the opposite problem--the aperture ring moves far too easily because the blades are covered in oil--but as for the index ending up in a logical position, nope, it just won't. For one, you have three possible orientations, 120 degrees apart, and for another, the whole lens rotates anyway as you focus. You have to find out what works best for you.
 
Just dug mine out and have to say the aperture ring turns with light finger pressure and there is no oil on the blades. This lens does not "snap" into the extended position but there is a slight increase in friction just before it rotates fully into the locked and extended position. The lens is pre war if that makes any difference.

Bob
 
I seem to have had a bit of brain-fade with that bit about the position of the aperture index! I seem to remember there was something I thought didn't seem right. Maybe I thought the index should be at the top at infinity, which it wasn't.

The aperture seems quite free, but I will be cleaning it anyway, so this might help. It looks as though I should open out the slots a bit then, to increase the friction. I'd still like to know why the clockwise end of the engaging tab has a wedge shape rather than just a square end, though.
 
It's not as nice of a locking mechanism as the Leica collapsible lenses. "Just Friction" holds it in. You can put the Zeiss module into a J-8 LTM mount, but the later Kiev/Contax J-8's are different construction optically, and I have not tried the Zeiss lens in a later J-8 Kiev/Contax mount. I suspect they will fit, will have to try. Usually, the winged aperture ring has to be changed out to fit the J-8 LTM mounts.

I bend the tabs to increase the friction.
 
Thanks, Brian. Seems a bit hit and miss to me! They would have done better to make it a fixed lens like the post-war Sonnar. On mine there is also a bit of slack with the lens in its out position, allowing the lens to rock. Presumably this just needs the tabs bending up a little to hold it firm, in fact maybe this is the way to increase the friction, rather than opening out the slots as I originally thought.

Thinking about my question of why the ends of the tabs are wedge-shaped - I guess it's just to make it easier for the tabs to engage in the slots in the mount sleeve. If the corners were square it might catch if you didn't have the lens pulled out firmly enough when turning it.

Do you think I would be able to take the rear element out of its housing for fungus treatment without worsening the separation? The fungus spots seem mainly to have started in the central areas of the glass, rather than creeping in from the edge as it very often does, so it's just possible there may not be any fungus between the glass and the metal. Would it be best to leave the elements in place and just keep an eye on it in the future in case of a recurrence?

Steve.
 
Last edited:
Back
Top Bottom