lynnb
Veteran
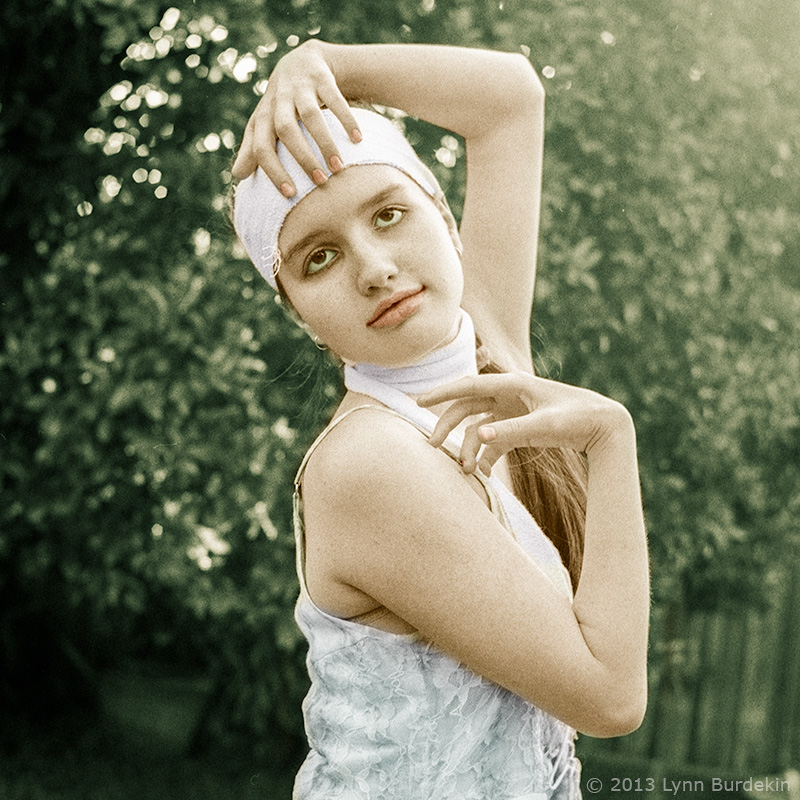
I was interested to see what results I could get colorising bw images in LR/CS. Early bw photos were often hand colorised and these old pictures have a quaint vintage look. Colorisation was popular before colour film was affordable, often for wedding photos and portraits.
I like traditional bw but sometimes I use split tone to gain extra colour contrast. Colorisation gives more control than split tone and I was curious to see what I could achieve using LR4 and CS6.
The original was taken with a 124G using HP5+ developed in XTOL. The colorised version was built up in several stages:
1. Original bw image opened in CS6 as background layer
2. duplicate image split-toned in LR4 to give b/g colour and imported to new layer
3. Additional Colour balance adjustment layers created to adjust skin tones, lips, dress etc, using layer masks to ensure colour adjustments acted on desired areas. Layer transparencies adjusted to get desired end result.
Before/after pictures:
Has anyone else played around with this technique? Care to share your methods?
(Yes, I know you can just shoot colour film - I do - but that's not what this is about).
Cheers,
Lynn
I like traditional bw but sometimes I use split tone to gain extra colour contrast. Colorisation gives more control than split tone and I was curious to see what I could achieve using LR4 and CS6.
The original was taken with a 124G using HP5+ developed in XTOL. The colorised version was built up in several stages:
1. Original bw image opened in CS6 as background layer
2. duplicate image split-toned in LR4 to give b/g colour and imported to new layer
3. Additional Colour balance adjustment layers created to adjust skin tones, lips, dress etc, using layer masks to ensure colour adjustments acted on desired areas. Layer transparencies adjusted to get desired end result.
Before/after pictures:


Has anyone else played around with this technique? Care to share your methods?
(Yes, I know you can just shoot colour film - I do - but that's not what this is about).
Cheers,
Lynn
craygc
Well-known
lynnb
Veteran
nice job! Did you hand-paint all those leaves?
Roger Hicks
Veteran
It's certainly a vast improvement on selective decolorizing! Have you ever tried "real" (physical) hand colouring as well? See http://www.rogerandfrances.com/sgallery/g hc 0.html
Cheers,
R.
Cheers,
R.
lynnb
Veteran
thanks Roger - no, I haven't tried real hand colouring - but I like your examples! I was trying the lazy way in software.
I have a collection of hand-coloured, printed postcards that were purchased on an around-the-world cruise soon after the Panama Canal was opened. A real nostalgia trip!
Roger Hicks
Veteran
If you can do the one, you can do the other -- and if you can do as well as that with a computer, you may find "real" hand colouring even more fun. I'm not a hand colourist but my wife Frances is. She's colouring a new series as I type this.thanks Roger - no, I haven't tried real hand colouring - but I like your examples! I was trying the lazy way in software.
I have a collection of hand-coloured, printed postcards that were purchased on an around-the-world cruise soon after the Panama Canal was opened. A real nostalgia trip!
Cheers,
R.
craygc
Well-known
nice job! Did you hand-paint all those leaves?
Yep, everything was done by hand on a Wacom tablet. I forget how long it took now but it was longer than I was expecting...
rwintle
Scientist by day
Nice results. I've played around with this technique in PS before but I doubt I have any efforts worth posting. 
djhurley92
Established
Here's the two times I've tried it...
Wasn't very careful with either so they're both quite messy, probably spent half an hour on each. Looks good enough at this resolution though. I wanna do it some more when I have the time...
I found adding just a few bits of colour detail into the background makes a big difference in what it looks like. But, if you're going for a particular vintage look you might not want to do that, like in the OPs picture which is very cool.
robert blu
quiet photographer
I tried to acquarel some of my inkjet prints from my pinhole photos, result was encouraging but I was not patient enough to improve the painting technique (my fault) .
Now, in the cold and dark season this thread is pushing me to give another try...
I saw Frances (Roger's wife) work in Arles last summer and what can I say? Simply beautiful!
robert
Now, in the cold and dark season this thread is pushing me to give another try...
I saw Frances (Roger's wife) work in Arles last summer and what can I say? Simply beautiful!
robert
shadowfox
Darkroom printing lives
I like the results very much.
You guys are inspiring.
lynnb
Veteran
rwintle
Scientist by day
This is probably the best of my attempts. However, this was a full-colour DSLR photo that I monochrome converted, then re-painted in PS. So I'm not sure it really "counts".
I am inspired by the posts above to try this on some recent B&W film shots though!

f1design@work, Mosport, May 2011 by Richard Wintle, on Flickr
I am inspired by the posts above to try this on some recent B&W film shots though!

f1design@work, Mosport, May 2011 by Richard Wintle, on Flickr
Share:
-
This site uses cookies to help personalise content, tailor your experience and to keep you logged in if you register.
By continuing to use this site, you are consenting to our use of cookies.