lam
Well-known
nice setup and write up, lam!
Thanks Dean.
About the BEOON, this image always fascinated me the compactness of it all.
With a Monochrom that should be an amazing B&W copy rig.

nice setup and write up, lam!
Copy stands like the Kaiser, really work well as copy stands. Buy a used one. You have to decide if you want to copy film, or develop a new skill of converting enlargers to copy stands. The original thread was really clear on how to set up a copy system, and included videos.
That will work well, but you could just use a light bulb, just give it some distance, the trick is a good diffuser.
Couldn't you just leave the enlarger head on its stand and use the camera pointing upward? Or am I missing something?
I have not paid much attention to pixel shift, other than on the iPhone. Can it be turned off, I am assuming it can?
Re your other question -- the Artograph Lightpad for instance, has a CRI value of about 80+. Spend more it can go as high as 97, but then you are talking $2000 plus for studio grade video test panels.
If you would be happy with output lower-res scanner like a v500 or Pakon, then you'll be fine. My view is that at least 16 mp is needed even for grainy film like TriX. AA Filter depends if you like grain... My preference is to see the true texture of the film and not exaggerated grain aliases.I just got 2 enlargers dropped in my lap and
- is it wise to use an older camera for this? I mean most people want to scan just once at the highest quality because scanning is such a chore. I can see the reason to make a fixed setup.
- is it worth it to get a camera without AA?
- regarding lightsources: all good and well to look for the ideal source but if this is a fixed setup, could a one-time calibration take care of this? If so, how?

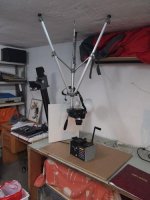
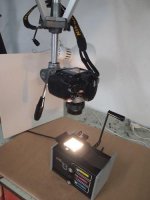
Here's how I make my scans with bits of Opemus and LPL enlargers. I've already posted this link several times on other forums here, so apologies if you've seen it before. I have updated to a Nikon D3300 body as it has no AA filter and use a Nikkor 40 micro f2.8 as the lens. I have also replaced the standard enlarging globe with an LED globe which runs cooler, is brighter and seems sharper as it may be a more collimated light source.
http://members.iinet.net.au/~fingon/howto/making_digitizer_mark_three/