Did anyone find out about a new bellows maker?

I had some time this afternoon, so I made my first camera bellows using some XXX-thin CPL leather from Columbia Organ that I referenced earlier. I had ordered a few 6"x12" pieces about 6 months ago, but never got around to trying it until today.

I used some great instructions from John Fyfe for making an Agfa Isolette bellows. The PDF instructions are here.

It took me several hours to make my first bellows. Part of that time was making the patterns and forms, a one-time occurrence for bellows of this size. The bellows turned out very well. They are light tight and very supple. I learned a few things along the way. My next attempt will be quicker and better.

That's made from 6" x 12" strips? I'm betting it's not made from one piece of leather. Does it have two seams?
 
Looks good Mike, I may try it myself. What did you use for the inner part? I know someone mentioned shutter curtain, but is that the appropriate material to use?

It would probably work, but no. Historically, they started off using black silk, then went to thin cotton fabrics. Eventually, they started using rubberized fabrics and that is what we still use today. About the best material available is shutter curtain material. It is thin, is very pliable, and can be folded and unfolded for years without becoming brittle. Aki Asahi sells those big sheets of curtain material especially for bellows making; there is no such thing as a shutter curtain in a camera that comes anywhere remotely close to as big as 1000mm x 1000mm.

Edit: 1000mm x 1000mm is well over a square yard.
 
Last edited:
That's made from 6" x 12" strips? I'm betting it's not made from one piece of leather. Does it have two seams?

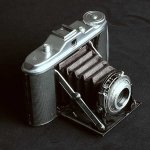
The interior leather is one piece, cut from a 6"x12" strip. The exterior leather is one piece, cut from a second 6"x12" strip. The only seam on each piece is where they meet to form a pyramid cone of sorts.

All together, I used two 6"x12" strips of leather. The interior seam is 180 degrees from the exterior seam. The leather is almost as thin as tissue paper. After the seam is glued, I have to look very closely to find it.

I'm considering getting a sheet of the shutter curtain material to test for the interior of the bellows. The XXX-thin leather is very soft and pliable. I think the suppleness of the leather is one of the reasons the corners don't fold as crisply as I've seen for other materials. Functionally, I know the soft corners will work fine but I like the crisp look of stiffer materials. This may just be the nature of leather bellows.

I'm going to continue experimenting.
 
I temporarily mounted the new bellows I made into my little Isolette. By temporarily, I mean I didn't glue anything down. I just assembled it using the pressure of the screws and mounting ring to hold everything in place.

It completely passes the light tightness test by using a strong flashlight in the open back and looking for any signs of pinhole light in a darkroom.

The leather bellows are much softer and more pliant than the paper(?) ones I removed. The camera closes fine. I can feel it compressing the folds of the leather slightly when I close it, but it isn't tight.
 

Attachments

  • bellows1.jpg
    bellows1.jpg
    69.5 KB · Views: 0
Last edited:
Well done and bingo. Now you have a good camera that will last for many more years. You ought to start thinking about doing this for others and charge for the service.
 
foto mike
Great job on the bellows and inspiration to give it a try - also for an isolette. One question - what sort of glue did you use?
 
One question - what sort of glue did you use?

I used Felt and Leather Glue from Columbia Organ Leather. It looks like Elmer's glue. I don't know if it's the same or not. Here's what they say about it:

Our Felt & Leather Glue is a PVC based glue which is water soluble before it dries and forms a flexible, water proof adhesive when it has cured. It is excellent for gluing felt & leather and for other applications where a flexible bond is desired.


Use it sparingly. The leather is as thin as tissue paper. Too much glue causes it to stretch and deform its shape. Once it begins to dry, don't even think about trying to separate it without destroying the leather.
 
Last edited:
Hey Mike, when you printed out the liner and cover template from the Roland and Caroline website did you shrink to fit or keep the print to normal size (no change) which is 11.7 x 8.3" This doesn't fit on a 8.5 x 10.5 sheet of paper. I think when I print out the liner part I am going to have to improvise on the corners. I only have a 8 x 10 canon printer.
 
Print normal size. This is very important.

The stiffener pattern will fit on an 8.5 x 11 piece of paper. The leather pattern won't quite fit, however only the two corners are off the page. I discovered you don't really need the outer sections drawn on the leather pattern anyway. They provide too much overlap and too large of a seam. I trimmed them off before I glued things together.

For those what wonder what patterns we're talking about, they are here.
 
Back
Top Bottom