
beedubs
Member
Hey all,
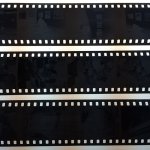
I just pushed my first roll of tri-x to 1600.
Unfortunately the results were less than impressive.
I shot the roll on my M2 and used an external incident light meter set to 1600.
Having no experience with pushing film, maybe it was my fault but as I have never done it before I can't tell if the pushed negatives should have come out like they did.
My main question is should the boarders be so dark?
I fell like they didn't cook it for long enough.
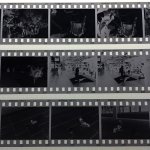
I've also included a photo of some tri-x shot and developed at 400 by the same lab as a comparison.
Thanks for your time,
Dan.


I just pushed my first roll of tri-x to 1600.
Unfortunately the results were less than impressive.
I shot the roll on my M2 and used an external incident light meter set to 1600.
Having no experience with pushing film, maybe it was my fault but as I have never done it before I can't tell if the pushed negatives should have come out like they did.
My main question is should the boarders be so dark?
I fell like they didn't cook it for long enough.
I've also included a photo of some tri-x shot and developed at 400 by the same lab as a comparison.
Thanks for your time,
Dan.
Attachments
Last edited:
