Bill Pierce
Well-known
I received a question off site about converting digital color images to black-and-white. A lot of folks don’t like the results they get from just converting to gray scale and are looking for a more film-like image. To a limited degree you can get that just by boosting contrast in programs like Photoshop and Lightroom. (Remember, changing the curve shape to boost contrast in these programs produces a different effect than printing on a higher contrast paper in a wet darkroom.)
Specifically, the questioner wanted to know about plug-ins for Photoshop or Lightroom. I’ve heard good things about Silver Efex from Nik, Exposure 3 from Alien Skin and Power Retouche’s b&w conversion software. But I have no experience with them.
(My own technique is to convert to black and white in Lightroom, boost the clarity to about 60, the fill light to about 35, the recovery to about 75 and reduce the brightness to about 0. Then I increase the contrast, exposure and finally the black setting to produce a pleasing image. Obviously these numbers change with specific images, but this is the range I work in.
And, no, I have no idea why it works, It’s something that evolved over time since the introduction of the original Lightroom.)
Could the folks who do have experience with the plug-ins pass on their thoughts? One of our members would be most grateful.
Last edited:
Honus
carpe diem
Glad you started this thread, Bill. I just tried your method in Lightroom 3 on an M8 image and I must say, it's looks pretty good. I have been using a Capture One/Photoshop/Silver Efex Pro workflow, which has given me acceptable results but still looks too digital for my tastes. If I have a chance later tonight I will post some examples.
jmilkins
Digited User
Bill thanks for this. Your method shows I have lots to learn, but with practice will get more personal results than the presets or plugins available. Thanks for sharing your settings.
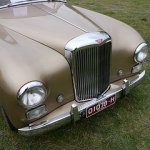
Examples are original, straight greyscale, B&Wwarm plugin, bill's settings with some vignetting,
Car is an Alvis with a rare German body I think from the 40s/50s. European style very different to the English body style.
http://www.flickr.com/photos/79865897@N00/4840681500/
http://www.flickr.com/photos/79865897@N00/4840675560/in/photostream/
http://www.flickr.com/photos/79865897@N00/4840067885/in/photostream/
http://www.flickr.com/photos/79865897@N00/4840066033/in/photostream/
Attachments
Last edited:
dcsang
Canadian & Not A Dentist
I still owe another thread a comment regarding this.
I will have to post once I'm back at home and have my photoshop Action in front of me.
I can say this though, having played with any number of photoshop actions and external/plug-in/programs; for converting from digital to B&W, the action I created does wonders based on what my clients like and when I've shown them to associate photographers.
Cheers,
Dave
Bike Tourist
Well-known
When converting from color to B+W don't forget this . . . Take a look at the image by looking at the channels, one by one. Now and then, I have an image that is backlit, either muddy or lacking facial details. If I use only the red channel for B+W facial details emerge where before they did not exist. I suppose that's a little infrared boost or something of that nature.
whitecat
Lone Range(find)er
I'll have to try that technique. By far the best I have tried is Silver Efex Pro which I use as a plugin in Lightroom and Photoshop.
xwhatsit
Well-known
A few of these are starting to get close, but no matter what you do with curves you'll never get the tonality of B&W negative, because digital sensors don't have the dynamic range of B&W negative. The highlights will always blow sooner and the shadows will always block up sooner (which would look good in flat lighting, but contrasty lighting will look like the `film' has been `pushed' very quickly).
On the other hand, you won't get drying marks and dust spots")
On the other hand, you won't get drying marks and dust spots
NickTrop
Veteran
I think film emulation software is "good enough" at approaching the films they try to emulate and are certainly good enough for 35mm/small format street photography with a good full frame or good APSC DSLR camera and a decent lens. They don't touch medium format and beyond. This is true of black and white and color. What's great about software like Alien Skin is you can easily try different film types out starting with a color image. Imagine picking the film stock you want to use after you capture the image and selecting the film stock you think works best with the image - black and white or color, print or slide, normal or low contrast and for some films even pushed one stop or two, and a bunch of other options like cross processing. Best way to see if you like this - or not, is to download a trial.
pachuco
El ****
Silver Efex Pro works well for me. I made several custom options that look a lot like Tri-X in my opinion. Does it look exactly like Tri-X? No, but as the old saying goes, it's close enough for government work.
Paddy C
Unused film collector
Setting aside the "why are you trying to make a colour digital image look exactly like it was taken with Tri-X" argument...Whenever I have to convert to black and white (which is only when I'm taking a colour image and converting it for a black and white magazine or newsprint ad) I use the channel mixer in Photoshop.
This allows a lot of play and control over the conversion that enables one to create a greyscale file that keeps the value/tonal relationships intact.
This allows a lot of play and control over the conversion that enables one to create a greyscale file that keeps the value/tonal relationships intact.
dcsang
Canadian & Not A Dentist
As promised: (not that anyone really reads this stuff anyway)
1) Make Hue/Saturation Adjustment Layer (REDS) - set "Lightness" to 50
2) Flatten the image
3) Make Gradient Map Adjustment Layer (this is where the conversion takes place)
4) Flatten the image
5) Image => Adjust => Curves (I've got a number of my own presets)
6) Image => Adjust => Levels (I just bump up the midtones a bit)
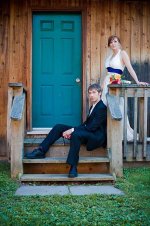
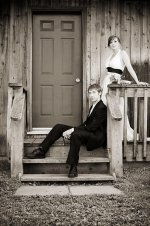
So it goes from the first image I'm attaching to the second image in B&W (this is a "warm tone" - I also have a neutral and a cool tone that can be used - I just like warm toned stuff)
Cheers,
Dave
P.S. these are pretty small.. but I can always upload full size ones if anyone cares to take a look
1) Make Hue/Saturation Adjustment Layer (REDS) - set "Lightness" to 50
2) Flatten the image
3) Make Gradient Map Adjustment Layer (this is where the conversion takes place)
4) Flatten the image
5) Image => Adjust => Curves (I've got a number of my own presets)
6) Image => Adjust => Levels (I just bump up the midtones a bit)
So it goes from the first image I'm attaching to the second image in B&W (this is a "warm tone" - I also have a neutral and a cool tone that can be used - I just like warm toned stuff)
Cheers,
Dave
P.S. these are pretty small.. but I can always upload full size ones if anyone cares to take a look
Attachments
scott kirkpatrick
Member
Capture One and JFI profiles
Capture One and JFI profiles
I use these, plus some contrast enhancement. There are two sets of ICC profiles, selilng for about $30 a set when I got them. One emulates about 30 film types of b/w file, the other does b/w conversion with the option of emulating blue, red, yellow, orange, and green filters each at four different strengths. Yellow filtration to knock out the blue channel when shooting at high ISO works for me, as do the Iflord profiles. But a careful eye doesn't think that the result is from film, just a reasonable tone range.
scott
lewis44
Well-known
M8, Capture One 5, Silver Efex Pro


M3, Kodak BW400CN, Scanned w/Nikon Scanner, Silver Efex Pro.

M3, Kodak BW400CN, Scanned w/Nikon Scanner, Silver Efex Pro.
Last edited:
tbarker13
shooter of stuff
Silver Efex Pro does everything I want it to. I know it's not cheap. But neither are our cameras or the lenses we put on them...
dcsang
Canadian & Not A Dentist
My only concern with Silver Efex pro is (and I've got the program and use it) is it does take a significant amount of time to tweak it so it looks "just right".
That said, for what I use, I need it to be "good enough" across hundreds of images and not just "one or two" that I convert. And that is where I find it to be a bit more difficult to use.
Just my opinion mind you.
Cheers,
Dave
That said, for what I use, I need it to be "good enough" across hundreds of images and not just "one or two" that I convert. And that is where I find it to be a bit more difficult to use.
Just my opinion mind you.
Cheers,
Dave
Bill Pierce
Well-known
There is so much difference from computer system/printer between one photographer and another that it is difficult to make specific recommendations about computer or printer settings when it comes to making black-and-white prints.
One of the easiest things you can do when setting up to print black-and-white is to print a gray scale on paper you plan to use at printer setting you plan to use. When you print out the gray scale, it’s easy to see the differences between what you see on the screen and what you see in the print. By using the curves option in programs like Photoshop and Lightroom, you can change the image so that the paper print resembles what you first saw on the screen. This make take a couple of attempts, but it’s actually pretty easy with a gray scale and pay off in a fairly close match with conventional photographs between what you see on your monitor and what comes out of your printer when you apply that curve to the photograph.
One of the easiest things you can do when setting up to print black-and-white is to print a gray scale on paper you plan to use at printer setting you plan to use. When you print out the gray scale, it’s easy to see the differences between what you see on the screen and what you see in the print. By using the curves option in programs like Photoshop and Lightroom, you can change the image so that the paper print resembles what you first saw on the screen. This make take a couple of attempts, but it’s actually pretty easy with a gray scale and pay off in a fairly close match with conventional photographs between what you see on your monitor and what comes out of your printer when you apply that curve to the photograph.
Mike Richards
Well-known
Thanks Bill and Dave. Good starting points for B&W. I set up a preset for LR and action for PS.
ampguy
Veteran
Best conversions I've seen are with Picasa 3:
Take color image, adjust contrast, shadows, if needed, go to filtered b/w, select best filter, if needed, add film grain, if needed.
Take color image, adjust contrast, shadows, if needed, go to filtered b/w, select best filter, if needed, add film grain, if needed.
PKR
Veteran
I think film emulation software is "good enough" at approaching the films they try to emulate and are certainly good enough for 35mm/small format street photography with a good full frame or good APSC DSLR camera and a decent lens. They don't touch medium format and beyond. This is true of black and white and color. What's great about software like Alien Skin is you can easily try different film types out starting with a color image. Imagine picking the film stock you want to use after you capture the image and selecting the film stock you think works best with the image - black and white or color, print or slide, normal or low contrast and for some films even pushed one stop or two, and a bunch of other options like cross processing. Best way to see if you like this - or not, is to download a trial.
Nick: does that "look" hold up when you print? p.
charles.k
charles.k
Using CS5 64 bit with window 7 64 bit, black and white conversion can be done well in CS5 by adjusting levels. My problem is usually consistency, and not wanting to spend too long in achieving the effect I think I want.
I really like Silver Effex Pro, but there is no support at the moment for 64 bit, so I have opted for Alien Skin Exposure 3 which supports 64 bit. This is very good software with a lot of options.
I really like Silver Effex Pro, but there is no support at the moment for 64 bit, so I have opted for Alien Skin Exposure 3 which supports 64 bit. This is very good software with a lot of options.
Share:
-
This site uses cookies to help personalise content, tailor your experience and to keep you logged in if you register.
By continuing to use this site, you are consenting to our use of cookies.