DIY 6x9 or 6x12 or even 6x17

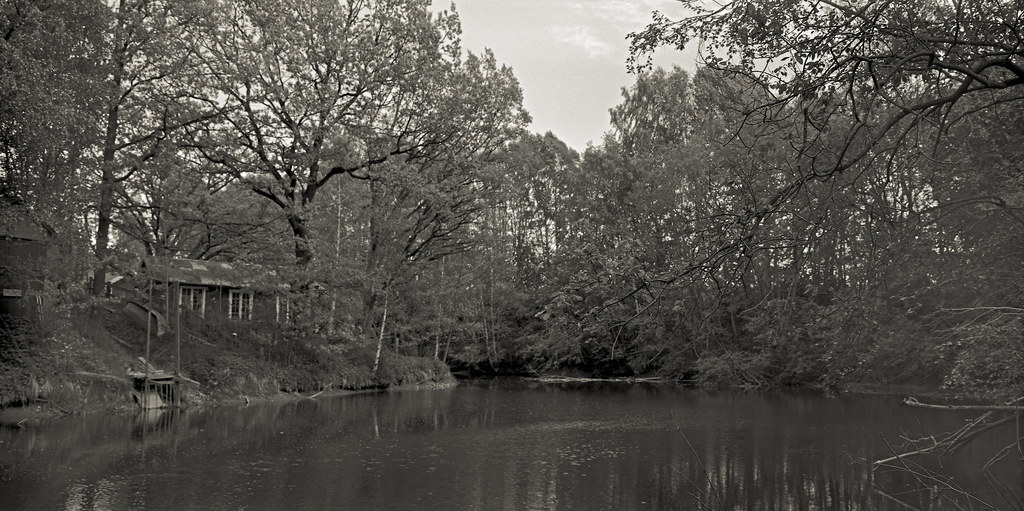
It would seem that the Graflok back is not altogether straight and flat. A test roll has been put through the camera and there are light leaks to the right and left. There are no mounting screws along the uprights, (ok, one on the right) and it seems that the light is creeping in between the back and frame.

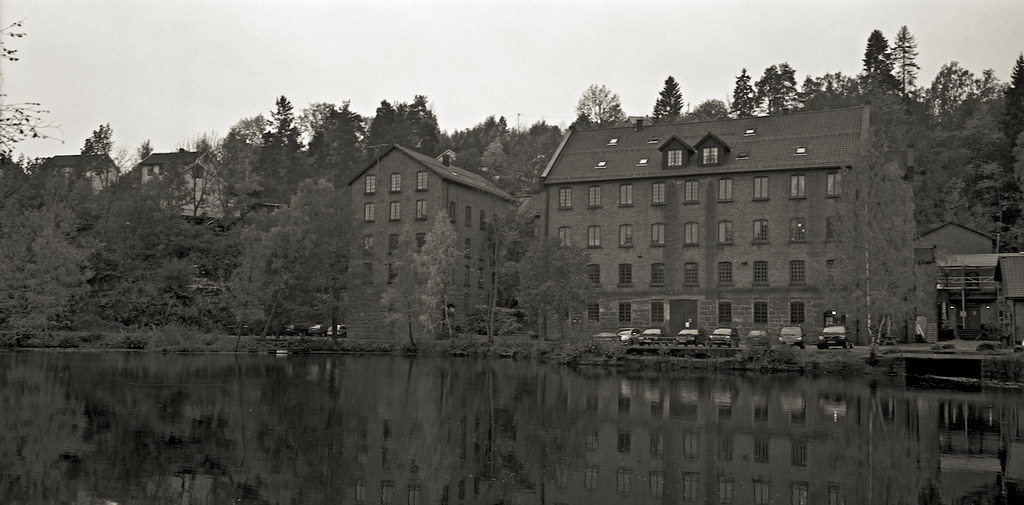
The light leaks are approx 5mm in from the edge of each frame. Quite strong to begin with and then fading rather quickly within the next 5mm The outer 5mm of the frames are OK.

Would you agree with me that the light is creeping in between back and frame?
 
Nice work Phil. I saw the thread, the panos looked great. Which city was it you pictured?


Gorgeous inspiration here! I might find a use for my old non-op Crown Graphic, if I can get to a band-saw...

I found a nice, solid platform to start with was a 9x12 plate camera.
I found a Voigtlander Avus 9x12cm plate camera with a great intact bellows but a ruined front standard that someone had pried the lens from.

I flattened the front standard then widened it up for a 90mm Graflex Optar f/6.8. I made a focusing scale for the rails and set up a new infinity stop.

The hardest part was finding a rollfilm back. They were made but they are a bit difficult to find. The one I finally secured was a Rada 6x9 that had a lot of room to the sides of the film gate for widening. It opened up to 113mm, so it technically was a 6x12. This little camera was tiny. Folded up nicely in a little steel box covered with leather & had a lunch pail leather handle. I attached a bubble-level to the top and side and used a modified wire-frame sportsfinder for composition.

These old plate cameras are extremely robust and work well even with their stock lenses. The 9x12 Avus has 15mm of shift and 18mm of rise in case I cared about perspective in the city (and I love vertical panoramas)

The other 6x12 I built was a very inexpensive non-op Kodak 2C Autographic vest pocket camera. Similarly modified as the Avus, but the Kodak had film transport built-in. 6x14 is possible, but keeping the film flat is a challenge, even with a large pressure plate. It tends to buckle in a "W" almost.
See this thread:
http://www.rangefinderforum.com/forums/showthread.php?t=90686

Phil Forrest
 
Ezzie,
Thanks! That's Manhattan NYC, as seen from Hoboken, New Jersey.
It was a gorgeous evening for light, but the temperature was about 15 degrees F. My girlfriend was with me and she was not a fan of me making 24 exposures at over a minute each. With windchill it was easily below zero F.

Phil Forrest
 
One out of 5 frames came out OKish. The other 4 were ruined due to a light leak between frame and Graflok back (the back was warped). So camera has been taken apart again for repairs. The image is nothing special, I took a similar image with the R-D1 (as a proofing tool) here: http://www.rangefinderforum.com/photopost/showphoto.php?photo=132099

As you can see, the film version has been able to retain more highlight detail, without loosing shadow detail. TMY-2 film, developed in TMAX developer 1+4 @5m30s, TMAX fixer 5m. Epson scan 24bit colour @ 3200dpi (seemed to work better than 16bit greyscale, I don´t know why. I need to experiment more).

4706926370_7609a97428_b.jpg
 
Last edited:
Hi. Thanks, I´m enjoying my return to film, and larger expanses of it too. ;)

The RF is a cheap old Russian Smena, and it works too. (scale in metres)
 
Still battling a light leak, but getting a decent exposure now and then:

Both TMY-2 developed in TMAX developer @ 24C, nominal times. Epson scan @2400dpi, colour, then picked the green channel.

5059990346_f06dba7b6c_b.jpg


5060037556_c79086eac6_b.jpg
 
Ezzie,
Can you post a link to the manufacturer of the helicoid you used? I'm about to embark on a similar project using a 65mm Super Angulon.
The photos are stunning!
Thanks,
Phil Forrest
 
I'm embarking on the creation of a new ultra-wide 4x5.
Using a 65mm f/8 Super Angulon and my old nude Crown Graphic frame I'm going to make this camera cover both 4x5" and 5x12cm.

It will have two lens boards with different mounts for a helicoid. The full-coverage 4x5 version will have the helicoid mounted dead-center to the axis of the film plane. The 5x12cm version is using the modified dark slide method mentioned earlier in this thread. The axis of the lens will be offset by 23mm (rise or fall) to center it in the half 4x5 frame. Using the modified dark slide, I can take two photos per holder with the lens in the "top" position, exposing the upper half of the 4x5 film and then flipping the offset lens board down, I can take two more photos per holder.

I'm using a Bronica S2 helicoid that will bayonet mount on the lens boards using the flange from old Komura telemore extenders. The Bronica helicoid has a 57x1mm thread allowing for an easy fit of a threaded cap to use as the real board for the lens.

On the Graphic body, the supporting lens board will be deeper with the 65mm lens but I want to keep the space available so the camera can be modular and I will be able to add a 90mm Super Angulon in the future.

Film will be held on with a Graflock back. I'll add 3 bubble levels for 3 axes and possibly even a clinometer in case I feel like doing math in my composition for some urban architectural landscape images. No tilts along any axis will be provided.

The camera should be somewhat like Britt Leckman's 65mm one but with the offset board providing rise and fall.

Viewfinder will be a 21mm Leica finder (unless I decide to get really fancy and use my 21mm Zeiss) with gaffer tape masks for the panorama mode.

I can't wait to get this thing built and to expose some f/22 Philadelphia night skylines.

Phil Forrest

I like the concept... I've used the modified dark slide in the film holders, and have posted about this method of doing pano using 4X5 holders and film.

I sounds like you are fixing the front standard and using the focus helicoid for focus... is that correct?

Another way you could accomplish the offset on the lens board in a way that would not involve changing the lens placement while shooting. That would be to use a stripped down Graflex Super Graphic with a revolving back and rotate the back to place the half portion of the film centered on the lens placement. In addition, I would place the lens on the upper half of the lens board in order to get more clearance on the front of the camera door. Then rotate the film and shoot the upper revealed film half.

Currently, I am working on a way to place a mask in the opening of the back in front of the rotating back, so that I can use Quickloads and rotate the back once for each pano. Mask the top half open, place the lens high on the front standard, use quickloads for two panos per envelope.?????

I currently have two of the Super Graphics stripped down... all the rangefinder stuff is gone, one has a replacement bellows, the other is light tight. The cameras both weigh at least a pound and a half less with all the guts stripped out.
 
Last edited:
Optimally, I would like a revolving back, but this is a low-budget project. To get off the ground I'm going to use the lensboard offset and eventually, could remove the graflock and replace it with a revolving back. The issue is keeping the size the same though and I think the revolving back is a bit larger than the back of the Crown body I'm using.

Of course, I COULD start over and use the revolving back as the basis for the whole project. Sourcing one is a pain though and they run more than all of the other expenses I have into this camera.

The issue I'm now facing is making it light tight. Light tight AND properly aligned with the film plane. I'd rather not use a compressed or cut bellows in this application since there's so little clearance behind the support board. I figure I can just make a 4 sided shelf on which the board will sit against and use some adhesive faux velvet to seal off light leaks around the edges. Optimally, I'd make a trap but then again, there's the issue of space. If I weren't making this interchangeable from full 4x5 to pano 5x12cm, I'd just hold it in place with screws and seal up the edges with black silicone. I guess the silicone is still an option though, I could use it for sealing but allow it to dry then cut it to snugly fit the board.

Choices, choices, choices.

I should have something up on the further construction of the camera later this week. I'll post photos.

Phil Forrest
 
Ezzie,
Can you post a link to the manufacturer of the helicoid you used? I'm about to embark on a similar project using a 65mm Super Angulon.
The photos are stunning!
Thanks,
Phil Forrest

Hi Phil.

No manufacturer's marking I'm afraid. I bought if of a fella on ebay. Its Chinese, that much I do know. And the throw of the helicoid is calibrated for a 90mm lens specifically, though he said he could supply helicoids for other focal lengths too. I'll see if my ebay purchasing history can divulge the seller's id.
 
Hi again Phil.

The seller´s ID is Jinfinance. He calls it a wide angle device ..... helical focus. And they don´t come cheap unfortunately. I do remember him being very polite and helpful though.
 
Hi again Phil.

The seller´s ID is Jinfinance. He calls it a wide angle device ..... helical focus. And they don´t come cheap unfortunately. I do remember him being very polite and helpful though.


I am in touch with him right now ordering one as soon as the chinese new year is over.
 
Back
Top Bottom