First Attempt At B&W Developing - Help!

Time Share

Newbie
Local time
12:41 AM
Joined
Jul 22, 2009
Messages
3
Well I finally did it!!!!!

Shot a roll of Kodak Professional 400 TMY 120 format on my Yashica Mat 124G and developed the roll last night.

My process was as follows ...

1. Struggle in the dark with my first attempt at loading the film reel
2. Pour in TMAX Developer (1:4) and develop for 6 Minutes @ 24 C
3. 30 second stop bath consiting of 1:20 is Vinegar solution
4. Pour in Ilford Rapid Fix (1:3) for 8 Minutes
5. Rinse for 30 seconds
6. Wash by filling tank & dumping, ten times
7. Hang Film ..... very exciting to see my first negatives ... large 120 format !
8. Squeege film
9. Lightly dry with hair dryer
10. Scan some negatives on my new Epson V500 scanner
11. Post some result on Flickr and find out what went right/wrong!

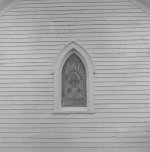
So here is a scan of my first negative using the Epson 500V.

<a href="http://bighugelabs.com/onblack.php?id=3841966306&size=large" rel="nofollow">View Large On Black</a>

I was disappointed with the scan as when I first saw the negatives, I thought they looked really good. This scan han no editing, the subsequent scan I made has a few edits using the epson software.

This was shot at f8.0 and 1/200 on the 400 iso Kodak 400TMY.

So I have a few questions after going through this process ...

1. Did I underexpose the negative hence the washed out look ?
2. Is the Epson V500 causing the washed out look ?
3. Perhaps my developing process had something to do with the washed out look of the negative?
4. Seems I have created more questions for myself !!!!
5. I'll have to scan the rest of the negatives to see if they are all washed out.

Any feedback would be appreciated!!!!!
 
Your developing process sounds pretty good. I know that 20C is pretty much the standard for development. Did you shoot the film at box ISO? Do the negatives look thin and weak?

You might try to re-scan, either using the auto setting, or if you did that originally, NOT using the auto setting. I always overscan a bit, and set my black point at the edge of the film. It's a pretty good starting point.
 
Thank you for the tip.

I did shoot at the film iso of 400.

Am I wrong to assume that is my exposure when taking the shot & my developing process was spot on then I shouldn't have to perform any post-processing when I scan the negative or because of the way scanners interpret negatives, post processing is always required?
 
Times Share,
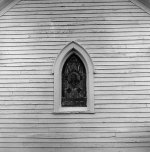
Attached is your original image and a version that has had the levels set in Photoshop along with an adjustment curve to add contrast. Hope you don't mind.

--michael
 

Attachments

  • a.jpg
    a.jpg
    163.5 KB · Views: 0
  • b.jpg
    b.jpg
    185.5 KB · Views: 0
My first develop was also something to remember! The film stuck in the reel some times; I close the tank wrong, so when I did an inversion, some of the liquid pour from it! But with experience one can do better!
I also use T-Max, I like it, in kodaks and ilford hp5. Isn't the ilford rapid fix 1+4? And due to the kodak emulation, I do a 10 m fix!
 
I think your scanner is doing its job and your memory of the shot is doing its own job. In short, your expectations are not being met. Seems to me you did a good job, but keep in mind that film may react sometimes unexpectedly though no fault of yours. That's when Photoshop comes in handy.

And if you think all prints turn out like their negs... talk to a printer and you'll find out! 🙂

You're doing fine. Take care, keep shooting and developing the stuff! 🙂


EDIT: I'd skip the hairdryer bit. You may curve the film or cause some damage to the emulsion. Let it dry naturally and file it promptly so it doesn't curve, because if it does, you get Newton's rings in your scans.
 
It's hard to tell without seeing the negative itself, but generally I always have to bump the contrast up a little with every B&W film. Also, I generally shoot tmy at 250. Hard to go wrong with that.

BTW--here's a good inexpensive way to wash your film: get a deep food storage container and poke a couple of holes in the bottom. It'll slowly drain. I wash for 10 minutes. After that, I dip in photo-flo, and rinse again till most of the bubbles are gone. (I found that if I didn't, I'd still have some little thingies on the film.)
 
Keep at it. I'm a newbie at this, too. Yesterday, I skipped from the stop bath to the fixer clearing agent, forgetting the fixer. I caught it right away, dumped the clearing agent back in the beaker, rinsed, added the fixer, and moved on. Most of the negatives were OK, but a few were a bit cloudy in spots.

Stuff happens and you learn from it. Also, deliberately changing one thing in your regime and noticing what happens is good way to learn. For example, if you agitate by doing 5 inversions, do 3 or 4 and see what happens. Change the time and/or temp, etc.

Speaking of inversion: The cap on my Patterson tank is pretty fiddly. Doesn't seal quickly. I have to go around the edge of the cap with my fingers. A bad fit or all they all like that?
Cap on my patterson doesn't seem to have that problem....works well.

I also tend to find my negs need some added contrast whenever I scan them (shooting tri-x in hc110), at first I thought I was doing something wrong but I just think it's kind of the nature of the beast.
 
Hi Timeshare.

Congratulations on your first attempt at developing film. It is great to see those first negatives. There is much to learn about refining your technique to gain the mastery of exposure and developing and many on this forum will give good advice. It will pay you to read as much as possible on metering especially, as subjects like the white wall of the church can fool the onboard meter of even advanced cameras into underexposure and making negatives a bit thin and less than optimum for easy scanning or printing. Overexposure is usually less detrimental to the final image and most negative film is more tolerant of this. You can learn greatly by bracketing your exposures and very often the ones that receive a fuller exposure will have better tones overall.
Keep up the good work and above all keep notes of what you do.

Regards, John.
 
Scans that come straight from the scanner without at least a levels adj to help the contrast will be too contrasty to print well. Use an editing program or the levels in Epson scan software. Scan in the profesional mode, not the home or automatic or easy scan, so you have access to those tools. Save the setting and name it at the top where it says "current setting" so you need not repeat for each neg.

The option is develope longer which I do not recommend.
 
I wouldn't worry too much about your initial results at this stage ... you seem to have produced a negative that scanned OK and will adjust nicely in post processing. After developing hundreds of rolls of film I've discovered you rarely get an image that looks right straight out of the scanner ... learn how to use curves and you'll be amazed at the results you can get from what appear to be very flat scans.

Also as you develop more film you'll discover that tailoring your actual developing technique will change the end result. A difference in the way you agitate can make a neg look quite different. I agitate very little and have discovered that this works for me and produces negatives that suit my personal work flow.

It's all good as they say! 🙂
 
Back
Top Bottom