Flash exposures.. weird thing going on with shutter speed?

jano

Evil Bokeh
Local time
7:28 AM
Joined
Jul 13, 2005
Messages
1,203
Hey, this is way OT and probably akin to heresay since most of us are fans of natural light (especially me). But I decided to play around a bit with my dslr to learn something about flash photography -- and because I really wanted something to do besides watch tv on saturday and sunday night :)

So here goes: I ran some tests to understand flash exposure. Four variables: iso, flash power, aperture, and shutter speed. I ran three tests. First fixed iso and flash power, second fixed iso and shutter speed, and third fixed iso and aperture. The remaining elements in each test were adjusted to allow for proper exposure.

The first test had expected results. When I closed up the aperture one stop, I decreased shutter speed one stop -- as I went from f4 to f16 my shutter went from 1/15" to 1", and I could see how ambient light took over the effect of the flash.

The second test I wasn't quite sure what to expect. As I increased the power output of the flash (1/16, 1/8, 1/4, 1/2, and full), I closed down the aperture. My thought was that ambient might take over because the shutter became longer relativley speaking (although it stayed the same length). However.. what actually happened was that the flash became more pronounced, pulling out the ambient. I guess this makes sense because I was simply letting in less of the ambient light.

Third test.. boy am I confused. When I doubled the power from 1/16 to 1/8, I increased my shutter by one stop from 1/15" to 1/30" while keeping aperture constant. Same idea as before. But the result? A flash blasted picture that was well overexposed. I had to drop the shutter one more stop (1/60") to get the right exposure. Then when I doubled the flash again to 1/4 power, I had to actually increase the shutter by a total of four stops from the original 1/15" to 1/250". Going to 1/2 and full power was not possible without closing down aperture, and or dropping the iso, since my sync speed is 1/200! I had to go 7 stops under exposed to get 1/2 power flash with good exposure.

So.. any idea what's going on? Does this make sense? Doesn't to me :(
 
Unless you're using one of those camera-maker dedicated flash units with a "high speed sync" feature, the basics are pretty easy to understand in principle:

1) Shutter speed affects the ambient light portion of your exposure only.

2) Aperture affects both the ambient and flash portions of the exposure.

3) Flash-to-subject distance affects the flash portion but not the ambient portion.

4) Flash power also affects the flash portion but not the ambient portion.

I'm not quite following all your different changes, but I suspect you'll find it easier to understand what's going on if you change only one variable at a time. (One good thing about shooting digitally is that you can look right away and see what the results were.)

To put this into a practical scenario, say you're photographing with no flash at all, in a room in which your meter indicates a correct exposure of 1/30 @ f/4 for whatever ISO setting you're using. You take a picture and see that this exposure is indeed correct.

Now you add a flash unit. Whatever light it contributes is going to be in addition to your ambient-light exposure, which is already correct -- so you're going to get varying degrees of overexposure depending on the power level you've set on the flash unit. The flash won't be lighting exactly the same areas as the ambient light, so the overexposure won't be uniform -- it'll be more prominent in the areas more dominated by light from the flash.

So you decide to cut back on your ambient-light exposure so you can add flash exposure just to the areas you want to emphasize. Leave the aperture setting alone -- it will affect the flash exposure as well, so you don't want to change it for now. Instead, increase your shutter speed to 1/125 (this should be safe assuming your maximum X-sync speed is 1/200.) Now if you take a picture without flash, you'll get a result that's two stops underexposed.

Now turn on the flash and start adding exposure to the areas you want to emphasize. You can consult the calculator dial or use the flash unit's guide number to get a starting point. Let's suppose that you've got the flash set at full power and you're 10 feet away from the subject; the calculator dial says at this distance you should use f/5.6 for a correct exposure. Well, you've left your lens set at f/4, so this would produce 1 stop overexposure; you don't want that. So, set the flash to half power (because each change of 1 f/stop is equivalent to halving or doubling the light.)

If everything is working correctly, this should result in a picture in which the areas lit only by the flash are correctly exposed; the areas lit only by ambient light are two stops underexposed; and areas that are lit by both flash and ambient are somewhere between two stops under and correctly exposed.

Now you can start fine-tuning. If you decide the whole picture is too dark overall, either open up the aperture or increase your ISO setting; these adjustments affect both the flash and ambient portions of the exposure, so they'll brighten the whole image uniformly.

If only the flash portion is darker than you want, leave the camera settings as they are and turn up the flash power (or move it closer to the subject.) This will leave the ambient exposure as-is while increasing the flash exposure.

If the flash portion is OK but you want the ambient light's contribution to be brighter, leave the other settings alone and choose a slower shutter speed. This will increase the ambient-light exposure without affecting the flash exposure.

Clear enough for a starting point? You probably already understood the theory of all this, but it gets tricky in practice because in most situations the flash and ambient exposures get mixed together, making it harder to tell what changes you need to make to get the effect you want. That's why I suggest beginning with a correct ambient exposure as a baseline, then change only one variable at a time.

If you run into any more problems, let us know...
 
Another thing I just thought of: All the stuff I just wrote you assumes that you've got everything set to manual exposure control. If you've got your flash set to TTL auto, that's going to interact with the other controls in a way that's going to make it very difficult to get predictable results.

If you're using TTL auto flash, your flash power adjustment won't affect the flash exposure at all -- it'll only affect the flash's maximum distance. And changing apertures won't change the flash's portion of the total exposure unless you stop down so far that the flash doesn't have enough power to expose correctly.

The only way to change the balance between flash and ambient exposures with a TTL auto system is if your camera has separate flash and ambient exposure compensation controls. If it does, your exercise is pretty easy: take a test picture, and if the flash portion is too bright, decrease the flash-compensation setting; vice-versa if the flash portion is too dim; and do the same with the ambient-compensation setting for the ambient light portion.

If your TTL system does NOT have separate compensation dials for flash and ambient, just forget TTL and set everything to manual -- it's the only way you can be sure of knowing what's going on.

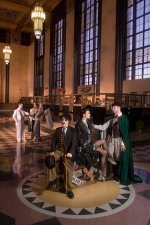
Normally I wouldn't post this picture on RFF since it was taken with a (blech!) DSLR, but since we've already started down the road to DSLR perdition I might as well include it as an example. It's a promotional photo I shot in our art-deco train station (now a museum) which obviously was much, much too large to light the whole thing with flash! However, the foreground area where I wanted to position the main subjects wasn't getting enough ambient light. And since the museum people didn't want us dragging equipment cases and cables all over, all I had to work with was one battery-powered flash, one lightstand, and one umbrella. So this really WAS a balancing act!

I started by choosing an ambient-light exposure that gave as much exposure as possible to the ceiling and windows without quite burning out the guy in the white tuxedo, who was standing in a shaft of light coming in the main window.

Then I positioned my flash unit (bounced into the umbrella) to light the figures in the foreground. I made sure it was aimed so it didn't spill onto the ambient-lit background. I left the camera settings alone, then turned up the flash power until the test shots showed I had a good balance between foreground and background.

Basically that's all you do -- the main trick is dealing with areas in which flash and ambient light contribute about equally, so that you can avoid either overexposing these areas or underexposing areas lit only by ambient or flash. Usually you have to tackle this by how you position your flash unit(s) -- you often can't achieve it by settings adjustments alone.
 

Attachments

  • 06-11-06_10r.jpg
    06-11-06_10r.jpg
    86.6 KB · Views: 0
WOW. Thank you! It will take a while to digest what you wrote, but I think I get the general gist now.

This is the key point, which I think explains why adjusting the shutter in my example led to flash-blasted images instead of what I thought was supposed to happen:
jlw said:
1) Shutter speed affects the ambient light portion of your exposure only.

My thinking was that the flash power output worked exactly like standard stops of light. Remove the variable for a moment, and you have three: iso, aperture, and shutter. For any given exposure, you can fix one of those and adjust the other two while maintaining the same exposure. You can even adjust all three, but that gets complicated :) I extrapolated from this to the flash power, but obviously, it doesn't work quite like I had expected, in that the shutter speed will only affect the ambient. That's why I had to resort to adjusting aperture and/or iso to get proper exposure in test #3. Makes sense now. I will test more later this week :)

To explain my tests.. I tried to maintain the same "correct" exposure in every shot by fixing two variables and adjusting the other two variables. In other words, I had to balance one change with another -- if you change only one, you change the exposure.

This will get fun when I bring in a second and/or third flash :eek:

Thanks again!!! :D
 
jlw said:
Another thing I just thought of: All the stuff I just wrote you assumes that you've got everything set to manual exposure control. If you've got your flash set to TTL auto, that's going to interact with the other controls in a way that's going to make it very difficult to get predictable results.

Don't have ttl flashes, but they do have auto modes (sunpak 383 x 3 of them, they are auto thyristors). I started playing with these and discovered something similar here what you were talking about. Looking over my notes, it got so hairy that I decided to stick with manual IF my intentions were to make the strobes the primary lights. However, if looking to do fill or complimentary flash, it's easier to set them in auto because then distance relaly doesn't become a variable (provided you are within the capabilities of the flash). Right?

Nice picture :) Hopefully I'll be able to get to that level soon! Wish I could see a slightly bigger version, though, all the details are too small.
 
Back
Top Bottom