kully
Happy Snapper
Three hours and I give up...
But first - I am offering five rolls of 135-36 FP4+ or Velvia 50 posted to you if you can show me how (and I can).
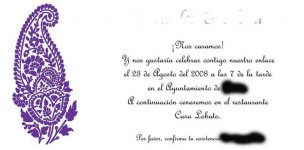
I have a PSD I've created of a wedding invitation, you can see a JPG of it below (with a little obsfucation). I want to colour the flower on the left a shade of purple but I cannot for the life of me get this to work.
I've tried the colour replacement brush but that only seems to colour in the edges , I'm sure people must do this kind of thing all the time.
I have the PSD available for download, if you fancy a bash.
Oh, and if you have any suggestions on making this better please tell.
cheers,
kully
But first - I am offering five rolls of 135-36 FP4+ or Velvia 50 posted to you if you can show me how (and I can).
I have a PSD I've created of a wedding invitation, you can see a JPG of it below (with a little obsfucation). I want to colour the flower on the left a shade of purple but I cannot for the life of me get this to work.

I've tried the colour replacement brush but that only seems to colour in the edges , I'm sure people must do this kind of thing all the time.
I have the PSD available for download, if you fancy a bash.
Oh, and if you have any suggestions on making this better please tell.
cheers,
kully
venchka
Veteran
This looks like a job for Adobe Illustrator or some other drawing program. Maybe one of the page design packages? Does that get me some film?
Morca007
Matt
Okay, this would be easier to do than to show, but the way I would do it is with the colour range selection tool, and then some edge cleanup using a few of the marquee tools, then simply paint bucketing in the selection on a new layer..
If you want, I could take a stab at it.
Anupam
Well-known
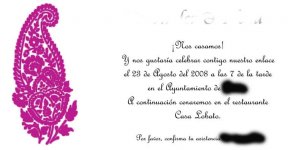
Something like this? Easy to do. I did it with a mask on a duplicate layer. If this is what you are trying to do, I could PM you more detailed instructions if what's below doesn't make complete sense:
Open
Make duplicate layer
Switch to the channels tab and click the load channel as selection button on the bottom left
Switch back to the layers tab and click on the "Add layer mask" button
Make sure the mask is selected and do Ctrl-I to invert the mask
Hit option/alt-A to edit the mask
Paint the portion you dont want to alter solid black
Hit Alt-A again and click on the layer thumbnail
Now just paint with whatever color you want - since you are painting thru the mask areas that are black in the mask won't be affected.
You can exert a lot more control by tweaking with the mask - I did it quick and dirty.
-A
Attachments
Last edited:
kully
Happy Snapper
Thanks Anupam and Matt.
I'll give this a go when I get to my desktop this evening.
Wayne, if this works I will probably be happy enough to send everyone film
I'm thinking of all the money saved printing my own compared to getting these done by a printer, not quite enough to give a M8, but certainly a user M2/3.
I'll give this a go when I get to my desktop this evening.
Wayne, if this works I will probably be happy enough to send everyone film
I'm thinking of all the money saved printing my own compared to getting these done by a printer, not quite enough to give a M8, but certainly a user M2/3.
dannynono
Survey sez....
If you have access to Illustrator I'd recommend you use that instead of PS.
Illustrator will give you better quality type output since it'll remain in outline form.
jamesj
Well-known
you can also go to hue and saturation under
image- adjustments
click on colorize
adjust the lightness going in the positive direction
then play with the hue and saturation...
it will change the text also so just do the image....
personally id do it over in illy just to make it not rasterized...
image- adjustments
click on colorize
adjust the lightness going in the positive direction
then play with the hue and saturation...
it will change the text also so just do the image....
personally id do it over in illy just to make it not rasterized...
edlake
The "Glory" Days
Draw a box around the graphic using the selection tool. Under the Select menu choose Color Range. Use the eyedropper on the black image in the selection box and it should choose only the graphic. Create your color as your foreground color and then press option-delete. The color of the graphic should change. How well it looks depends on how good your selection is. Here is an example using your image.
Edit: Cheers! and good luck.
Attachments
Last edited:
gdi
Veteran
If you like the looks of this, PM me you email and I'll create a step by step documents w/screenshots. (Also, you need to determine exactly what color purple you need - with RGB values)kully said:Thanks Anupam and Matt.
I'll give this a go when I get to my desktop this evening.
Wayne, if this works I will probably be happy enough to send everyone film
I'm thinking of all the money saved printing my own compared to getting these done by a printer, not quite enough to give a M8, but certainly a user M2/3.
Plus - no film required...

sweathog
Well-known
Well, I guess I was a bit late to offer my input. It seems we have a few dab hands among us.
Share:
-
This site uses cookies to help personalise content, tailor your experience and to keep you logged in if you register.
By continuing to use this site, you are consenting to our use of cookies.