Help with Voigtlander Vitessa A 3 Rangefinder Adjustments

luminiso

Newbie
Local time
2:11 AM
Joined
May 18, 2022
Messages
5
Location
EU
I've been trying to adjust the rangefinder on my Voigtlander Vitessa A 3 and it hasn't been going well. There also isn't a lot of information online about adjusting Vitessa A rangefinders.

So far I was able to set the focus at 1m. I placed the camera on a table pointed at a printed plus symbol 1m from the film plane and adjusted the RF horizontal using the rear screw. Then checking with the top plate over and over again.

But now when I check infinity it doesn't match. I've been going in circles and I feel stuck. What should I be doing to get this right?
 

Attachments

  • photo115595.jpg
    photo115595.jpg
    259 KB · Views: 5
  • photo115594.jpg
    photo115594.jpg
    223.8 KB · Views: 5
  • photo115596.jpg
    photo115596.jpg
    225.9 KB · Views: 5
I find the images you've added confusing. The lens won't rest at infinity without the focusing dial fitted, and the lens should be extended.
  • First, the lens should be precisely set to sharpest possible infinity focus at the film plane.
  • Then, the vertical patch alignment should be optimised.
  • Next, the rangefinder should be precisely calibrated to the lens at infinity. This is the primary rangefinder calibration.
  • Subsequently, the rangefinder to lens match should be checked at close range. If RF does not match lens the linearity will have to be adjusted and calibration then re-checked, Ie:
    (a) RF infinity calibration re-checked and corrected if necessary, before;
    (b) the close range calibration is re-checked and corrected.
    Repeat (a) & (b) iteratively, until both infinity and close calibration is right.
It is not always necessary to alter the linearity, if a rangefinder is in good original condition and has not been abused, or tampered with. It sounds as if you or a previous owner has upset the linearity.

I can't recall having to adjust linearity of a Vitessa previously, following the steps outlined above it's not been necessary. The last few examples I've worked on have been early examples, and there were significant changes to the details of the rangefinder installation during production. You may need to remove the rangefinder assembly for inspection, and to identify the correct adjustments, to get things right. In your shoes, I probably would, (unless setting infinity calibration then sees the close match fall into place, which sounds unlikely).

You haven't said how you're actually inspecting lens focus and RF calibration. Loupes and magnifiers are a must for excellent calibration. Unaided eyeballs don't really cut it. The Vitessas, laudable as they are, don't benefit from vision assistance as much as a Contax or a Leica, because they do not have the sheer precision of the latter. But for best calibration (and why bother making any other standard of calibration?) a magnified view can help one get factory, or near-factory, levels of setting precision.
 
Have a look at the Classic Camera Repair Forum archive, which is in the Repair section here. I'm sure there used to be a piece on there about adjusting the RF on the Vitessa - though IIRC it was also a rant about what a pile of pony the mechanism was.
 
I downloaded this a long time ago, This is the worst designed adjustment for a Rangefinder mechanism that I have ever dealt with. The Prominent is 2nd worst. Voigtlander made great lenses. The cameras themselves are not well thought out, and beautifully made. The phrase is "What idiot designed this!"

========================================================================================
Downloaded almost 20 years ago:

Barn-Doors Voigtlander Vitessa N. Circa 1954.
Adjusting Rangefinder.
by Stuart Willis

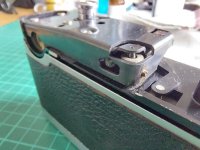
The adjustment comes in two parts. First adjust the prism (3 screws plus a central locking screw). The adjustments here are so fine that it is almost impossible to get the horizontal RF coincidence exact. The fine tuning is then done by adjusting the swinging beam-splitter. (See Pix).

vitessarf1.jpg


RF adjustment is made extremely tedious by the thoughtless design. There are no access ports via the camera's top plate. With the top-plate removed one needs to set the focus at infinity for adjustments. But the focusing wheel blocks access to the prism adjustment screws. There is worse to come. The eyepiece and exit-pupil optics are integral with the top plate and thus one cannot view rangefinder performance unless the top plate is refitted.

It is clear that there is a special factory tool which one just drops over the viewfinder - and which incorporates eyepiece and exit-pupil optics. With such a tool, the factory (or suitably equipped service lab') can easily adjust the rangefinder when the top plate is removed.

Lesser equipped mortals must reinstall the top-plate and focusing wheel and check the results after each fine tweak.

When first removing the top plate you doubtless think your "Vitessa N" has been misassembled by some previous incompetent deisel mechanic. However, the tilted viewfinder/rangerfinder module is made like this.

Supplementary Note:

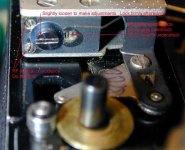
The shutter cocking / film advance wind plunger on these Vitessas is prone to knocks and abuse. Any "rock" will have its fulcrum at the top - and given the long moment, when the lens block is at full extension for closest focus, even 0.015 of play will transpose into "slop" at the other end as sufficient to overshoot the shutter cocking latch which is only 1mm thick.

The telltale symptom of this is that after a close-focus shot the plunger may not fully return. This leavesyou with a jammed camera.

Even though I brass shimmed the plunger, I found it necessary to limit the maximum lens block extension to a closest focus point of 4ft.
This was accomplished by adding an 0.020" thick brass washer beneath the focusing wheel. As can be seen from the Pic - that washer by its carefully chosen diameter, prevents rangefinder cam from fully returning. Indeed - the brass washer was hand made for the job.

The alternative to such modification is a complete strip out of the barns doors, lens block assembly and the plunger mechanism. A very complicated procedure to be followed by some precision re-engineering of worn components. Shimming of the plunger and incorporation of the brass washer as with its inherent loss of 6 inches of close focus, was thus a most acceptable course.
Click image for larger version  Name:	vitessarf1.jpg Views:	0 Size:	47.8 KB ID:	4785799 Click image for larger version  Name:	vitessarf2.jpg Views:	0 Size:	47.5 KB ID:	4785798 Click image for larger version  Name:	vitessarf3.jpg Views:	0 Size:	47.2 KB ID:	4785800 Click image for larger version  Name:	vitessarf3.jpg Views:	0 Size:	47.2 KB ID:	4785800 Click image for larger version  Name:	vitessarf1.jpg Views:	0 Size:	47.8 KB ID:	4785799
 

Attachments

  • vitessarf3.jpg
    vitessarf3.jpg
    47.2 KB · Views: 9
Ah - now I see who wrote it, I understand why! I corresponded with him a couple of times on matters Werra, and he was a man of strong opinions!
 
Hey, I wanted to thank everyone for responding. Ok so... I think I've found the problem. I was able to compare it to another Vitessa A that an acquaintance had on a shelf and I'm pretty sure the beam splitting arm is bent. I can't imagine how that has happened. I guess i'll be looking for some spares in the future.
 
Back
Top Bottom