Home Darkroom - first prints came out flat

x-ray, thanks so much for your very detailed message.

I have a condenser enlarger so I guess it'll produce results with higher contrast.

About the above note, I believe I will never have the experience you have, after all you did this mainstream and I only do it to please myself and hopefully sometimes family and others who look at my prints. Wouldn't call it art or work even...

To set such scientific standards will be hard for me and to be honest, I am not too keen on getting everything right. Many times I shoot without a meter. I enjoy old cameras and I enjoy shooting black and white. This means if I discover I should be shooting 1/3rd of a stop below the way a previous negative was produced at, I'd need to stop - meter and my subject would perhaps have already vanished.

Regardless of what will happen in my workflow going forward I will do the test you suggested above as I think I'll learn a lot from it.

I will also read books and will try to understand as much about the subject as possible.
But again, the way I shoot will perhaps never be as critical as I would need it to be if I wanted to get consistent and reproducible results.

About Dodging and Burning, I am 100% with you. I also don't have a single image I think where I didn't do something in Photoshop to change a part of an image. This is why from the second time I went to the darkroom I started experimenting with the blocking of light on certain parts etc. It is just something I want to always do, it is how I did it pre-wet printing my images in PS.

And this is why I am desperately trying to increase the time of enlargement, as it currently stands are 3-4 seconds maximum when I print 5x7. If I go larger I gain time but I don't always want to print large. With the small paper I can get 50 sheets for the price of 20 sheets of the larger. For practicing I think it's okay.
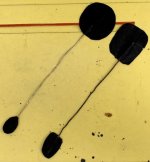
I am going to buy some slim wire over the weekend onto which I'll glue the shapes I need for dodging.

Ben
 
Ben, I use large paperclips straightened out with black tape on them cut to different shapes. I have a set I made thirty years ago and still use them. I use my hands also and burn using my hands to form shapes like a funnel to direct the light to tiny areas or large depending on what I need.

I would suggest going to the hardware store and getting a dimmer or make now on a power cord with a plug to plug the enlarger in. It won't cost but a few dollars and you can cut the power to the bulb back for longer exposures. I used an industrial dimmer for my 5x7 Durst but for your enlarger a simple inexpensive extension cord with a dimmer in the line will work.

1/3 of a stop is no big deal. Shutters and meters can be off by that much.

Just strive for the best negative / image you can make.

Click the link at the bottom of my post and it will take you to my gallery. All the B&W images with the exception of one or two are film printed on fiber based silver gelatin paper and the print scanned.
 
Ben, I use large paperclips straightened out with black tape on them cut to different shapes. I have a set I made thirty years ago and still use them.

Great idea! Do you happen to have a picture of these clips? Would give me a good idea on where to start.

I definitely need to strive for better negatives and also to understand the relation between it and the time it requires to enlarge a print.

Take the two prints below. The one on the left took 18.5 seconds and the one on the right 3 seconds.
Both on f11 and in the same enlarger (LPL Pro 7700)

The left hand side is TMAX100 in bright sunshine midday in Dubai - the Arabian sun.
The right hand side was on TMAX400 and indoor in a Japanese style pub (izakaya). Both developed by me in TMAX Developer.

Lots to learn.
Good day,

Ben


image-1353061870.jpg
 
Here are a couple of dodging tools made from paper clips and black masking tape.

I'm using my phone but your prints look good. The white robes might need a little burning in and aower grade of paper but again I'm viewing on my phone at the moment.

Such an extreme in print times indicates one negative is over exposed or one is under exposed. I'm guessing one is under but that's just speculation without seeing the negs. You'll get the kinks worked out. It just takes time and practice.

By the way the girl kissing the guy is a great shot.
 

Attachments

  • image.jpg
    image.jpg
    20.9 KB · Views: 0
Once you have reached the point where you have sufficient control over paper grade and exposure, you might want to have a look into Larry Bartlett's Photographic Printing Workshop book. The second part of the book the book is full of examples demonstrating straight prints, dodged/burned versions and a corresponding mask where/how much dodge/burn was applied.

So far I had understood dodge / burn as minor corrective actions. But the achievements Barlett demonstrates give you a clue where this may take you.

Lars
 
Hello all,

Thanks for all the helpful tips. I will look into getting that book!

X-ray thanks for the examples, I have now created my own set and tried it last night. Worked good! I also cut a hole into a black paper for burning which I also took on a test drive. Need to practice more but so far so good.

I have also gotten two sets of filters, one that goes below the lens and is easy to swap - for shots where I change contrast while enlarging. And I have the set for the drawer which I'll use most often as it provides no loss of quality which I understand is the case from messages above. This should give me a good starting point!

Still no ND filter but whatever I've enlarged since then gave me at least 4 seconds of time at f16 so it isn't as bad as it was with the sub 1sec print.

The biggest challenge at this point are the scratches. As I never understood the implication a scratch could cause to a print, I didn't baby my negatives to an extent I should have. They were in sleeves etc, but while scanning I was moving them around etc. This left me with some great shots having scratches over them which is a shame. Is there anything I can do to reduce their visibility?

The other thing to learn is to judge the length of time i need to give a certain negative just by looking at it. So far I have to send a few test strips through to get a feel for the negative. Once I have the time in mind, I run a full print and then check for areas I need to dodge and burn. Then I run a print the way I imagine the final print to be and adjust later for anything else missing or not quite right.

Thanks again,
Ben
 
Ben is your paper variable contrast? If so use the appropriate filter even if you need a #2. Most variable contrast papers are roughly a #2 without the filter but the filter will give you longer exposure times. I donf worry about filters under the lens if they're in good shape. They won't degrade the image anymore than a filter on your camera lens.


Do the scratches appear white or black on the print? Black on the print are scratches in the emulsion and there's nothing you can do but white on the print are in the film base. If there base scratches there's was or may still be made a product by Edwal called no scratch. It's a clear oil much like turpentine. It's clear and thin and can be removed easily with film cleaner. It has the same refractive I dec as the film base and makes the scratches disappear when you print. After printing use a pec pad or similar and a few drops of film cleaner. I've read of people using petroleum jelly on the base but would think it would be hard to cleanup. If you can't find no scratch or equivalent take a reject piece of film and experiment with turpentine or something like that. Try to avoid getting it on the emulsion. No scratch is safe but others I don't know. Experiment with a reject neg.
 
Here's no scratch. http://www.freestylephoto.biz/5415120-Edwal-No-Scratch-1-oz.

If you can't order it where you live try turpentine from an art supply. Be sure to clean it off ASAP with film cleaner. You might also try Kami scanning fluid but it evaporates quickly and is flammable. Kami makes a great film cleaner too. If you can't find those items you might try microscope immersion oil. It's used with 100x oil immersion objectives. You place one drop on the glass cover slip over a specamine and carefully run the lens of the objective into the drop of oil. It becomes part of the optical system.
 
http://www.apug.org/forums/forum41/1...-enlarger.html

If you are afraid of burning a hole, buy a 20x24" sheet of Rosco full white or Lee 216 diffuser.

Thanks! I am very interested in this, would be perhaps better than an ND filter and easier to replace should the bulb burn a hole into the ND filter. It's a really hot bulb, I could cook an egg on my enlarger head!

Can you explain a bit more about it? It seems like a non traditional way so I can't find anything about it.

http://www.rangefinderforum.com/forums/showthread.php?t=146874
 
Just thought I should update the thread. I have since printed off of 10 different negatives and they all worked without any issues. I am printing Post Card size and the minimum time I got at f16 was 4 seconds, and on one negative I even had to go to f11 as my times were over 20 seconds on f16...

The bulb still creates a lot of heat and I can hardly touch the enlarger head if I have the lamp on for a minute. I am thinking of getting a 75W bulb to reduce the heat...

An unrelated question if you don't mind. My timer will cut the power to the safe-light automatically when the enlarger is on and I think this might be unnecessary?
Is it okay if I keep the safe-light on even while the enlarger is going? The light comes right back when the enlarger is off and is directly above my developer tray so i don't think it would cause too much trouble.
I did test putting a blank paper under the safe light for 5 minutes and once developed, it kept completely white.

Thanks,
Ben
 
Hi Ben,

1 )Condenser enlargers create a lot of heat build-up. As long as the 35mm neg. remains flas it's OK, if not use painter's tape.
2) Enlarger time should be above 15sec. to compensate for possible electrical fluctuations (up to 15%).
3) Yes, it's OK to keep the safe-light on.

Regards,
Robert

1. No curls what so ever, neg is flat. Heat is mostly felt at the head's housing, specially at the top. Nevertheless, I just ordered a 75W light bulb and it's in the mail already.

2. Yes, also for the dodging it's easier. One can always open up the lens if times are too long, but if I can't close it up enough to gain time, it's a hassle. Hope the 75W bulb will help!

3. Thank you! Much better to leave it on. I'll bring another extension cord in this case. My bathroom has no plugs as it's a "splash all you can" type of Japanese bathroom and no outlets installed.

Also checked the no scratch thingy, can't find it in Japan but will look for some alternatives.

So far I've printed about 10 hours on the little guy, things are improving every day!
Ben
 
Excellent!

The 75 watt bulb will be better for small prints. If you make large ones swap back to the brighter one.

If you're dodging and burning try top get your time to around 20-30 seconds. Jt has nothing to do with voltage fluctuations, just long enough times to be consistent in your dodge and burn. Short times are hard to be consistent between prints from the same neg. one second error in your dodge or burn with a 30 second time is less error than 1 second off in a 10 second exposure.

Try turpentine for a substitute for no scratch. Use film cleaner to remove it. I's try on an old neg. Don't put it on the emulsion, just on the base.
 
Hello again,

I've gotten the 75W bulb and wanted to see what you guys think. See the picture below, the size of the bulb is different. As it is a condenser enlarger, I could see the original 100W bulb was exactly above the condenser lens, the new 75W while fits - sticks out a little further and the round part of the bulb isn't exactly over the condenser lens' dome.

Will this be a problem? I installed the bulb and tried it in the room, looks to me that the light coming out is even but I am worried. What do you guys think?

I placed the head of the enlarger face down on the floor so you'll see how the bulb mounts. It isn't top-down but horizontal rather.

I haven't thought about the White LED (from the post above). Is that something to look at?

Thanks,
Ben

EnlargerBulb_75W.jpg
 
Tell your buddie I believe in democracy!

This is based on my experience. Contrast is dependent on several factors.

I have found that negatives that are gradually overdeveloped will print with greater contrast. My primary film developer is D-76 although I have a bunch of others. I just developed a roll of Tri X in Rodinal using stand developing as i wanted the grain.

Printing is another way of varying the contrast using VC paper. I use Dektol but others are available. I have an Omega B-22 enlarger with a color head I use to dial the contrast I desire.

It can get confusing. So I use D-76 as my primary film developer, Dektol as my primsry print developer. I use Ilford VC papers and I like the satin finish type in sizes offered by my supplier, B & H.

Please remember, it takes a lot of practice with this and my best friend, to this day, in my analog darkroom, is a garbage can!
 
.... and my best friend, to this day, in my analog darkroom, is a garbage can!

Although I haven't been doing this darkroom thing for long, the above is already something I can relate to.

Thanks for the advice. The contrast thingy is mostly under control now, I had a bad lens which caused the awful flat prints. Very happy with my setup now except the short developing times I get with small paper even on f16, hence I got the 75W bulb. It is however larger than the original 100W and I wonder what it'll do to my results. Not having enough experience in the darkroom - I wanted to ask the question before wasting too much paper on something I don't fully understand.

On a side-note, I was totally on the supporting end of the Hong Kong movement and I am displaying 5 photos I took there for a duration of 6 days in Tokyo which is why I am printing like a madman these days, trying to get everything ready.

Ben
 
Hello all,

If you see the last post on the 3rd page, you'll see a picture of the light bulbs (new 75W and old 100W original) side by side. I am worried that the 75W one which I got in order to reduce the times it takes to enlarge might have its bulk over the condenser lens' dome. Not sure if this would have any effect on the picture?

If you see the picture you'll understand what I mean.
Thanks,
Ben
 
Back
Top Bottom