How to get started?

david3558

leicaboss
Local time
1:57 PM
Joined
Sep 24, 2011
Messages
91
Location
Boston
I am looking to get started in not only shooting but also developing my own B+W film. I'm thinking about starting out with Kodak Tri-X or its generic equivalents but I'm not sure what kind of gear I need to get started or if its just cheaper to send it somewhere. What do you guys think?

(I just got my first rangefinder, M6TTL + 50 summicron)
 
Do it yourself. ALL photo labs suck for black and white. All of them, and I've tried some very good/expensive ones. Doing it yourself is easy and CHEAP.

You need a developing tank. Get one that holds two 35mm reels. Some developers likeD-76 diluted 11 need twice the volume of developer needed to cover the film, so a 2-reel tank will develop one roll of film for such developers. Even for other developers, larger tanks give more even developing...I've seen one reel tanks give uneven developing (meaning streaks or splotches on the film).

There are stainless steel tanks and reels, or plastic. Some find plastic reels easier to load, but good steel reels are actually easier once you learn how. Get Patterson tanks and reels if you like plastic, Generic metal tanks are fine, but buy Hewes brand reels. They cost more than cheap ones but really are worth it. Cheap metal reels are often built sloppily and are not aligned correctly, which makes loading them HARD.

You'll need a thermometer. Patterson makes a very good one that is not terribly expensive ($25).

You'll need a couple of measuring graduates. Get one liter size, two of them. One for developer, one for fixer. Patterson makes good ones.

Developer. D-76 is the old standard but is a powder, so a pain to mix. Tmax developer is good for any film too, is liquid and easy to use.

Fixer. Get Ilford Rapid Fixer.

Kodak Photo Flo: you need this too.

Metal film clips to hang film to dry from. Get two for each roll of film you want to develop at once. So four to start is fine.

Check my developing info webpage.
 
Chris,

I really appreciate the tips! I'm definitely going to look into this. The reason I was considering mailing it out even though I want to learn to do it myself is because I was afraid I would have to convert my dorm/apartment into a photo lab, but it seems like that might not have to be the case. The problem is how does one get these scanned/enlarged? That's something I actually have never had experience with.
 
I'm sorry I don't have any useful bits to contribute here, but that is actually why I'm posting. I have been wondering about these exact same things as I contemplate getting into b&w film as well. So please, keep the tips, gotchas, and beginner experiences coming. It is more than one person that would like to know!
 
Chris,

I really appreciate the tips! I'm definitely going to look into this. The reason I was considering mailing it out even though I want to learn to do it myself is because I was afraid I would have to convert my dorm/apartment into a photo lab, but it seems like that might not have to be the case. The problem is how does one get these scanned/enlarged? That's something I actually have never had experience with.

All you need is the kitchen sink to develop film. I did forget one thing. You need a Changing Bag. It is a black lightproof bag with elastic armholes. You put the reels, film, and developing tank in it and it keeps light away while you open the film cartridge (use a bottle opener to pry the top or bottom off the cartridge), put the film on the reel, and put the reel in the tank. These cost about $30. Lets you load film in a normally lit room. Getting a room truly dark is VERY hard, there are always little light leaks around doors and such. For making prints in a darkroom, that's not a big deal, but film is a lot more light sensitive than printing paper, so absolute darkness is required.

I scan my negs with a Nikon film scanner, which is the best way to go if you can afford it and don't have space for a printing darkroom.
 
Or if you don't have the money for a nikon scanner than an epson 4490 or v500 can be had for between $100 and $150 bucks depending on where you live. Thats what I use and I don't have much to complain about
 
I prefer Ilford chemicals, as they come in liquid form, and are easier to deal with since you don't have to mix up powdered chemicals, but this is a personal preference.

There is a great app for the iPhone or iPod Touch that will make timing your development a breeze, just stick the iPod in a plastic sandwich bag so you don't get it wet.

If your in the US, look on Craigslist for gear. I got a very nice Bessler 4x5 enlarger in June that way. It's nice to finally be able to do my own prints after about 30 years.

Chris is right, don't let someone else do your B&W developing, they won't do as good of a job as you can! Both developing and printing are easy, and both can be done under fairly primitive conditions.
 
I process mine as then I know I can scan it or print in in the darkroom. It's TRI-X to whom I have been married for a longtime.
 
Nobody has mentioned stop bath yet. It's not essential but I find it makes my life a lot easier, because I can reuse my fixer. The idea is that you don't want to get developer into the fixer.

There are commercial products but all I've ever used is diluted white vinegar. Yes it smells but the smell of fixer will overpower it anyway.

Also, no need to get hung up on absolute accuracy (volumes, temperatures). It's much more important to be consistent. As long as you use the same containers, same thermometer, etc. roll after roll, it's OK to buy your graduates and such at the grocery store.

Find out what your local laws are regarding disposal of used chemicals.

Finally, if you decide on a liquid concentrate for your developer, you'll need to measure small volumes. An oral medication syringe (baby care section in your drugstore) works well.

I never use stop bath, and I have had no problems with contaminated fixer. I fill the tank with water, agitate, empty, add more water, and empty again.
 
Here is my kit. The tank and reel came from eBay for $20, the total investment, including chemicals, is under $50.

Darkroom001.jpg
 
I prefer Ilford chemicals, as they come in liquid form, and are easier to deal with since you don't have to mix up powdered chemicals, but this is a personal preference.

There is a great app for the iPhone or iPod Touch that will make timing your development a breeze, just stick the iPod in a plastic sandwich bag so you don't get it wet. [...]

I like Ilford too, but Kodak has liquid chemistry to choose from, as well. HC-110 for example. When it comes to wetting agents, I'd take Kodak's Photo-flo hands down over Ilford's Ilfotol.
I do not use stop bath either for film development, just two tank fills of water and 3-4 agitations each between developer and fixer.

Welcome to the club! 🙂
 
All the advice above is good, and this really is easy. Just assemble the gear, shoot a test roll, and develop it. Here are my additions:

I launched with Tri-X. Buy Arista Premium from Freestyle Sales in the US (this is rebranded Tri-X).

I want a developer I don't have to mix from dry powders. And, it has to have reasonable shelf life (before dilution; nothing has shelf life after dilution). In the US, Sprint Film Developer is "like D-76" and readily available. Ilford DDX or Kodak T-Max developer are other alternatives.

To get started, develop your film and send the whole uncut roll to Precision (sponsor here) or North Coast Photographic Services for excellent scans at very reasonable prices. With practice and attention I can make a slightly better scan, but these are very good. Lightyears ahead of the typical mini-lab.

The iPhone app is "Massive Dev Chart" and they are also on the web. Highly recommend this.
 
There's lots of good information on the Ilford website about home processing - http://www.ilfordphoto.com/applications/page.asp?n=9 obviously referencing their products but you can substitute other suppliers equivalents if thats what you have.

It doesn't really matter whether you use Kodak or Ilford or someone else's equivalent products, or whether you mix and match between them. It's more important to use what you can get hold of easily and at the right price.

Stick with a standard combination for the first few months then start experimenting with different films and developers once you've established a sound methodology.
 
Everyone, keep those tips/replies coming - tons of appreciation from me (and I'm sure from others too).

I think scanning it might be the most difficult part for me, I'm not too keen on post processing in general and I don't really want to do much editing with the photos. That being said, what type of scanner is affordable/small?
 
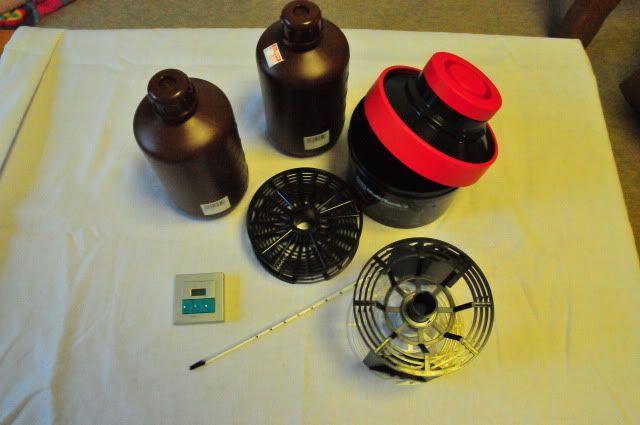
Here is the stuff you will need:

filmdevelopingkit.jpg


And here is what to do in 11 easy steps:

1) Put the reels, tank, film cassette(s), church key style bottle opener and some small scissors (if they have rounded tips, it's better) into the changing bag. Reach in through the sleeves. Use the pointy end of the bottle opener to pry the cap without the protruding spool end, off of the film cassette. Use the scissors to cut the leader off the strip of film.

2) Load the film onto the reel. (The process is different for loading stainless reels and for loading plastic reels.) Once you get the entire film strip onto the reel, cut off the spool.

3) Put the reel into the tank and close it. Take the tank, tools and detritus out of the changing bag.

4) Check the Massive Development Chart for time and temperature recommendations for your combination of film and developer. If it is inconvenient to use 68°F, you can convert the temperature using the time/temperature conversion chart.

5) Take the tank and chemicals to a bathroom sink. Develop for the recommended time. Agitate for the first minute then every 30 sec there after for 5 seconds (turn the tank over three times. Tap it on the sink or tray when done agitating to dislodge any bubbles.)

6) At the end of the developing time, pour the developer down the drain. Be sure to include the time for the tank to drain in the total time. Then fill the tank with water agitate for 15 sec. Pour it out and refill it with water, agitate, then pour it out.

7) Fill the tank with the working rapid fixer solution. Agitate for the first two minutes then every 30 sec thereafter for 4 to 5 minutes of time in the fixer, pour the fixer back into the fixer bottle. You can reuse fixer about six times. After the last use, pour it into a waste container (for later disposal.)

8) Fill and empty the tank several times with water and remove the top of the tank. Run water constantly into the tank so that it changes the water in the tank in about 30 seconds. Keep it in the wash water stream for 20 minutes. Pour the wash water out.
Note: to conserve water, you can use the Ilford method of film washing.​

9) Fill the tank with wetting agent solution and gently swirl the negatives for a minute. Pour the wetting agent down the drain and take the reels holding the negatives out of the tank.

10) Gently rap the reels against your hand to dislodge any clinging liquid, then de-spool and hang the film to dry in an enclosed shower or other dust free environment. The time it takes for the film to dry depends on the humidity - from an hour to overnight. The slower the film dries, the less curl it will have.

11) Wash the tank and reels, and dry with a lint free towel. Now cut up the film and put it into sleeves. Label the sleeves so you can remember what is on the negatives.

That's all!
 
Chris101 has nailed it, of course (he pulls this out every now and then).

Two small additions:

- If you use plastic reels, the film will go in much easier if you round over the corners after you cut the film leader off.

- Step #3 above: Remove and review the detritus. It's very easy for small pieces of film to end up in the tank and, the universe being the way it is, settle on your favorite frame. So take a sec to make sure all the cut-off pieces are accounted for. If they're not in the bag, they're in the tank. Back into the bag, open it and shake it out.
 
There are some great videos on youtube on home developing, well worth a look.

Practice loading film onto reels with some unexposed film go get a feel for it. Once with eyes open, once with eyes closed and finally in the changing bag.
 
Back
Top Bottom