How to improve rangefinder readability

lotech

Member
Local time
3:42 AM
Joined
Jul 27, 2024
Messages
25
Hi there,

I just received the lovely Aires 35 III C from an auction, it is near mint everything worked fine. It got a very bright viewfinder with automatic parallax correction, the only problem I have is the focusing patch is not clear enough. It lacks contrast, compare to my Soviet FED 2 it is day and night ! Although the FED 2 is few stops darker on the viewfinder, the focusing patch is super clear easy to use in any lighting condition, I don't know how they did that. I wonder if anyone actually own this camera can share the experience using it, and if any tricks to improve the focusing, thanks !
 
I guess this is going to be a three pronged answer.

First of all these compact RFs never had the same quality rangefinder system than even a "lowly" (it isn't!) FED2. These interchangeable lens rangefinders were aimed at (semi)professional use whereas the compact RFs were always strictly consumer affairs. Of course when they were new compact RFs still had usable if not amazing patches. So with that out of the way and expectations set accordingly, let's move on.

Basically the first thing I would do is shine a light in (phone LED flash works well) from the viewfinder port and look at the front of the camera. Don't just look straight on, tilt both the camera and the light and have a look around. Does anything look hazy? Does the mirror (behind the RF window) look corroded? If so a cleaning and maybe even a change of the front silvered mirror is in order. When cleaning be careful - the silvering can come off quite easily!

If that's too much you can also buy an old Kodak or Tiffen gel filter which was meant to go in front of lights or lenses. They are basically plastic colored sheets, but unlike the arts and crafts stuff the coloring is quite subtle. Ideally choose a color that is complementary to the RF patch - aka if it's gold go for blue or green. Then somehow attach (physically wedging it in works well if there's a seam) it to the front viewfinder portion of the rangefinder. This will darken the overall view a bit but will give you increased RF contrast.

images.jpg
 
Last edited:
If you have working FED-2 here is nothing much to improve by buying some exotics :)
This one has twice shorter RF base and unknown condition of half-mirror.
You could replace it, in theory.
On practice, use color negative with frame which was not exposed. Cut it to try to slide behind VF window cut of the top plate.
 
I have an Aires IIIL with similar dimness. I first removed the top cover, fairly easy on these,


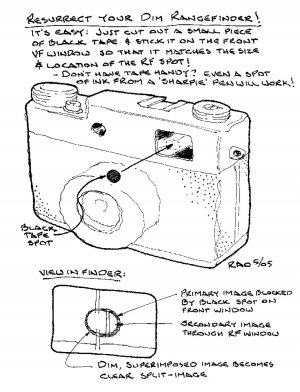
I cleaned all the surfaces, taking extra care with the half silvered mirror and the pivoting mirror. I found the old cement gluing the glass is is pretty brittle, so be careful. Also there is a small cardboard square patch glued on one of the glasses that is easily knocked off. I did, and had to put it back on. That all helped, but the patch contrast was still low. I thought about darkening the whole viewfinder window, as suggested above, but found a suggestion on the web that worked for me. I just put a small 1/8” black dot on the front window right where the patch shows. This way the rest of the window does not lose visibility, and the patch is bright. If I did it again I would use a 3/16” dot. I used a commercially available sticker, but you could make it easily enough out of tape of some sort. I had to try a couple of positions to get it right on the patch, but the dots are easily removable and I have 18 to play with. The picture below shows the dot apparently off center, but that is just the camera angle.


IMG_0731.jpeg
 
Last edited:
Aha, the true source speaks! Thanks Rick. I think I saw it when someone was wondering why a camera he bought had tape on the viewfinder, leading to a discussion about how it worked.
 
I guess this is going to be a three pronged answer.

First of all these compact RFs never had the same quality rangefinder system than even a "lowly" (it isn't!) FED2. These interchangeable lens rangefinders were aimed at (semi)professional use whereas the compact RFs were always strictly consumer affairs. Of course when they were new compact RFs still had usable if not amazing patches. So with that out of the way and expectations set accordingly, let's move on.

Basically the first thing I would do is shine a light in (phone LED flash works well) from the viewfinder port and look at the front of the camera. Don't just look straight on, tilt both the camera and the light and have a look around. Does anything look hazy? Does the mirror (behind the RF window) look corroded? If so a cleaning and maybe even a change of the front silvered mirror is in order. When cleaning be careful - the silvering can come off quite easily!

If that's too much you can also buy an old Kodak or Tiffen gel filter which was meant to go in front of lights or lenses. They are basically plastic colored sheets, but unlike the arts and crafts stuff the coloring is quite subtle. Ideally choose a color that is complementary to the RF patch - aka if it's gold go for blue or green. Then somehow attach (physically wedging it in works well if there's a seam) it to the front viewfinder portion of the rangefinder. This will darken the overall view a bit but will give you increased RF contrast.

View attachment 4859848
Thanks for the tIp. I read on other post that a green tinted sheet can help to improve contrast, and I believe that's why the Petri exists

 
I have an Aires IIIL with similar dimness. I first removed the top cover, fairly easy on these,


I cleaned all the surfaces, taking extra care with the half silvered mirror and the pivoting mirror. I found the old cement gluing the glass is is pretty brittle, so be careful. Also there is a small cardboard square patch glued on one of the glasses that is easily knocked off. I did, and had to put it back on. That all helped, but the patch contrast was still low. I thought about darkening the whole viewfinder window, as suggested above, but found a suggestion on the web that worked for me. I just put a small 1/8” black dot on the front window right where the patch shows. This way the rest of the window does not lose visibility, and the patch is bright. If I did it again I would use a 3/16” dot. I used a commercially available sticker, but you could make it easily enough out of tape of some sort. I had to try a couple of positions to get it right on the patch, but the dots are easily removable and I have 18 to play with. The picture below shows the dot apparently off center, but that is just the camera angle.


View attachment 4859861
Haha that's interesting, and I have a crazy and lazy idea, to make the dot with a marker ! I can use any color, and it is easy to remove, right I'll try that !
 
If you have working FED-2 here is nothing much to improve by buying some exotics :)
This one has twice shorter RF base and unknown condition of half-mirror.
You could replace it, in theory.
On practice, use color negative with frame which was not exposed. Cut it to try to slide behind VF window cut of the top plate.
The reason I do not use the FED 2 much was the curtain leak, my shots were fogged. What a pity its a very nice camera with a working shutter, all my other Soviet RF like the Zorki, Fed 5 and the Leningrad auto winder with jammed and sluggish sticky shutters, that's why I turned to leaf shutter.
 
A Sharpie works great, I like it s little better than the tape because it dims the center spot but you can still see through it. Rubbing alcohol easily removes sharpie ink.

If anyone is interested, my repair notes are now a free download
http://rick_oleson.tripod.com/index.html
 
Back
Top Bottom