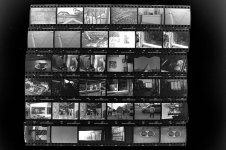
Digital Contact Sheets
Digital Contact Sheets
From Film to Digital Print Via Linux
Observations on Digital Printing of Black and White Film Photography
by Stephen Harris, 2009.
- Work Flow Goals
A. Reasonable camera costs
B. Reliable archive storage
C. Digital fine art printing
D. As little use of Windows, Apple, and Adobe software as possible.
The goal is to be able to process black and white film, and print digitally using open source (Linux) software and where possible avoid the expensive programs and upgrades when committed to Windows, MAC, and Adobe. A second goal is to avoid constantly upgrading cameras, and use less expensive cameras when traveling or shooting on the street.
- Film Negatives:
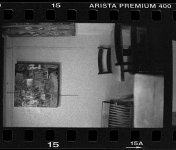
Create the negatives using FujiFilm Neopan 400, Professional film, or other film. The negatives are not cut. Rolls are stored, without sleeves in 8” x 10” boxes with dividers made out of matte board. The lid of the box can be ruled in a grid, and information written about the rolls.
Cameras used include:
a. Leica M3 w/ 28mm 2.8, 50mm 1.4, 35mm 1.4, or 90mm 2.8;
b. Praktica LB w/ pentax 50mm 1.5; Very inexpensive choice when in high risk areas.
c. Fuji gs645S, (Lightweight, medium format rangefinder street camera)
d. Rollei 35 S (Small light camera with a full 35mm negative)
e. Hasselblad film cameras C, CW, and/or EL/M
The film is developed locally when traveling or in D-76.
- From Negative to Digital
Any high quality, digital SLR can be used. In this case, the negatives are copied to digital using a digital camera and enlarging lenses. Leica R8, with a DMR back, or a Canon EOS 30D, and a Leica Focotar 60mm lens, or Rodenstock 75mm APO D lens.
The light source is either the Bowens Illumitan slide copier, or a flash 238 Vivitar
variable flash. Film is copied emulsion side up to the camera.
- Zork (www.zoerk.com) sells the components to adapt an enlarging lens to a 35 mm digital SLR camera. The Leica R8 with the DMR digital Leica back attached has less than full-frame sensor. Zork supplies an adapter for Leica R, their “Zork Mini Makro, and an adapter to thread the Rodenstock 75mm Apo-Rodagon D lens into the Mini Makro. The Mini Makro allow the enlarging lens to be focused so that it covers from 35m to medium format negatives.
The APO-Rodagon-D is not necessarily an enlarging lens, but optimized for near 1:1 reproduction ratios, for purposes such as duplication of transparencies, or preparation of internegatives. It is a 6-element, 4-group designs, and optimum f-stop is 2 stops below maximum aperture (f8). The APO-Rodagon-D 1x 75 mm f/4 (for 6×6 cm) and APO-Rodagon-D 2x 75 mm f/4.5 (for 6×7 cm, optimized for 1.2x-2.5x reproduction) . The APO-Rodagon-R is optimized for 1:1 reproduction ratio (APO-Rodagon-R 75 mm f/4 ).
Use an ND material (neutral density, gray filter) in sheet form, between the light source and the negative, to adjust the intensity of the flash. You cut any size ND filter, and it is very inexpensive to purchase a large sheet. You can just keep adding layers and opening up the lens, until you get the aperture you want. It probably works better than trying to mount an ND filter on an enlarging lens. One can also change the number of sheets to compensate for the density of the negatives, and maintain the aperture. The Bowens illumitran slide duplicator has a knob that adjusts the flash intensity, and a system to meter the exposure, which also helps speed up the process. Since the Illumitran was built for ASA 50 or slower duplicating film the light intensity needs to be reduced to obtain the optimum aperture. The manufacture or others may have already worked out the best aperture for the lens.
One of the major advantages of this system, compared to scanning, is that once the system is setup, it is possible to get digital (computer screen) proofs of over 10 to 12, or more, rolls of 35mm – 36 exposure film in a day.
- Digital Raw Processing Negative Images:
The negatives or slides are copied with the DSLR using Raw and the digital files processed with BibblePro.
In BibblePro, the images are converted from negative to positive by using the curve feature. They are then adjusted for exposure and contrast, sharpened and noise reduction applied.
- Post Processing:
GIMP is an open source software program, with functions similar to Photoshop, which allows photo manipulation. Photos can be cleaned of dust and scratches, toned for printing, curves applied, etc. Images can rotated, flipped (necessary when negatives are reproduced with emulsion side toward the camera.) It is provided free as part of the Mandriva operating system and most Linux operating systems. Upgrades are also free.
- Refining the Image Choices:
The proof sheets have 12 images to an 8x10 or 8.5x11 page. This corresponds to a full roll of 120 or 3 sheets for a 36 exposure 35mm roll.
a. Create digital Proof Sheets, using Photoshop, or GIMP if working on a MAC. (For Photoshop, I use File > Automate > Contact Sheet II, with a setting of 3x4, 7.65, 10.15)
b. When working in Linux, proof sheets can be made as a jpg file using ImageMagick. Copy flat tiff files to a folder. Then open a terminal window and cd (change directory command) to the file. The following code will produce proof sheets (multiple) 7.188"x10.3" at 240 dpi. <montage -geometry 575x575 -density 240x240 -tile 3x4 -label '%f' *.tif proofs.jpg>. Imagemagick will create a multiple proof sheets with 12 photos to a sheet, file names below, in jpg format which can be then opened in Gimp, and printed on 8.5” x 11” paper.
c. When printing the contact sheets 3 up on a 24” wide epson printer, 24w x 11h paper setting use a MAC and the ImageNest layout program. Or, print on 8-1/2 x 11 sheets on a Epson R2400.
d. The proof sheets are then punched and placed in a spiral bound notebook for each negative file box.
- Clean-up and Tinting using GIMP:
GIMP the “clone” tool in GIMP can remove dust and scratches. Other techniques used in Photoshop can also be used with GIMP. A set of on-line tutorials for GIMP is at http://www.gimpguru.org/Tutorials. There is an excellent one on sepia toning.
- Printing Final Images:
a. Using a Epson 7600, the prints are make with a MAC, running QuadTone Rip,
and the ImageNest layout program.
b. For printing in Linux, prints can be made from GIMP, through a TurboPrint control plugin,
to control final ink density, contrast and toning.
- Conclusion:
It is possible to use a workflow for black and white photography which does not depend on Windows, Apple, or Adobe software. This can lower the cost significantly for the casual, hobby or dedicated amateur photographer. It works well where no one but the photographer is paying the costs.
It also results in a negative file archive, allowing for the production of traditional silver gelatin prints in the future, or drum scans, if desired. However, the process does allow for the production of excellent 16' x 20' prints from Tri-X and other film negatives.
In addition to the software, one needs a computer, printer, at least one film camera, and digital SLR, with a bellows and enlarging lens. A Bowens Illumitran cost about $100-200 on e-bay. So why do this, and not just shoot on the digital camera? This system results in a film archive and avoids carrying an expensive DSLR on the street.
Prints can be digital or traditional silver gelatin. Also, it allows the full digital workflow using a Linux based system, for those wishing to skip the film step.
Reference Sources and Links:
Mandriva (Linux Operating System)
$89.00
www.mandriva.com
BibblePro (Raw Digital Processor)
$159.95
www.bibblelabs.com
GIMP (A Photoshop like program for Linux, Windows and MAC)
Free Open Source
www.gimp.org
http://www.gimp.org/tutorials/
TurboPrint for Linux (A printer management program for Linux, but theEpson 7600 is not supported)
60 Euros
www.zedonet.com
ImageMagick (A powerful image tool for Linux)
Free open source
www.imagemagick.org
The following software is not needed for the Linux workflow, however it is useful when printing with a Mac on the Epson 7600:
QuadTone Rip (A printer control program dedicated to black & white printing which runs in Windows and MAC, but no Linux version)
$50.00
Shareware price
www.quadtonerip.com
ImageNest (Layout Rip for MAC and Epson 7600 Printer and wide range of printers, no Linux version yet. The 7600 version costs almost $400)
$99.00
Epson R2400
www.bluecubit.com